Measuring Radioactive Radiation with ESP32 and a Geiger Counter
To wrap up the year, here is a not-quite-so-serious project. Recently, it was Black Friday on AliExpress, and a small board capable of measuring radioactive radiation caught my eye. The board, including the counter tube, cost only around 20 Euros, and I simply couldn't resist.
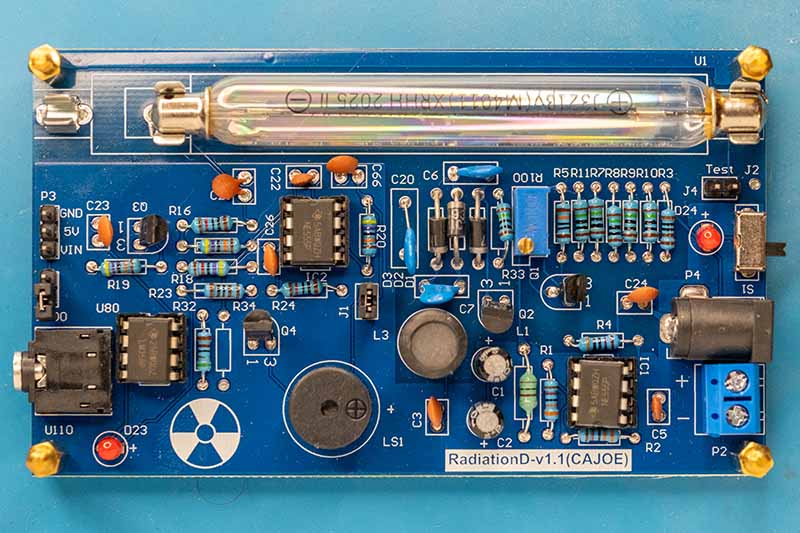
It is a RadiationD-v1.1 board featuring a Geiger-Müller tube that outputs acoustic and electrical pulses. I know relatively little about the background of this board, but there is a GitHub repository with a lot of useful information, including an Arduino example for displaying radiation values. However, since I develop almost exclusively using the ESP-IDF framework, I wrote a simple component for the ESP32 that can be easily integrated into your own projects.
What can you measure with the RadiationD-v1.1 board?
A Geiger-Müller tube measures neither the energy, the particle type, nor the direction of the radiation. Instead, it merely detects individual ionizing events. Every time a high-energy particle or photon penetrates the tube and ionizes the gas inside, a short electrical pulse is generated. The RadiationD-v1.1 board processes these events and outputs them in two forms: acoustically as "clicks" and electrically as digital pulses, which can be easily counted using a microcontroller like the ESP32.
The number of pulses per unit of time, also known as the count rate, is usually specified in Counts per Minute (CPM). The higher the count rate, the more ionizing radiation is hitting the tube at that moment. Even without further conversion, it is easy to recognize:
- whether the radiation is elevated compared to the natural background radiation
- whether the radiation changes over time
- whether a radiation source is closer or further away
For many experiments and comparisons, this relative measurement is already perfectly adequate. However, radiation is usually specified in microsieverts per hour (µSv/h). This quantity describes the dose rate, i.e., how strongly ionizing radiation affects the human body.
A Geiger-Müller tube cannot measure this quantity directly. Instead, it is estimated from the count rate:
Dose rate = CPM × Conversion Factor
This conversion factor depends on, among other things:
- the counter tube used
- the type of radiation (Gamma, Beta)
- the energy of the radiation
This factor is therefore only a rough approximation. While the displayed µSv/h values are good for orientation, they should not be understood as a precise dose measurement.
The Geiger-Müller tube installed in the RadiationD-v1.1 board detects mainly Gamma radiation and high-energy Beta radiation. Alpha radiation, on the other hand, is barely detected as it is already shielded by the housing, the air, or the tube wall. The conversion factor from CPM to µSv/h for the J321 tube used (a replica of the M4011 tube) is 0.0066 µSv/h per CPM, i.e., 151 CPM corresponds to approximately 1 µSv/h. However, Matt's Blog specifies a value of 153.8 here.
This makes the board well-suited for measuring:
- natural background radiation
- slightly elevated ambient radiation
- radioactive materials with Gamma or Beta emission
Conversely, the following cannot be measured:
- type of radiation in detail
- energy of the particles
- exact biological dose
The RadiationD-v1.1 board is therefore excellent for experiments, long-term measurements, and educational projects where the focus is less on absolute accuracy and more on understanding radiation and measurement principles.
Evaluating Radiation with the ESP32
To analyze the measurement pulses, the RadiationD-v1.1 board is connected to an ESP32. Electrically, the connection is pleasantly simple: in addition to the power supply, only a digital input is required to capture the pulses from the Geiger-Müller tube.
The RadiationD-v1.1 is powered via the 5V and GND pins of the ESP32. The pin labeled "Vin" is somewhat misleading. Contrary to the label, it is not an input, but the pulse output of the Geiger counter. The count pulses generated by the board are present at this pin. In my setup, this output is connected to GPIO 4 of the ESP32.
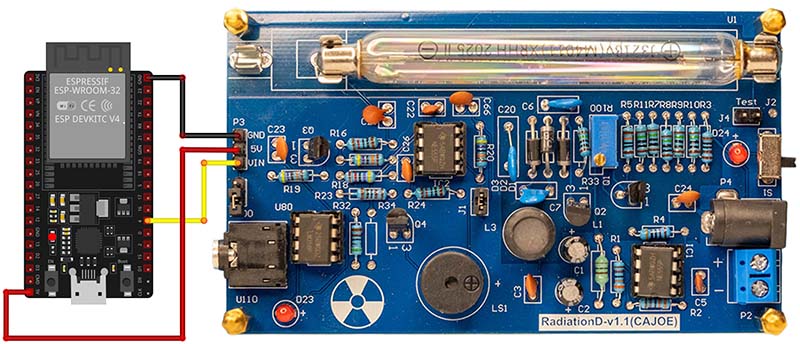
In the idle state, the output of the RadiationD-v1.1 board is High. If an ionizing event is detected in the tube, the board generates a short Low pulse. Each of these pulses corresponds to exactly one registered radiation event. For this reason, the GPIO of the ESP32 is configured for a falling edge. This ensures every pulse is reliably detected, regardless of how short it is.
The initialization of the input is handled using the ESP32's GPIO interrupt functionality. The pin is configured as an input; internal pull-ups or pull-downs are not required since the board actively drives the level.
    // GPIO Setup
    gpio_config_t io_conf = {};
    io_conf.intr_type = GPIO_INTR_NEGEDGE;
    io_conf.pin_bit_mask = (1ULL << config->gpio_pin);
    io_conf.mode = GPIO_MODE_INPUT;
    // No pullup here!
    ESP_ERROR_CHECK(gpio_config(&io_conf));
It is important to select the interrupt type GPIO_INTR_NEGEDGE to react to the falling edge.
Every detected pulse triggers an interrupt, which is processed in a short Interrupt Service Routine (ISR). Since ISR functions should be executed as quickly as possible, the routine is limited to atomically incrementing a counter.
// ISR Handler
static void IRAM_ATTR geiger_isr_handler(void* arg) {

    atomic_fetch_add(&pulse_count, 1);
}
The actual evaluation of the measurement data takes place outside the interrupt context in a separate FreeRTOS task. This task runs with a fixed period of one second and performs three steps:
- Atomic access to pulses: Once per second, the current counter value is read atomically and reset simultaneously.
- Rolling Average: The events recorded per second are stored in a ring buffer. A moving average is calculated over the configurable length of this buffer. A large buffer reduces statistical fluctuations but reacts sluggishly to changes. A small buffer reacts faster but shows stronger fluctuations.
- Calculation of values: The current CPM figure is calculated from the summed count rate, and subsequently, an estimated dose rate in µSv/h is determined using a conversion factor.
// Background task
static void geiger_task(void *pvParameters) {
    int buffer_index = 0;
    uint32_t total_counts_in_period = 0;

    // Initialize buffer (allocate memory)
    rolling_buffer = calloc(active_config.rolling_avg_seconds, sizeof(uint32_t));
    if (rolling_buffer == NULL) {
        ESP_LOGE(TAG, "No memory for rolling buffer!");
        vTaskDelete(NULL);
    }

    while (1) {
        // Wait 1 second
        vTaskDelay(pdMS_TO_TICKS(1000));

        // 1. Atomically retrieve and reset the counter
        uint32_t counts_this_second = atomic_exchange(&pulse_count, 0);

        // 2. Rolling Average Logic
        total_counts_in_period -= rolling_buffer[buffer_index];
        total_counts_in_period += counts_this_second;
        rolling_buffer[buffer_index] = counts_this_second;

        buffer_index = (buffer_index + 1) % active_config.rolling_avg_seconds;

        // 3. Calculation
        float cpm = (float)total_counts_in_period * (60.0f / (float)active_config.rolling_avg_seconds);

        // Write values to global (static) variables
        current_cpm = cpm;
        current_usvh = cpm / active_config.conversion_factor;

    }
}
Integrating the Geiger component into your own ESP-IDF project is kept very simple. A configuration structure is used to define:
- the GPIO pin used
- the conversion factor from CPM to µSv/h
- the size of the rolling average window
#include <stdio.h>
#include "freertos/FreeRTOS.h"
#include "freertos/task.h"
#include "esp_log.h"
#include "driver/gpio.h"

#include "geiger.h"

static const char *TAG = "APP";

void app_main(void) {
    // 1. Create configuration
    geiger_config_t config = {
        .gpio_pin = GPIO_NUM_4,
        .conversion_factor = 153.8f, // https://muman.ch/muman/muman-geiger-counter.htm  or 151.0 ?
        .rolling_avg_seconds = 600
    };

    // 2. Initialize component
    geiger_init(&config);

    // 3. Main loop: Do whatever you want here
    // (Display data, send via MQTT, write to screen)
    while (1) {
        // We just read the calculated values
        float usvh = geiger_get_usvh();
        float cpm = geiger_get_cpm();

        ESP_LOGI(TAG, "Measurement: %.2f CPM | %.4f µSv/h", cpm, usvh);

        // Insert code here, e.g.: send_to_mqtt(usvh);

        vTaskDelay(pdMS_TO_TICKS(5000)); // Logging every 5 seconds is sufficient
    }
}
While I am writing this text, the ESP32 is providing the following output:
I (1180280) APP: Measurement: 23.10 CPM | 0.1502 µSv/h
I (1185280) APP: Measurement: 23.20 CPM | 0.1508 µSv/h
I (1190280) APP: Measurement: 23.30 CPM | 0.1515 µSv/h
I (1195280) APP: Measurement: 23.20 CPM | 0.1508 µSv/h
I (1200280) APP: Measurement: 23.40 CPM | 0.1521 µSv/h
I (1205280) APP: Measurement: 23.30 CPM | 0.1515 µSv/h
I (1210280) APP: Measurement: 23.60 CPM | 0.1534 µSv/h
I (1215280) APP: Measurement: 23.10 CPM | 0.1502 µSv/h
I (1220280) APP: Measurement: 22.90 CPM | 0.1489 µSv/h
I (1225280) APP: Measurement: 22.60 CPM | 0.1469 µSv/h
I (1230280) APP: Measurement: 22.50 CPM | 0.1463 µSv/h
I (1235280) APP: Measurement: 22.70 CPM | 0.1476 µSv/h
I (1240280) APP: Measurement: 22.40 CPM | 0.1456 µSv/h
I (1245280) APP: Measurement: 22.10 CPM | 0.1437 µSv/h
I (1250280) APP: Measurement: 22.00 CPM | 0.1430 µSv/h
I (1255280) APP: Measurement: 22.20 CPM | 0.1443 µSv/h
I (1260280) APP: Measurement: 22.30 CPM | 0.1450 µSv/h
Fortunately, these values lie within the range of typical natural background radiation. The slight fluctuations are not measurement errors, but a direct consequence of the statistical nature of radioactive decay. Even with constant radiation, events occur randomly, which is particularly noticeable at low count rates.
Conclusion
Despite the very low price, the RadiationD-v1.1 board delivers stable and comprehensible measurement values in the range of natural background radiation. However, it is important to know the limitations of this solution: The board measures events exclusively, not the energy or type of radiation, and the conversion to µSv/h represents merely an approximation. Such a system is therefore not suitable for safety-critical or calibrated dose measurements.
Unfortunately, I currently do not have any material with which I can measure elevated radiation. While there is some information on the internet, I have neither uranium glass nor a smoke detector. Perhaps someone has a tip for me?
Since the hardware requirements are minimal, I'm even considering integrating the Geiger counter into my weather station. Given the unpredictable egomaniacs currently driving world politics, that idea is unfortunately not so far-fetched. As always, the source code for the Geiger counter component is available on GitHub.