Lyrion Music Server on the Raspberry Pi 5 in a retro case
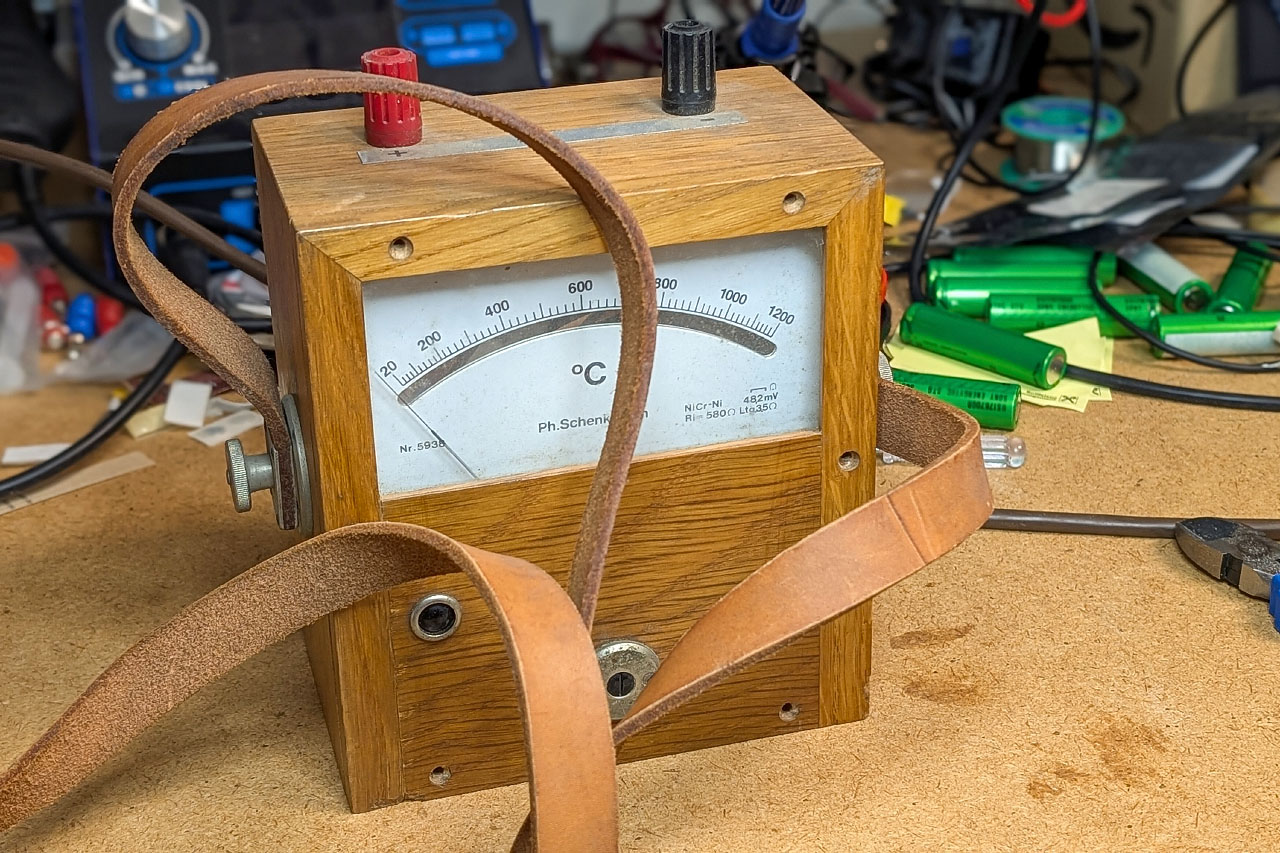
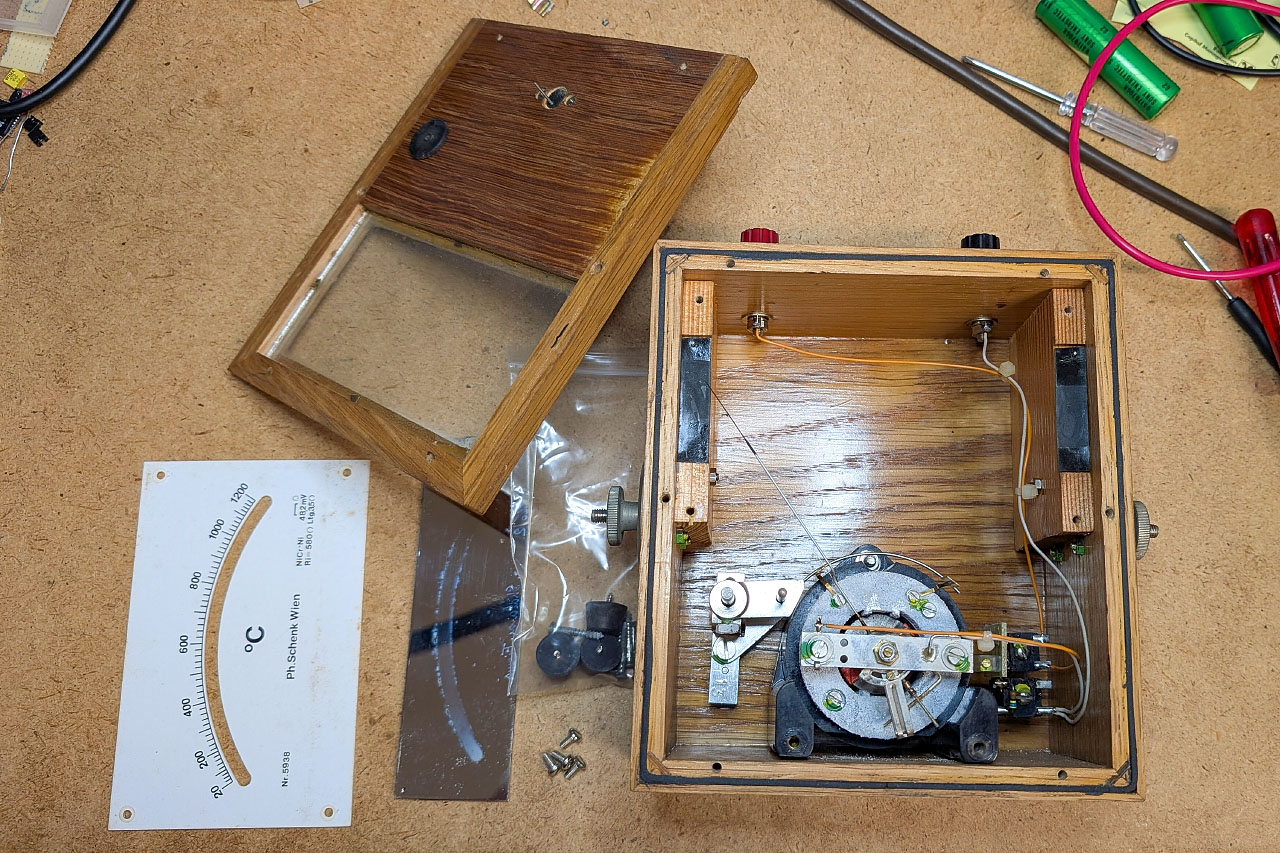
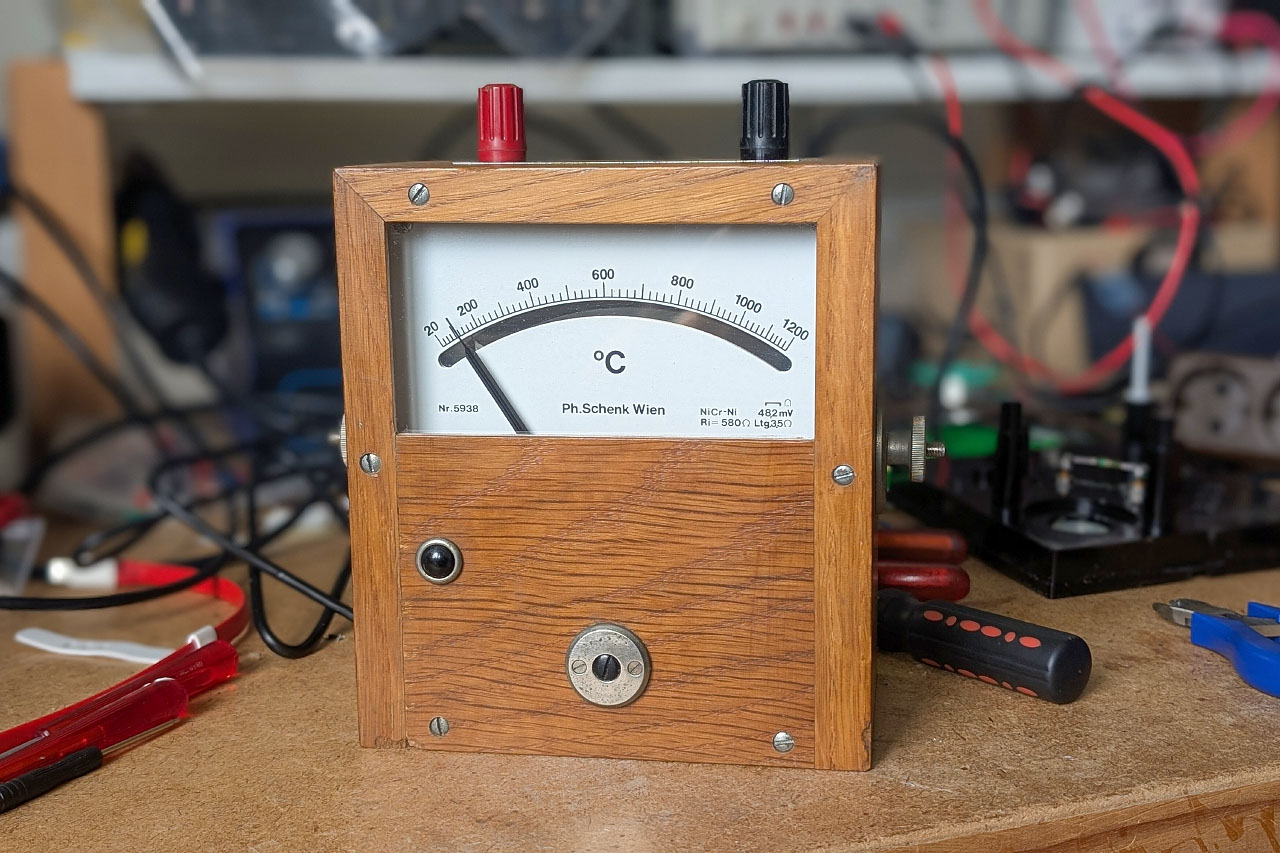
Recently I discovered an old measuring device at a flea market - an analogue temperature indicator from Ph. Schenk Vienna, probably from the 1950s or 60s. It was encased in a solid wooden case with a carrying strap and a classic moving-coil meter.
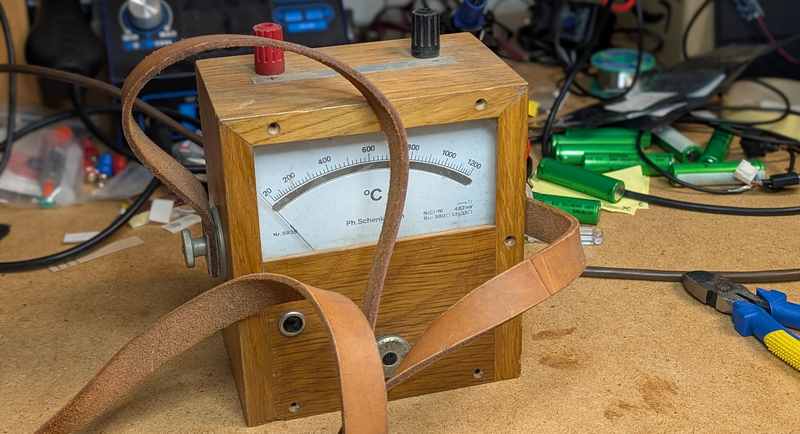
As soon as I saw it, I had the idea that the case could be a good new home for my Lyrion Music Server (formerly Logitech Media Server). And the pointer could display the CPU load or a similar value
Setting up the Raspberry 5 with NVMe M.2 SSD
My current Squeezebox Server is an old Raspberry Pi 3B with an SSD connected via USB. Unfortunately, the wooden case is too small for this SSD, so I decided to replace the entire hardware. I opted for the Raspberry Pi 5 in the 8GB version, which is more than sufficient for a Squeezebox Server. The new Raspberry Pi 5 has the significant advantage that it offers a PCIe 2.0 interface to which an NVMe M.2 SSD can be connected via a small additional board. Apart from the significantly higher speed, this is above all very space-saving. Another advantage is the fan control. In contrast to the Raspberry Pi 4, the Raspberry Pi 5 offers full PWM control for the fan.
I have used these components in detail (Amazon affiliate links):
- Raspberry Pi 5 8GB
- SD-Card with 32 GB
- Raspberry Pi 5 USB-C power supply 45W
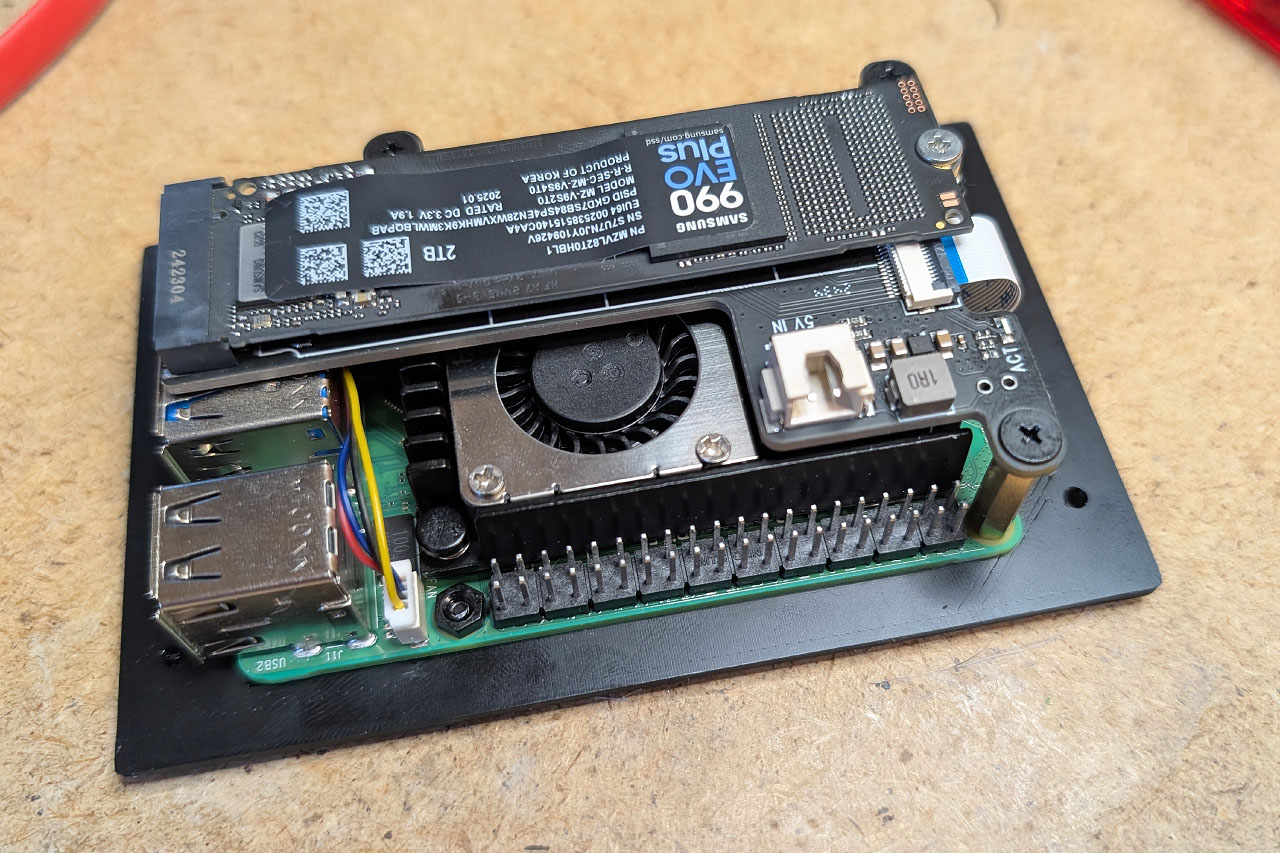
- Geekworm X1001 PCIe to M.2 NVMe Key-M SSD Shield
- Geekworm H505 Active Cooler Fan
- Samsung 990 EVO Plus NVMe M.2 SSD 2 TB
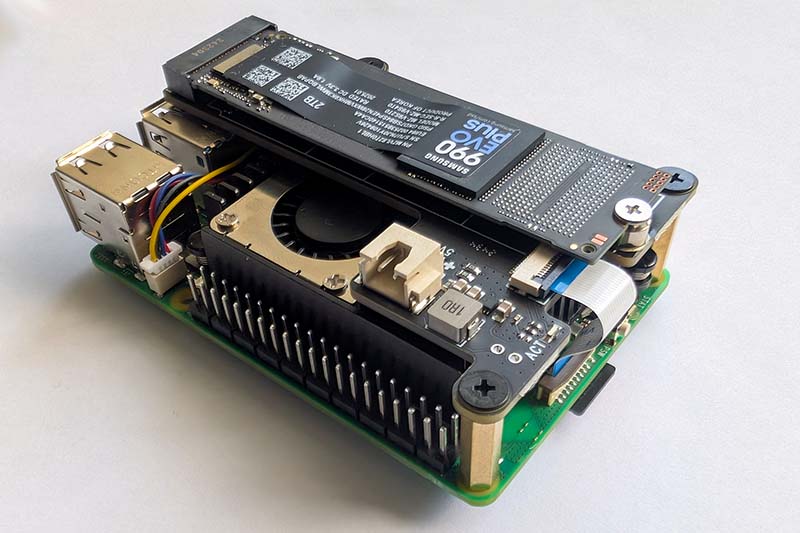
When assembled, the little power pack looks like this:
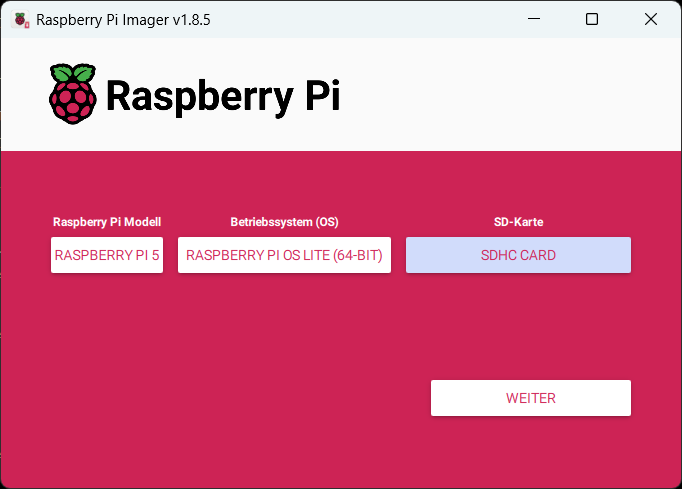
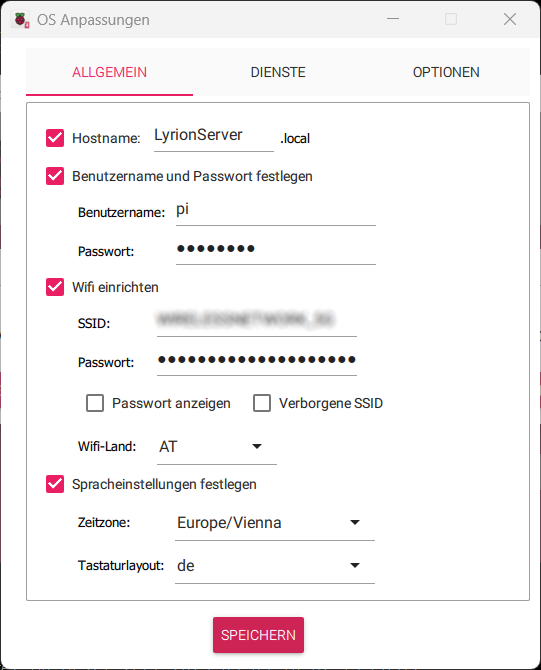
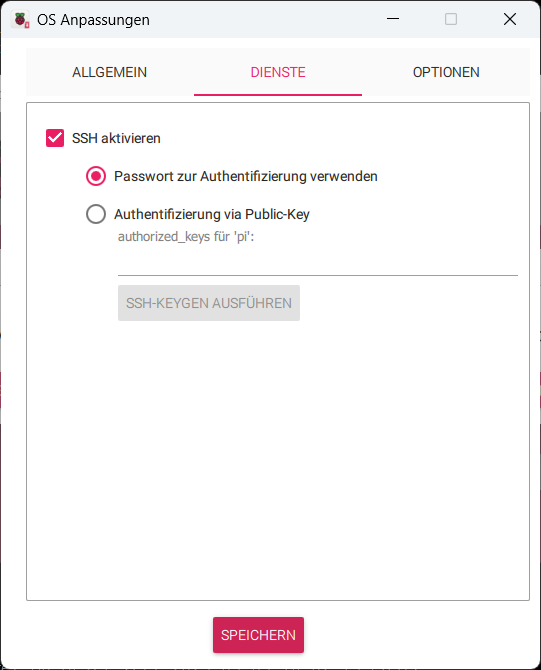
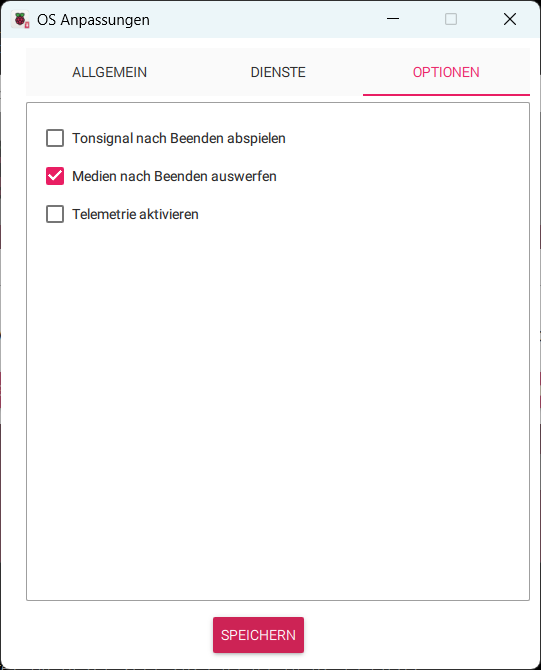
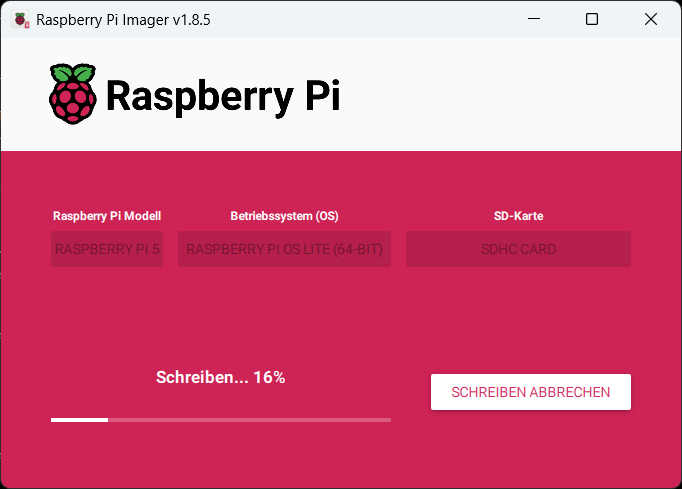
After assembly, the Raspberry Pi OS is installed. To do this, the Raspberry Pi Imager is first used to create an SD card with the operating system, which includes all the important basic settings such as Wi-Fi access, user account, host name and language settings. I use the Raspberry OS Lite (64-bit) as the operating system for the Lyrion Media Server.

Then insert the SD card into the slot of the Raspberry and connect the power supply unit. You can check on the router whether the Raspberry was able to connect to the Wi-Fi.. If everything has worked, you can log in to the Raspberry via SSH with the configured user (the easiest way is with PuTTY). The IP address of the Raspberry Pi can be viewed in the router, alternatively you can use the host name configured in the setup.
After logging in, the operating system is updated first:
pi@LyrionServer:~ $ sudo apt update && sudo apt full-upgrade -y
pi@LyrionServer:~ $ sudo reboot now
In the next step, the bootloader of the Raspberry is updated:
sudo raspi-config
The menu item is 6 Advanced Options -> A5 Bootloader Version -> E1 Latest
The output should look like this:
*** CREATED UPDATE /usr/lib/firmware/raspberrypi/bootloader-2712//latest/pieeprom-2025-05-08.bin  ***

   CURRENT: Mon 23 Sep 13:02:56 UTC 2024 (1727096576)
    UPDATE: Thu  8 May 14:13:17 UTC 2025 (1746713597)
    BOOTFS: /boot/firmware
'/tmp/tmp.8vZyAiT5rb' -> '/boot/firmware/pieeprom.upd'

UPDATING bootloader. This could take up to a minute. Please wait

*** Do not disconnect the power until the update is complete ***

If a problem occurs then the Raspberry Pi Imager may be used to create
a bootloader rescue SD card image which restores the default bootloader image.

flashrom -p linux_spi:dev=/dev/spidev10.0,spispeed=16000 -w /boot/firmware/pieeprom.upd
Verifying update
VERIFY: SUCCESS
UPDATE SUCCESSFUL

Broadcast message from root@LyrionServer on pts/1 (Fri 2025-05-09 18:49:09 CEST):

The system will reboot now!
The version of the bootloader can be checked with this command. Current and Latest must be identical:
pi@LyrionServer:~ $ sudo rpi-eeprom-update
BOOTLOADER: up to date
   CURRENT: Thu  8 May 14:13:17 UTC 2025 (1746713597)
    LATEST: Thu  8 May 14:13:17 UTC 2025 (1746713597)
   RELEASE: latest (/usr/lib/firmware/raspberrypi/bootloader-2712/latest)
            Use raspi-config to change the release.
These commands are then used to check whether the Raspberry has recognised the controller of the NVMe SSD:
pi@LyrionServer:~ $ sudo lspci
0001:00:00.0 PCI bridge: Broadcom Inc. and subsidiaries BCM2712 PCIe Bridge (rev 30)
0001:01:00.0 Non-Volatile memory controller: Samsung Electronics Co Ltd NVMe SSD Controller PM9C1a (DRAM-less)
0002:00:00.0 PCI bridge: Broadcom Inc. and subsidiaries BCM2712 PCIe Bridge (rev 30)
0002:01:00.0 Ethernet controller: Raspberry Pi Ltd RP1 PCIe 2.0 South Bridge
and
pi@LyrionServer:~ $ lsblk
NAME        MAJ:MIN RM  SIZE RO TYPE MOUNTPOINTS
mmcblk0     179:0    0 14.6G  0 disk
├─mmcblk0p1 179:1    0  512M  0 part /boot/firmware
└─mmcblk0p2 179:2    0 14.1G  0 part /
nvme0n1     259:0    0  1.8T  0 disk
The two lines marked in bold show that both the controller and the SSD have been recognised correctly. Unfortunately, I cannot say how the Raspberry behaves with NVMe SSDs from other manufacturers. In any case, no configuration was necessary with the Samsung 990 EVO.
At this point, the operating system is still on the SD card. So that the Raspberry can also work without an SD card, the operating system must now be copied from the SD card to the SSD. To do this, the rpi-clone tool is installed with this command:
curl https://raw.githubusercontent.com/geerlingguy/rpi-clone/master/install | sudo bash
The operating system can now be copied to the SSD:
pi@LyrionServer:~ $ sudo rpi-clone nvme0n1
Error: /dev/nvme0n1: unrecognised disk label

Booted disk: mmcblk0 15.6GB                Destination disk: nvme0n1 2.0TB
---------------------------------------------------------------------------
Part               Size    FS     Label           Part   Size  FS  Label
1 /boot/firmware   512.0M  fat32  bootfs
2 root              14.1G  ext4   rootfs
---------------------------------------------------------------------------
== Initialize: IMAGE partition table - partition number mismatch: 2 -> 0 ==
1 /boot/firmware      (65.0M used)   : MKFS  SYNC to nvme0n1p1
2 root                (2.1G used)    : RESIZE  MKFS  SYNC to nvme0n1p2
---------------------------------------------------------------------------
Run setup script       : no.
Verbose mode           : no.
-----------------------:
** WARNING **          : All destination disk nvme0n1 data will be overwritten!
-----------------------:

Initialize and clone to the destination disk nvme0n1?  (yes/no): yes
Optional destination ext type file system label (16 chars max):

Initializing
  Imaging past partition 1 start.
  => dd if=/dev/mmcblk0 of=/dev/nvme0n1 bs=1M count=12 ...
  Resizing destination disk last partition ...
    Resize success.
  Changing destination Disk ID ...
  => mkfs -t vfat -F 32 -n bootfs /dev/nvme0n1p1 ...
  => mkfs -t ext4 -L rootfs /dev/nvme0n1p2 ...

Syncing file systems (can take a long time)
Syncing mounted partitions:
     e2label /dev/nvme0n1p2 rootfs
  Mounting /dev/nvme0n1p2 on /mnt/clone
  => rsync // /mnt/clone with-root-excludes ...
     fatlabel /dev/nvme0n1p1 bootfs
fatlabel: warning - lowercase labels might not work properly on some systems
  Mounting /dev/nvme0n1p1 on /mnt/clone/boot/firmware
  => rsync /boot/firmware/ /mnt/clone/boot/firmware  ...

Editing /mnt/clone/boot/firmware/cmdline.txt PARTUUID to use c33f61cd
Editing /mnt/clone/etc/fstab PARTUUID to use c33f61cd
===============================
Done with clone to /dev/nvme0n1
   Start - 19:01:23    End - 19:02:59    Elapsed Time - 1:36

Cloned partitions are mounted on /mnt/clone for inspection or customizing.

Hit Enter when ready to unmount the /dev/nvme0n1 partitions ...
  unmounting /mnt/clone/boot/firmware
  unmounting /mnt/clone
===============================
Finally, the boot order must be changed:
pi@LyrionServer:~ $ sudo raspi-config
The menu item is 6 – Advanced Options -> A4 – Boot Order -> B2 – NVMe/USB Boot -> OK – Finish – NO (kein reboot)
The Raspberry can then be shut down:
sudo shutdown now
Now remove the SD card and turn the Raspberry back on with the power button. After the Raspberry has booted, this command provides an overview of the file system:
pi@LyrionServer:~ $ df -h
Filesystem      Size  Used Avail Use% Mounted on
udev            3.9G     0  3.9G   0% /dev
tmpfs           807M   14M  794M   2% /run
/dev/nvme0n1p2  1.8T  2.2G  1.7T   1% /
tmpfs           4.0G     0  4.0G   0% /dev/shm
tmpfs           5.0M   48K  5.0M   1% /run/lock
/dev/nvme0n1p1  511M   66M  446M  13% /boot/firmware
tmpfs           807M     0  807M   0% /run/user/1000
This gives you a system that now runs completely on the fast NVMe SSD, making the SD card obsolete for operation.
With an NVMe M.2 USB adapter, you could also avoid copying the SD card and write directly to the SSD with the Raspberry Pi Imager. However, as I would only need such an adapter once, I chose the somewhat more complicated option.
Install Samba
To be able to copy the music files from the PC to the Lyrion Media Server, it is helpful to set up a shared folder. To do this, the Samba package must first be installed.
pi@LyrionServer:~ $ sudo apt-get install samba
The shared folder is then configured in the /etc/samba/smb.conf file:
pi@LyrionServer:~ $ sudo nano /etc/samba/smb.conf
The following configuration is added at the end of the file:
[Lyrion]
 comment=Raspberry Pi Share
 path=/media/lyrion
 browseable=Yes
 writeable=Yes
 only guest=no
 create mask=0644
 directory mask=0755
 public=no
I use the directory /media/lyrion for the Lyrion Media Server in my installation. To allow the user pi to write to this directory, the authorisations must be changed accordingly:
pi@LyrionServer:~ $ sudo mkdir /media/lyrion
pi@LyrionServer:~ $ sudo chown pi:pi /media/lyrion/
Now a Samba user must be created. I use the user pi again with the same password as above.
pi@LyrionServer:~ $ sudo smbpasswd -a pi
After restarting the Samba service with
pi@LyrionServer:~ $ sudo service smbd restart
the network drive can be mounted on the PC. When logging in, enter the user pi with the corresponding password that has just been created. The music collection can now be copied to the hard drive of the Lyrion Media Server.
Installing the Lyrion Media Server on the Raspberry Pi 5
Now follows the installation of the actual server. In the meantime, the name has changed once again. After Logitech Media Server, SlimServer, SqueezeCenter, Squeezebox Server, it is now called Lyrion Media Server. Unfortunately, Logitech completely discontinued support for the Squeezebox system in March 2024, so the Squeezebox community will now probably shrink even further. One positive side effect, however, is that used devices are now available very cheaply.
The version for Arm architecture must be downloaded for the Raspberry Pi. The current version is 9.0.2. The package is downloaded with
wget https://downloads.lms-community.org/LyrionMusicServer_v9.0.2/lyrionmusicserver_9.0.2_arm.deb
Then the installation is started:
pi@LyrionServer:~ $ sudo dpkg -i lyrionmusicserver_9.0.2_arm.deb
Selecting previously unselected package lyrionmusicserver.
(Reading database ... 58884 files and directories currently installed.)
Preparing to unpack lyrionmusicserver_9.0.2_arm.deb ...
Unpacking lyrionmusicserver (9.0.2) ...
dpkg: dependency problems prevent configuration of lyrionmusicserver:
 lyrionmusicserver depends on libio-socket-ssl-perl; however:
  Package libio-socket-ssl-perl is not installed.
 lyrionmusicserver depends on libcrypt-openssl-rsa-perl; however:
  Package libcrypt-openssl-rsa-perl is not installed.
dpkg: error processing package lyrionmusicserver (--install):
 dependency problems - leaving unconfigured
Errors were encountered while processing:
 lyrionmusicserver
The output shows that some packages are missing. This can be fixed with this command:
pi@LyrionServer:~ $ sudo apt --fix-broken install
The installation should now be completed and the Lyrion Media Server service started. The log file must look something like this:
pi@LyrionServer:~ $ tail /var/log/squeezeboxserver/server.log
[25-05-09 19:56:53.9765] main::init (387) Starting Lyrion Music Server (v9.0.2, 1741501853, Thu Mar 13 14:57:35 UTC 2025) perl 5.036000 - aarch64-linux-gnu-thread-multi
[25-05-09 19:56:54.4422] main::init (661) Server done init: http://192.168.0.67:9000
[25-05-09 19:56:55.5454] Slim::Web::Cometd::handler (437) errorNeedsClient: 192.168.0.43, 00:04:20:2b:05:91, status, -, 10, menu:menu, useContextMenu:1, subscribe:600
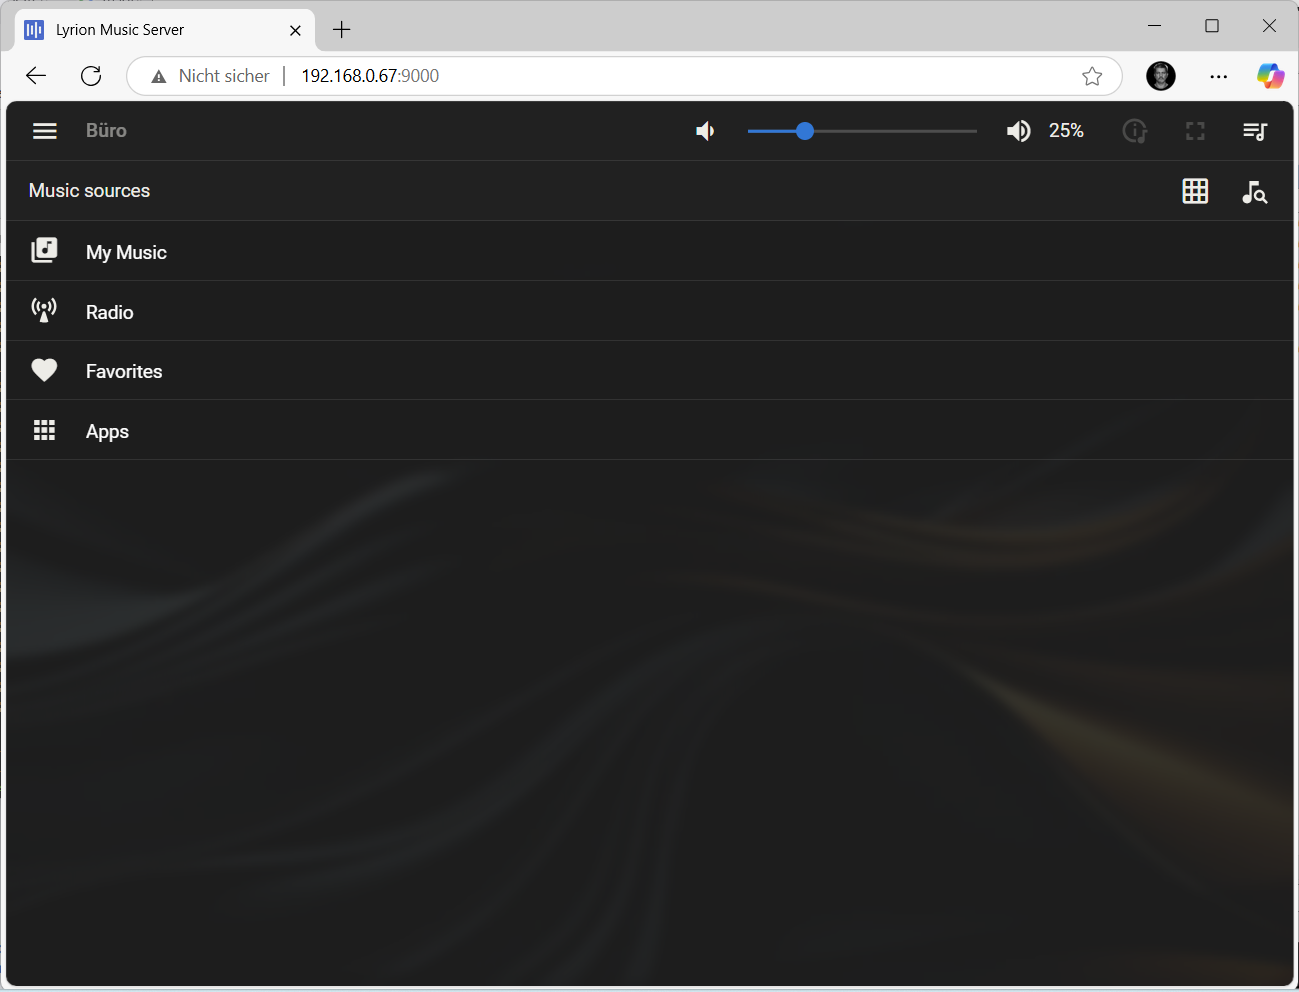
The installation is now complete and you have a new, extremely fast Lyrion Music Server. The web interface is accessed either via the IP address of the server or with the configured host name. In my case, these are the two addresses:
http://192.168.0.67:9000 or http://LyrionServer:9000
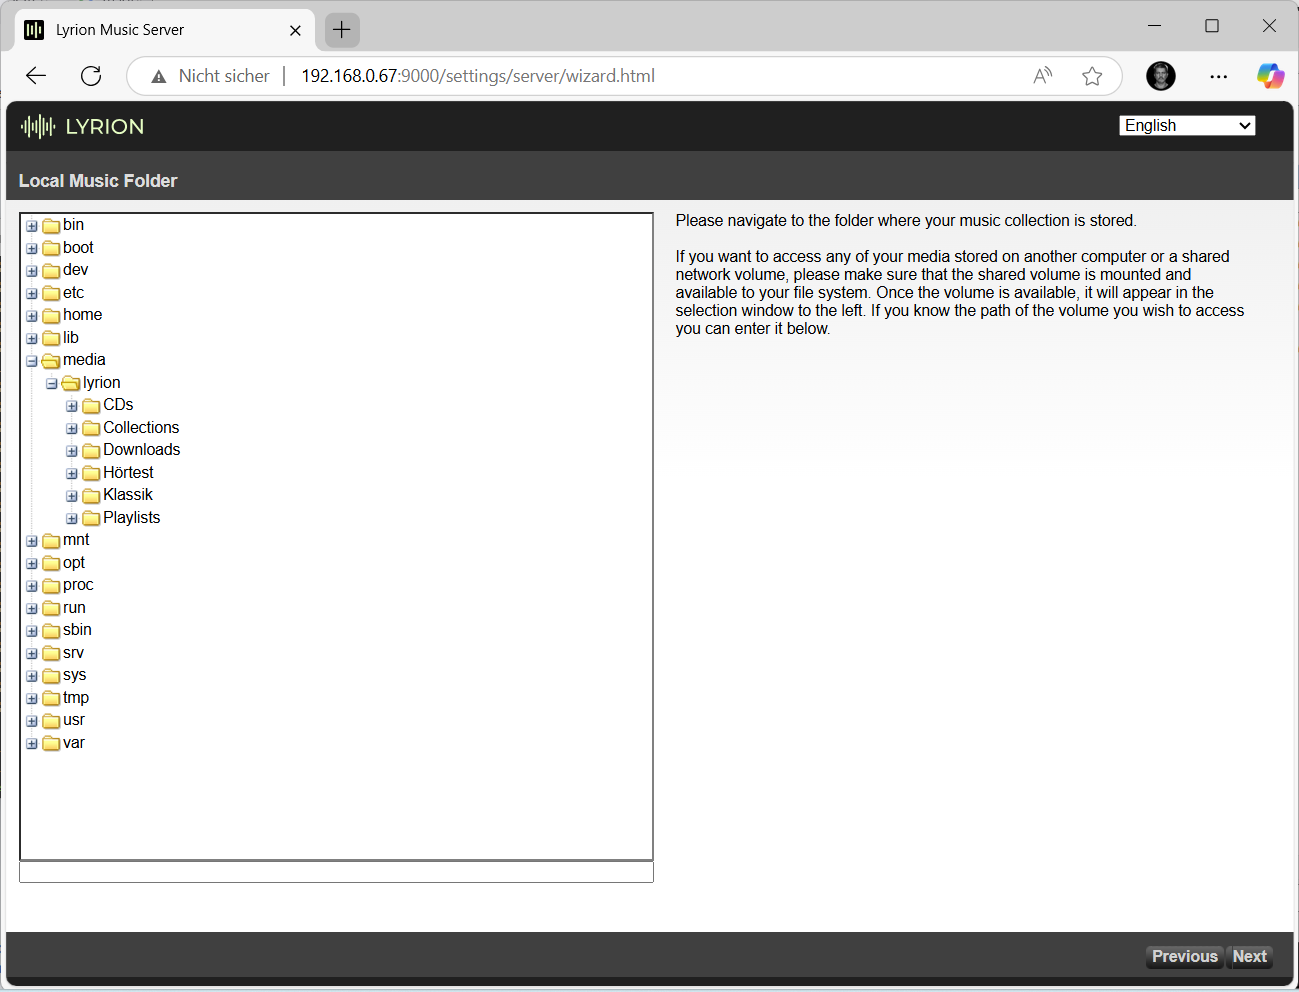
The first server setup is done in the web interface:
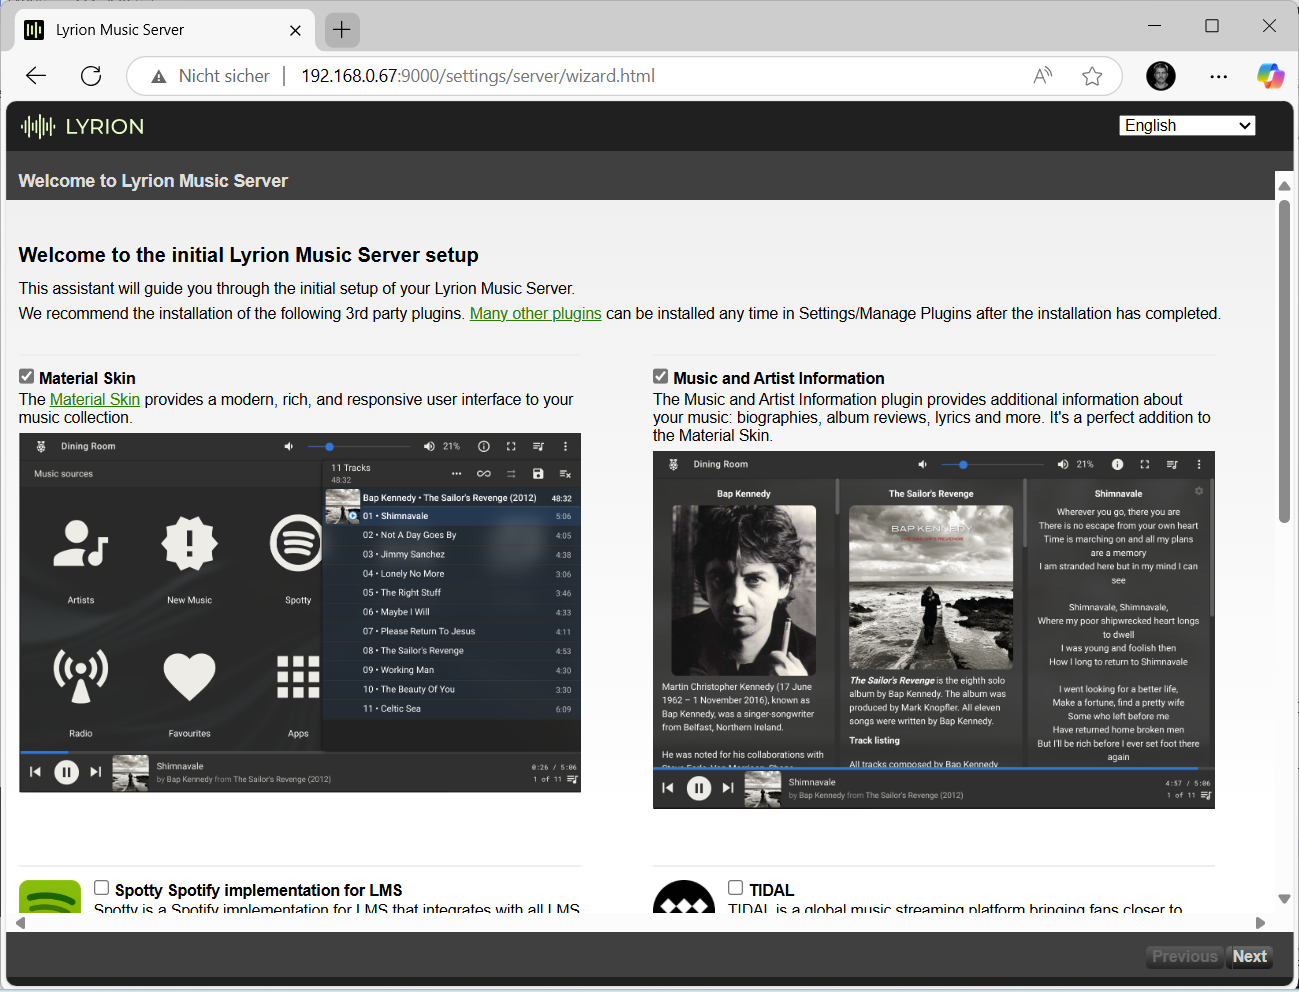

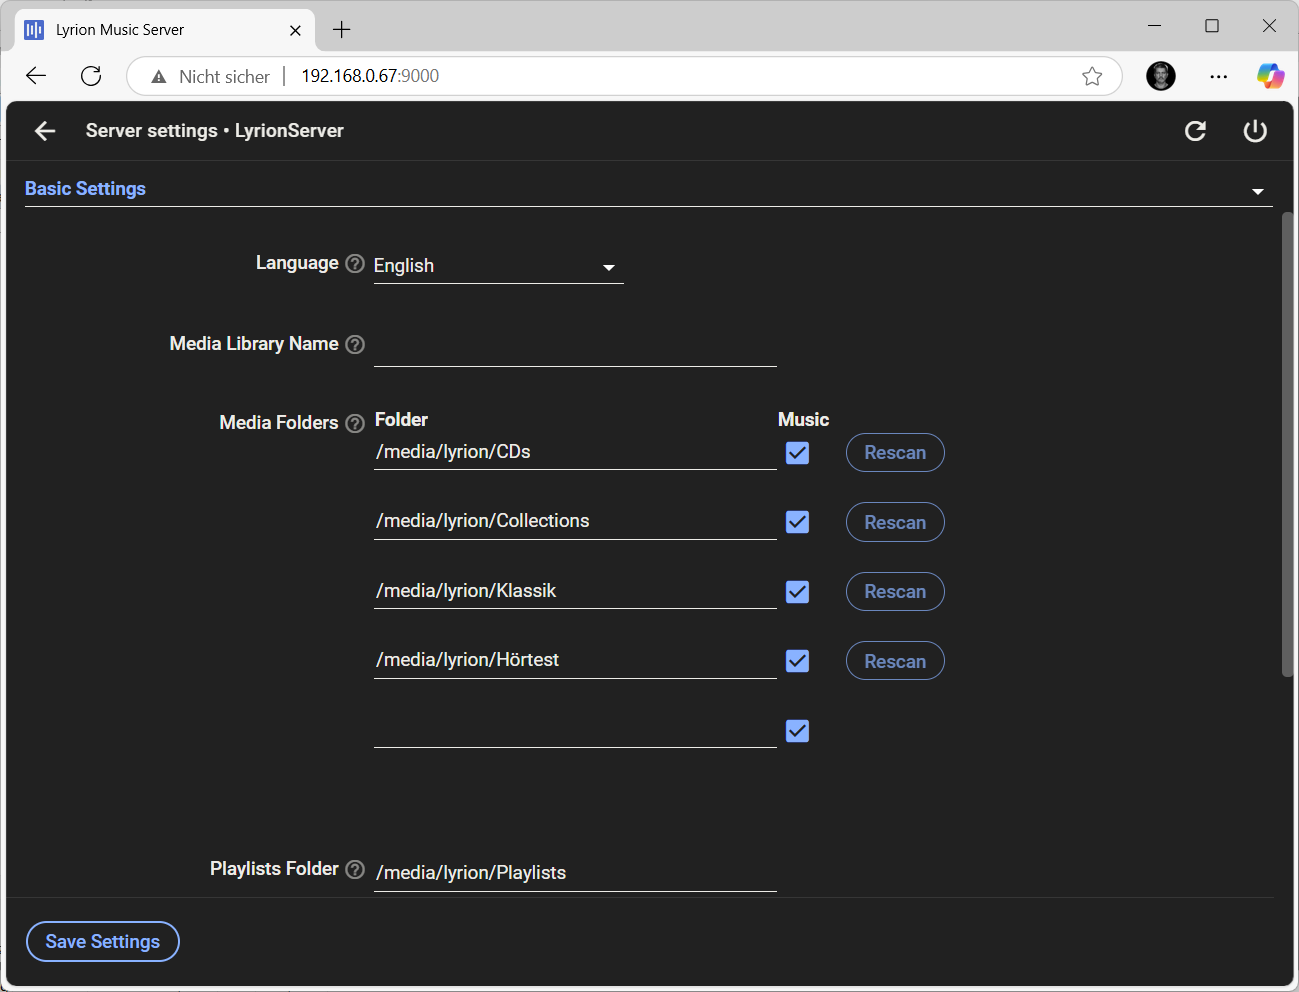
The installation and configuration of the Lyrion Music Server is now complete. After the setup, the server starts indexing the music files, which took less than a minute for me for just over 20,000 tracks. The performance of the Raspberry Pi 5 in combination with the NVMe SSD is really very impressive here.
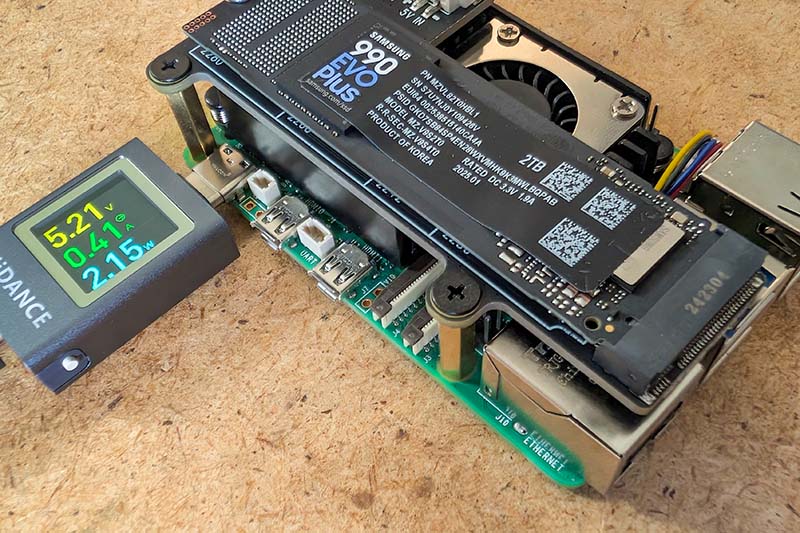
As the Raspberry Pi will be running day and night, the power consumption is a very important factor for me. This value can be determined quickly using a simple USB-C tester. As the photo shows, the power consumption is extremely low at around 2 watts. The small server will therefore hardly be noticeable on the electricity bill.
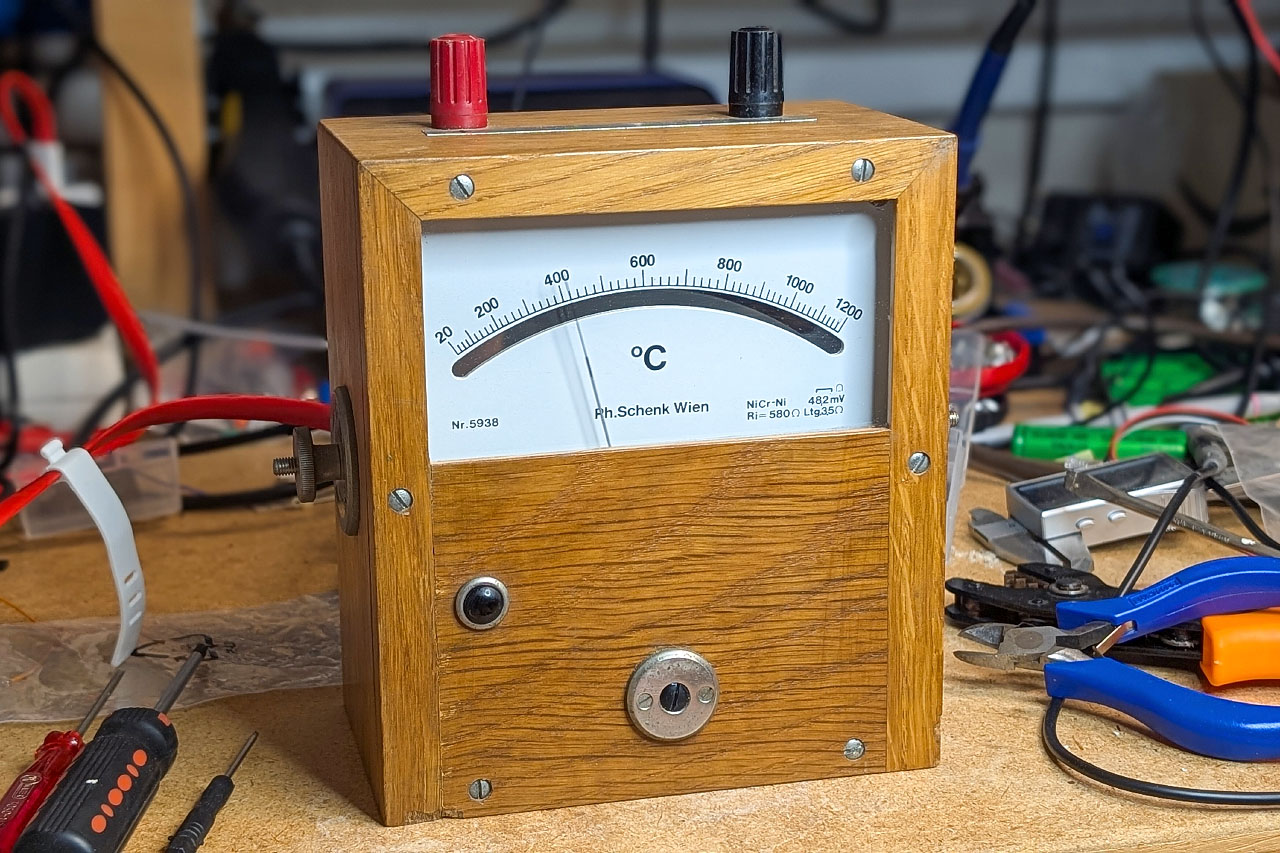
Installation in the case
Basically, the Lyrion Music Server is now ready. Just a small case around it and you could start listening to music. However, as I mentioned at the beginning, I wanted a stylish retro case, which required a few more steps.
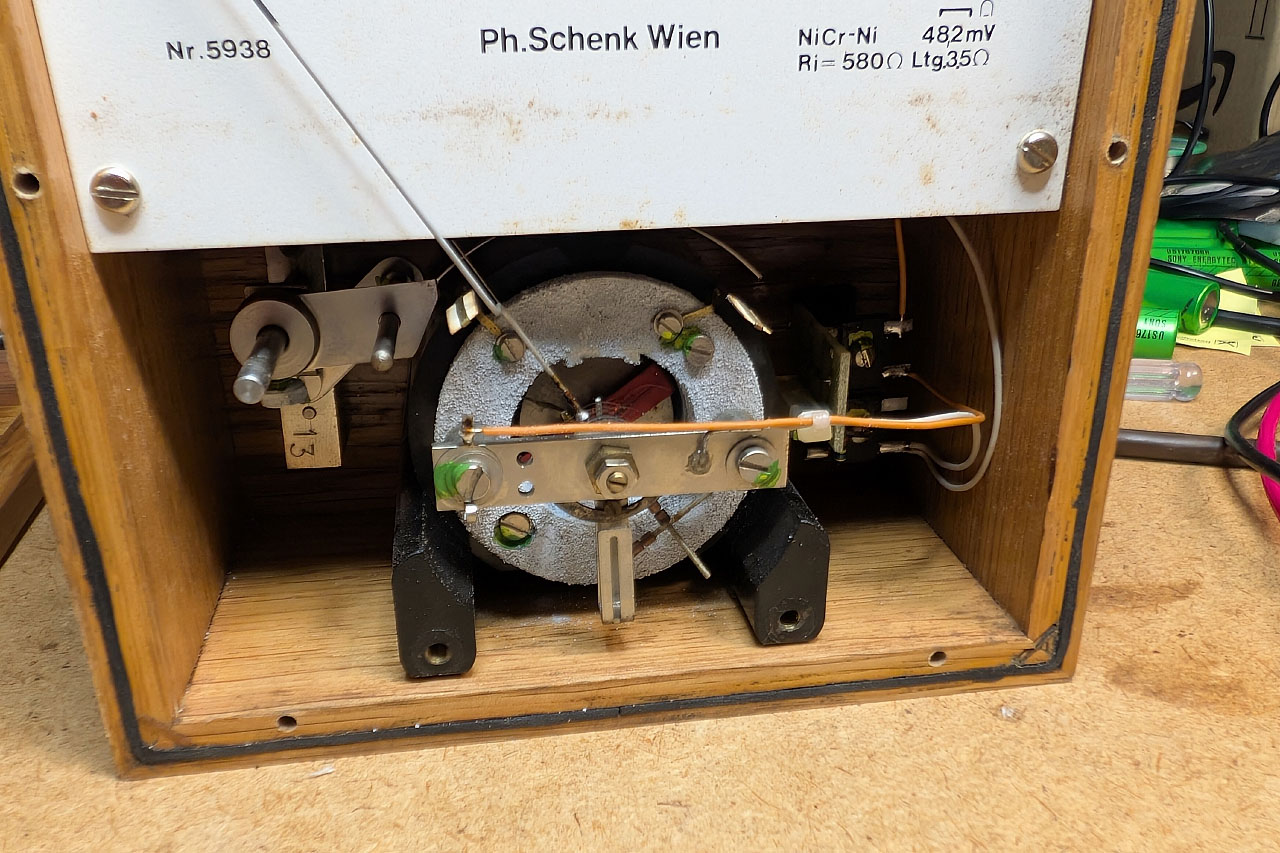
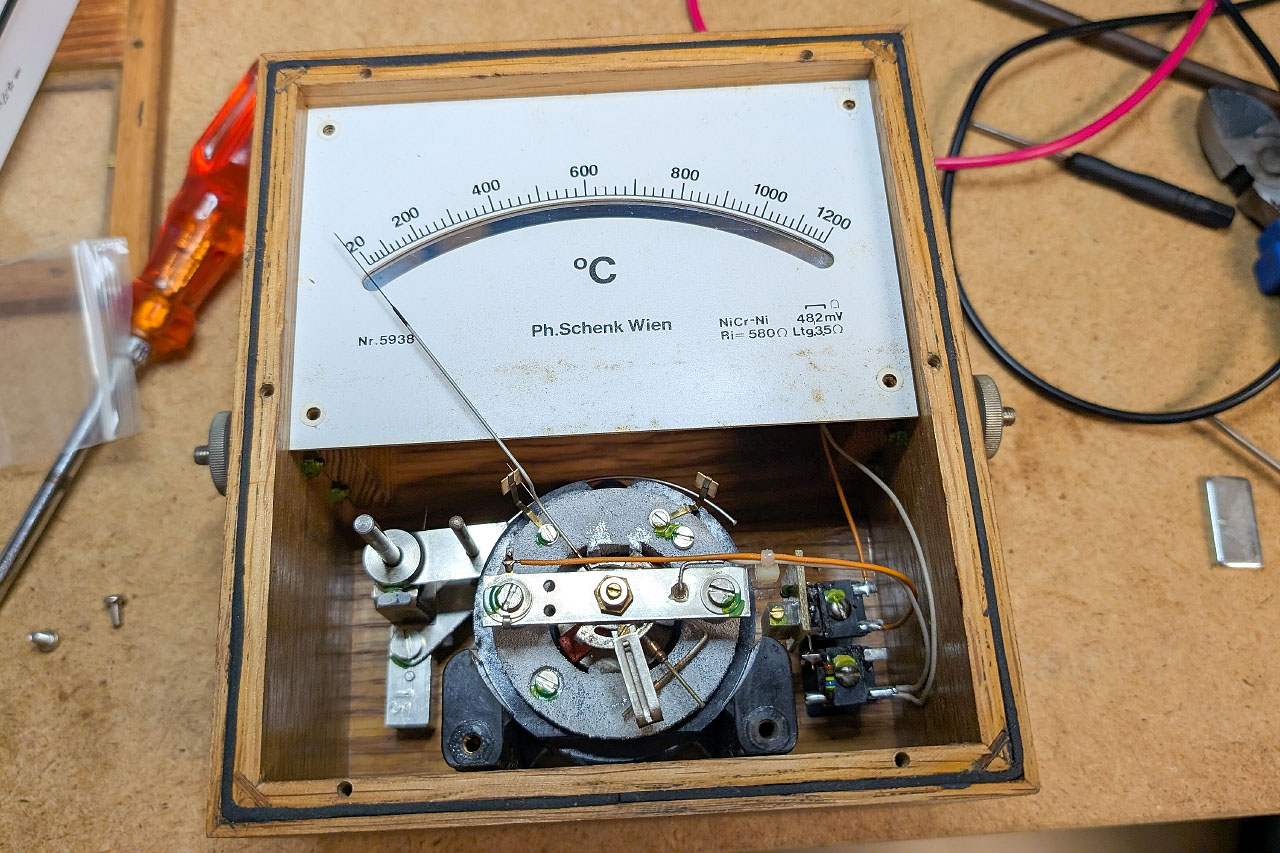
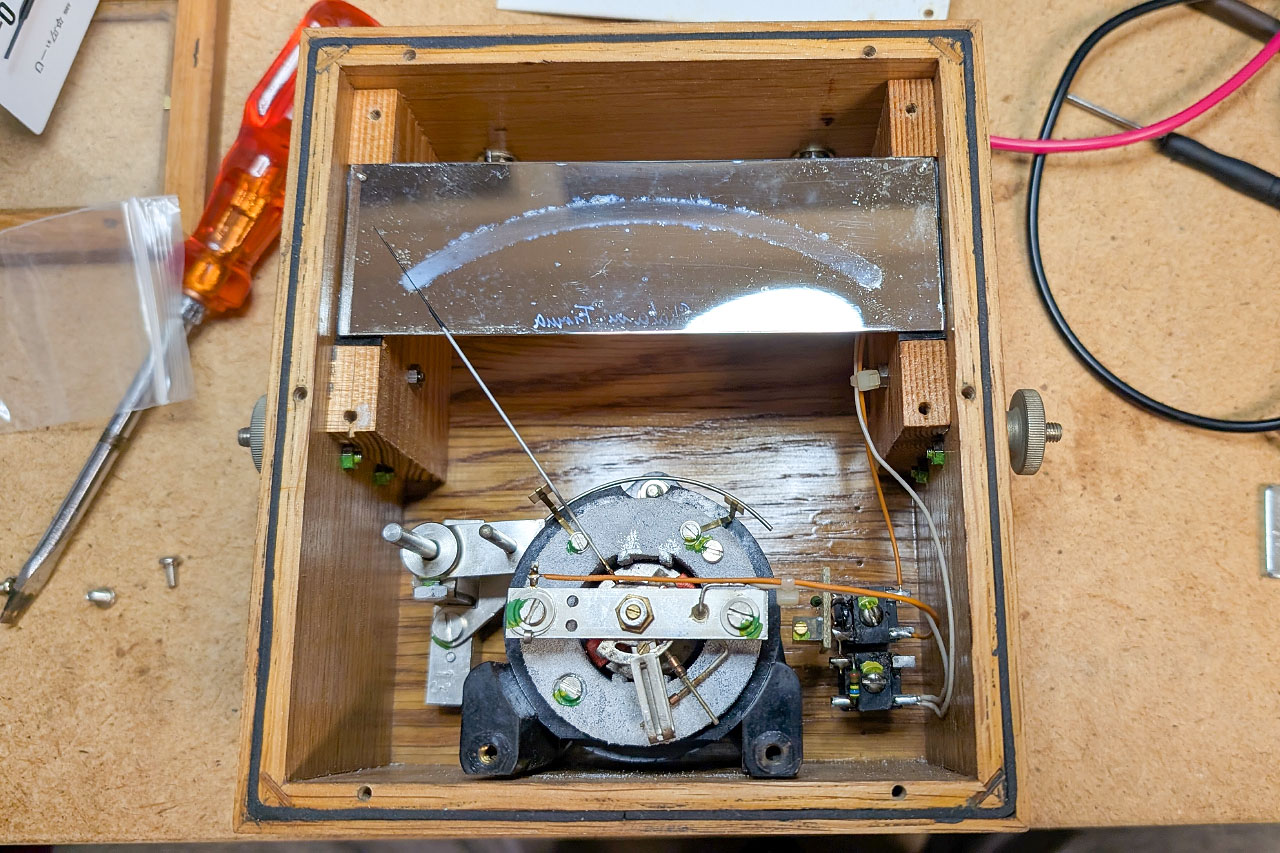
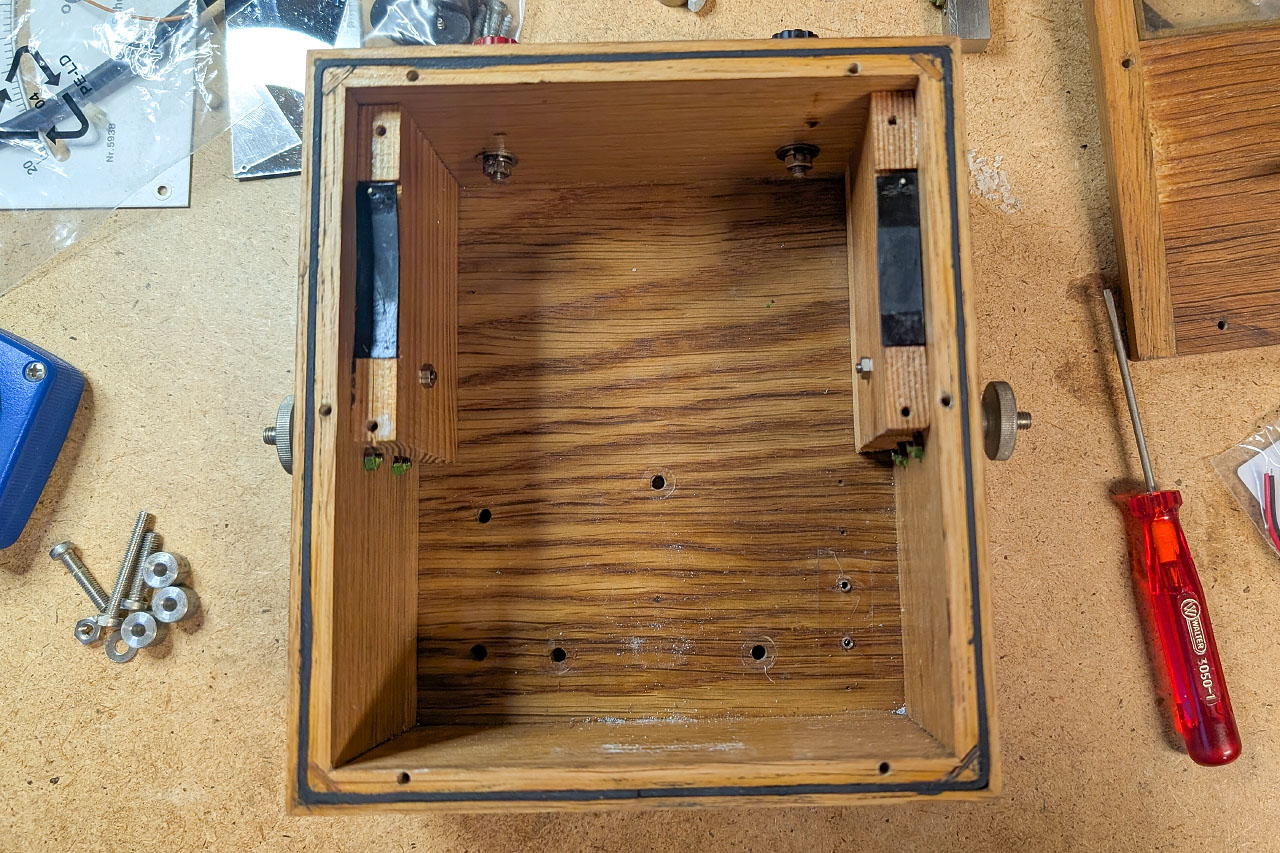
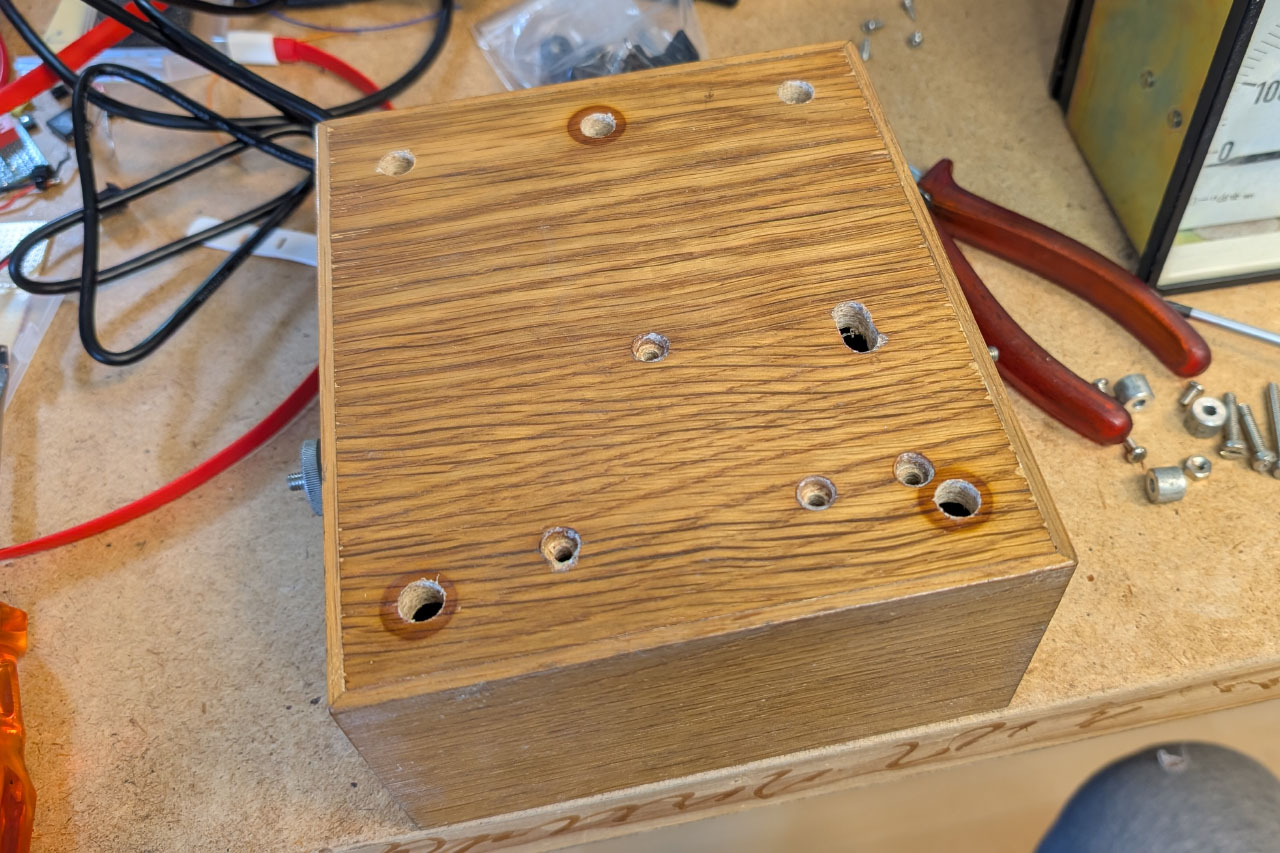
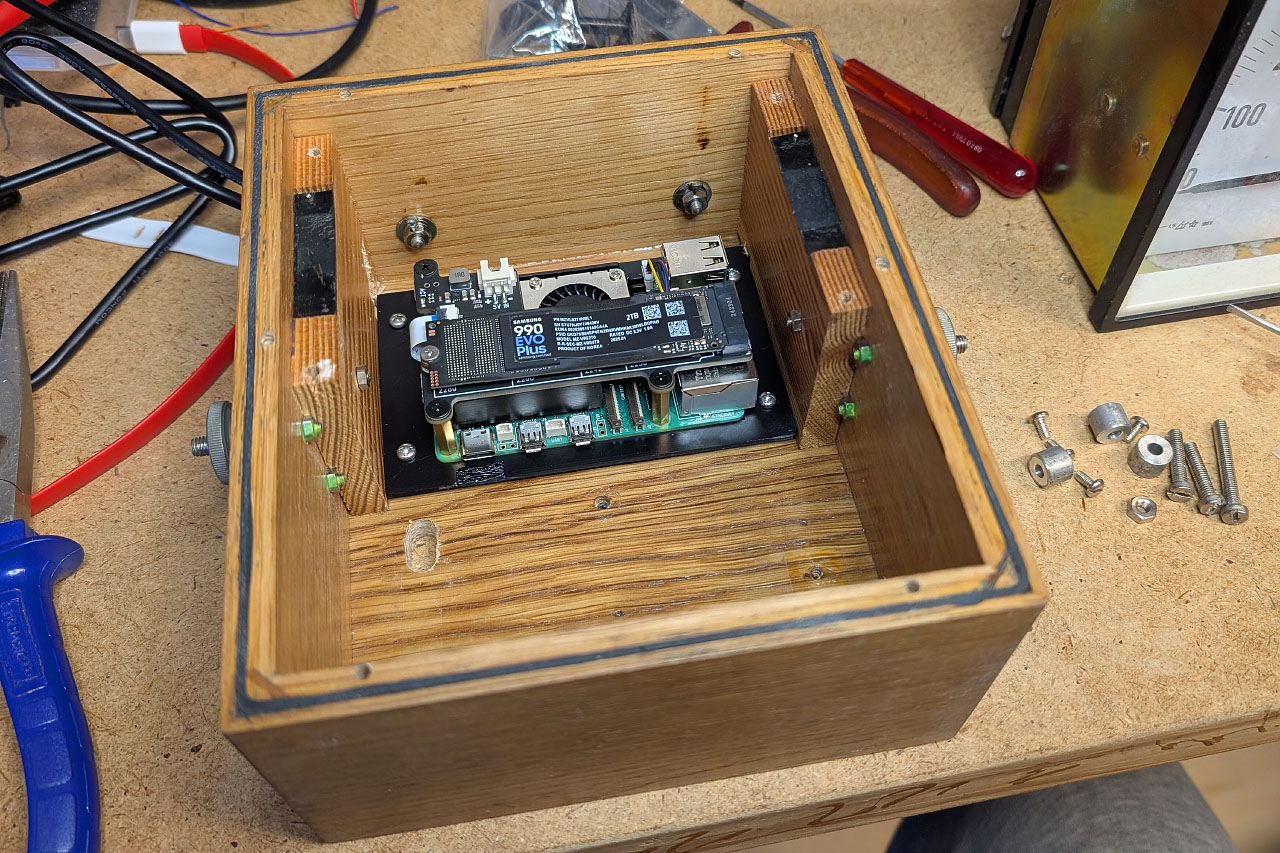
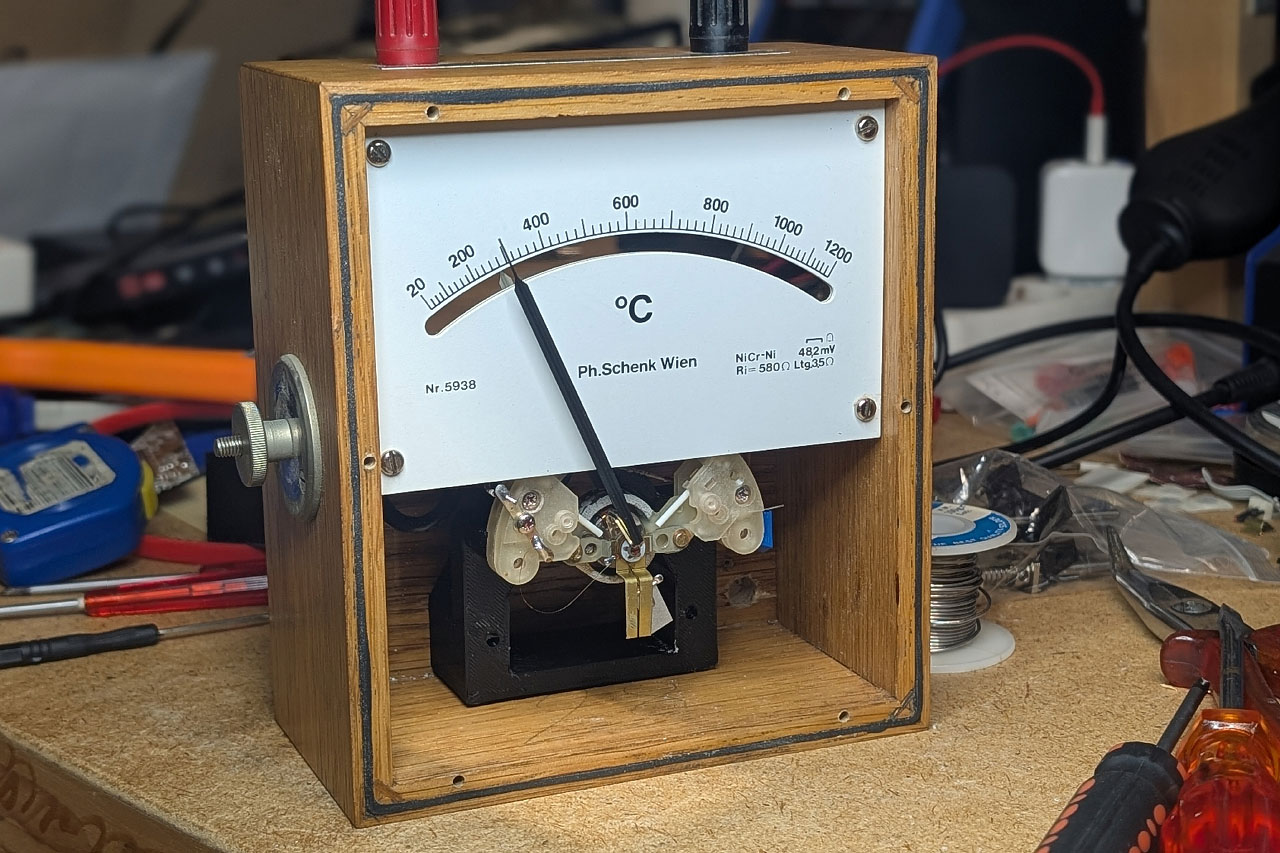
Firstly, I removed the sensitive moving-coil meter so as not to damage it. Then I carefully cleaned the glass, the mirror and the scale. I drilled a few holes in the housing so that at least a little air could circulate. Unfortunately, I didn't have anything better available, otherwise I'm sure I could have done a much nicer job.
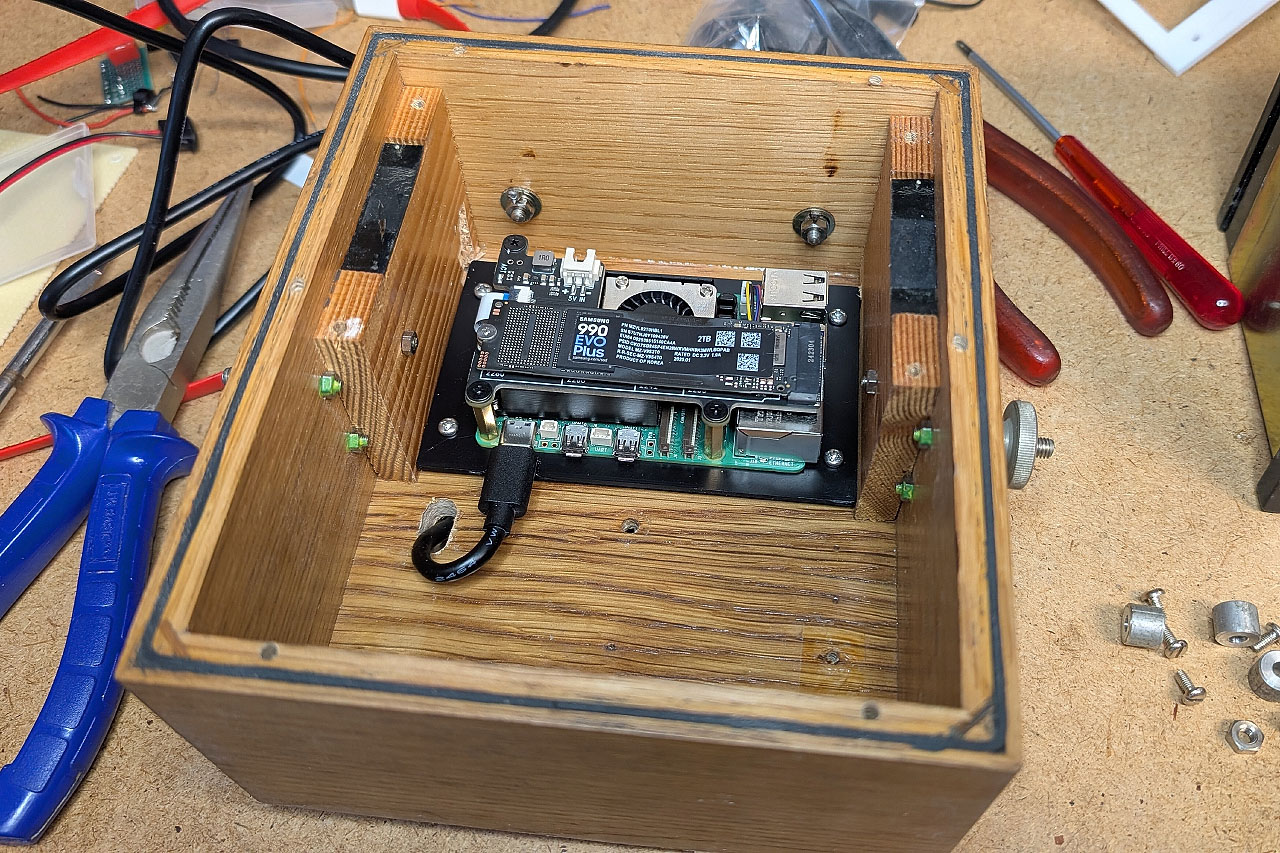
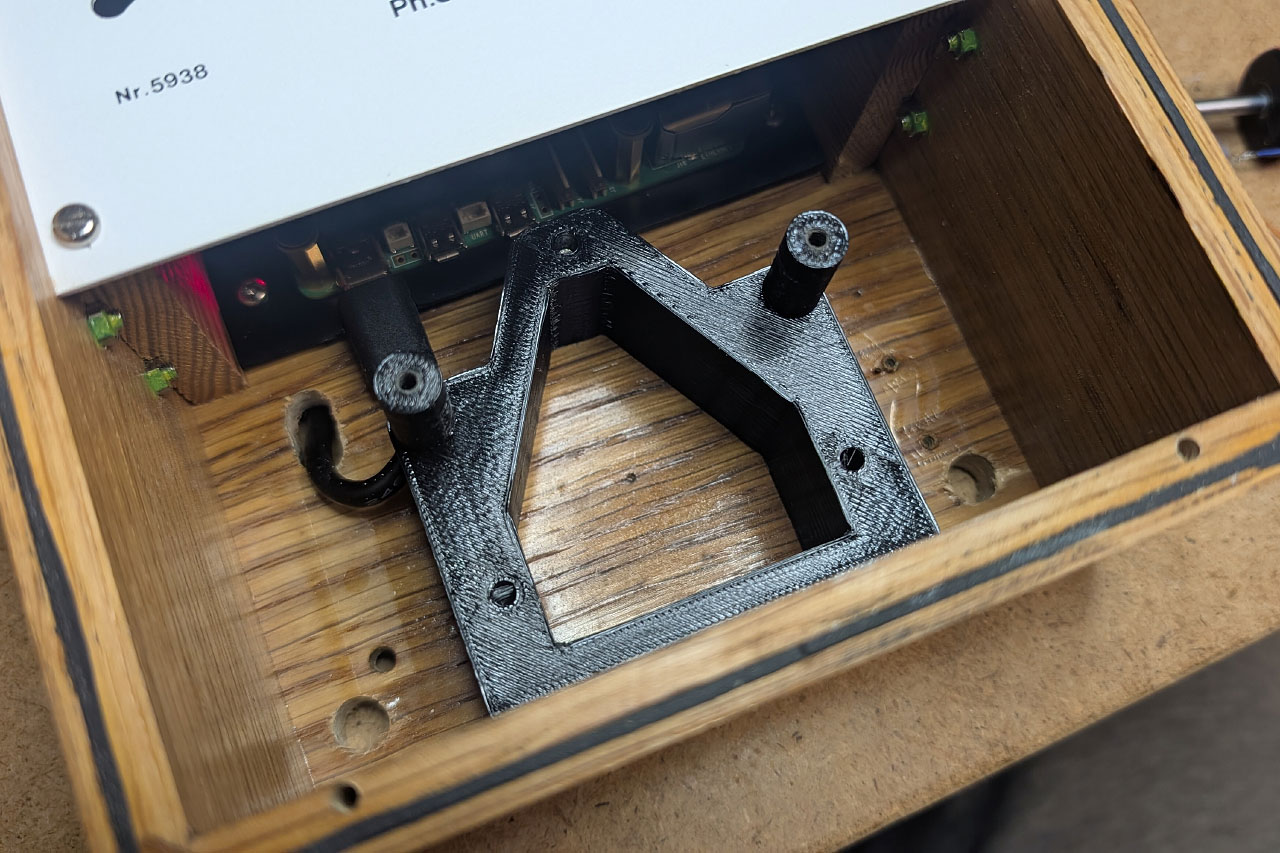
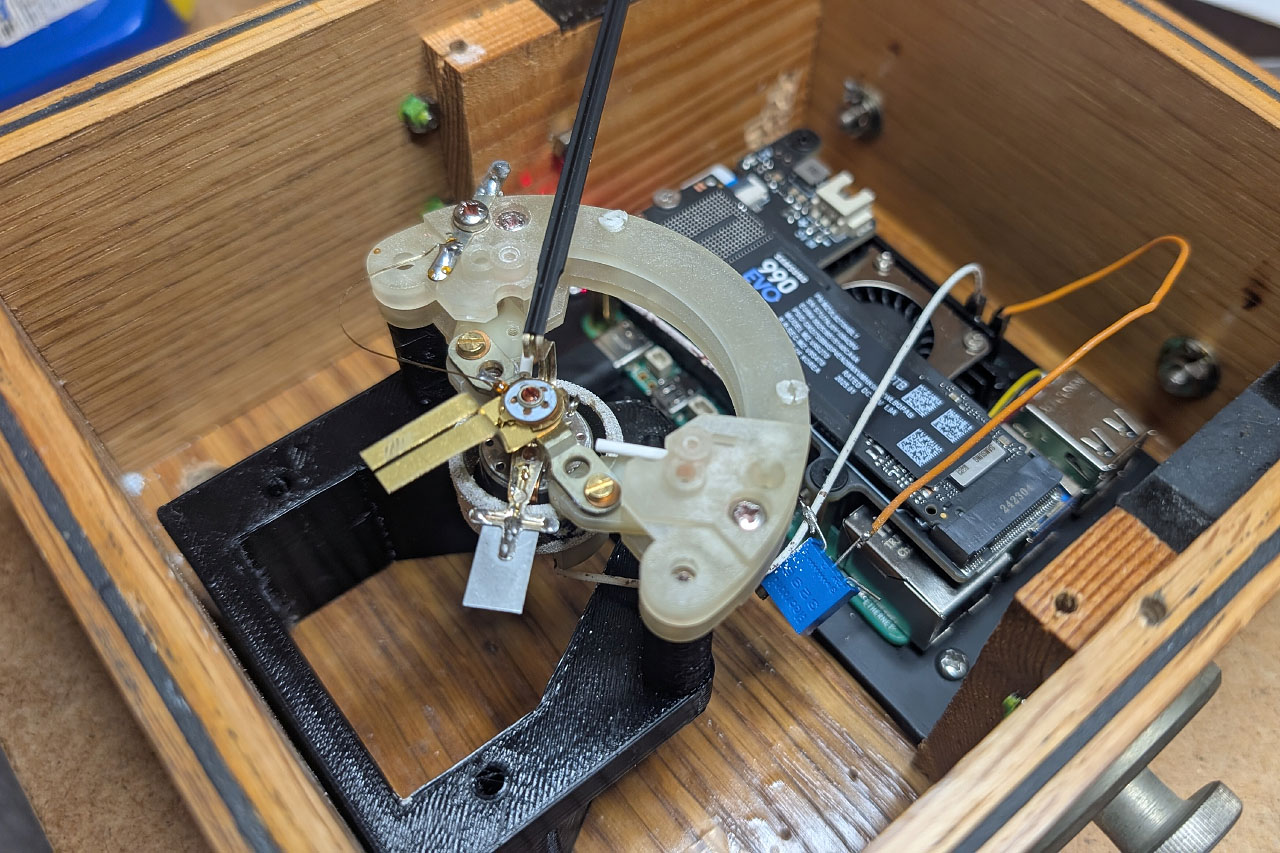
To mount the Raspberry Pi in the housing, I constructed a simple bracket onto which the Raspberry can be screwed and which is then screwed to the back with short screws. The power supply was a bit problematic. Originally, I wanted to install a USB-C connector in the housing and then supply the Raspberry with power via the GPIO pins. However, this USB-C connector did not work with the Raspberry power supply. Apparently there is a difference between normal chargers, where this connector works, and a real power supply. Instead, I have now simply plugged the whole cable through the case. Not ideal, but it works.
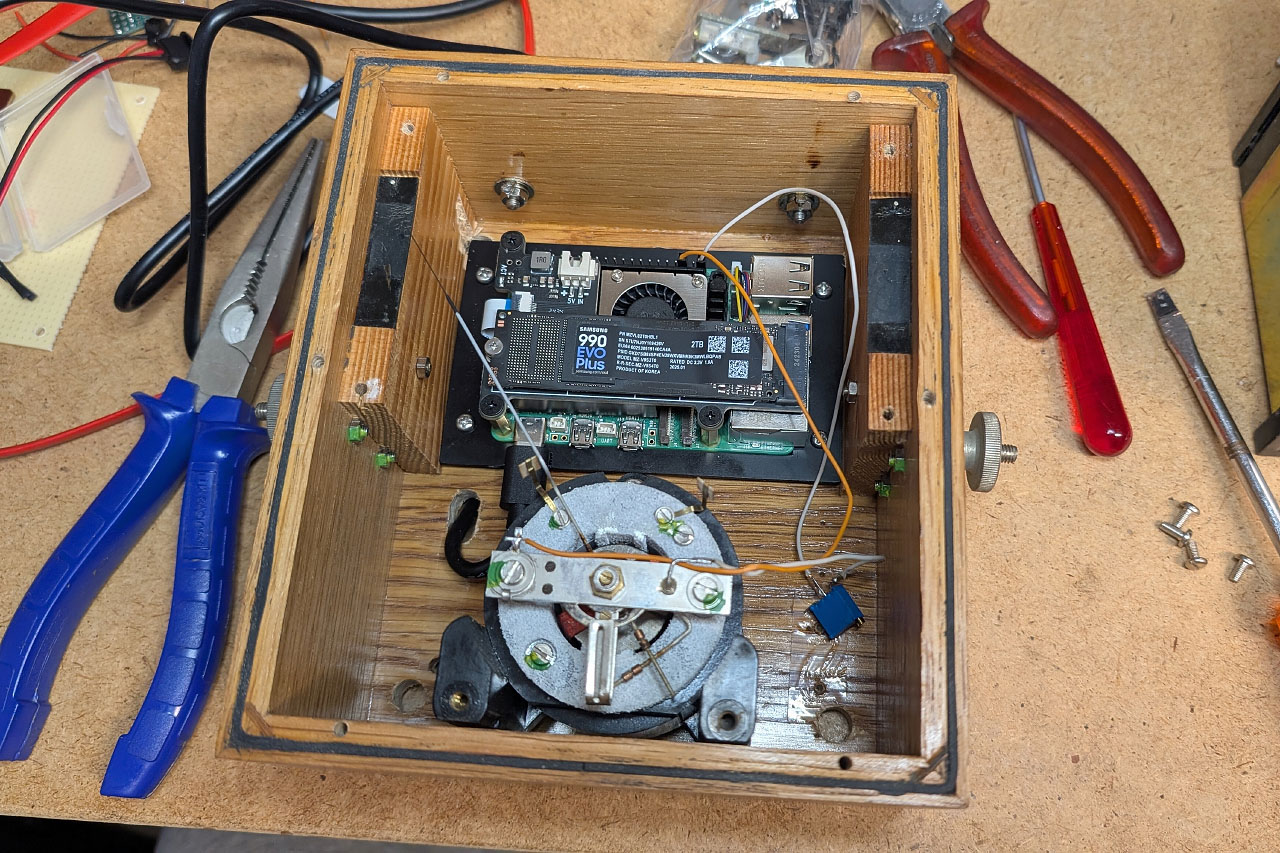
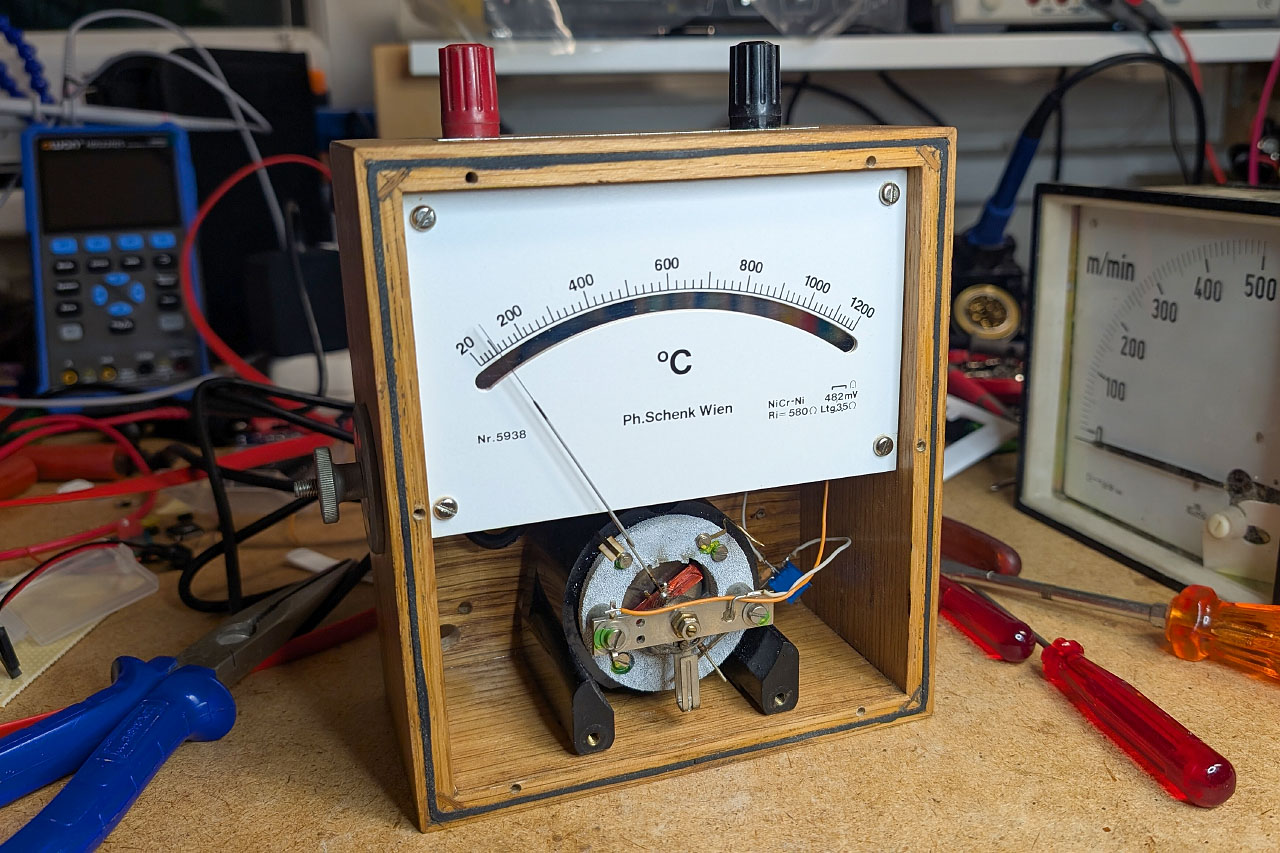
The two lines of the measuring device are then connected to a ground pin and GPIO 19 of the Raspberry. As the current at 3.3 volts is far too high, a series resistor must be connected in between. The value can be easily calculated. The analogue measuring device has the following parameters:
- Full scale deflection at 48,2 mV
- Internal resistance: 580 Ω
It should be operated with a supply voltage of 3.3 V.
The current at which the measuring device fully deflects is calculated according to Ohm's law:
To ensure that only 83.1 µA flows at 3.3 V, the total resistance must be as large as this:
The series resistance is calculated by subtracting the internal resistance:
I therefore used a 50 KΩ potentiometer and adjusted it so that the pointer is slightly above full scale at 3.3 volts.
Finally, everything is screwed back together. Initial tests have shown that the heat generated inside the housing is not too high. When playing music the CPU heats up to about 48 °C, I think that's ok, but I'll have to keep an eye on it in the summer.
Load indication with the meter
Of course, the measuring device should also display something. The CPU load would be an obvious choice, but most of the time it is so low that the pointer would hardly move. I have therefore opted for a combination of CPU load, disc I/O, network I/O and temperature. These values can be read out very easily with the psutil package. However, there is still a major problem. The measuring device must be controlled with an analogue signal, but the Raspberry does not have a digital/analogue converter. However, as the measuring device is very slow, an analogue signal can be simulated with a PWM signal. I use the rpi-hardware-pwm package for this, which also works with the Raspberry Pi 5.
Both packages must first be installed in a virtual environment:
pi@LyrionServer:~ $ python3 -m venv ~/pwm-venv

pi@LyrionServer:~ $ source ~/pwm-venv/bin/activate

pi@LyrionServer:~ $ pip3 install rpi-hardware-pwm
pi@LyrionServer:~ $ pip3 install psutil
In addition, a small configuration in /boot/firmware/config.txt is necessary. At the end after [all], simply enter these lines so that all PWM channels are available:
# PWM
dtoverlay=pwm-2chan
This small script can be used to test whether the PWM output works. The signal is output via GPIO 19.
fromrpi_hardware_pwmimport HardwarePWM
import time

pwm = HardwarePWM(pwm_channel=3, hz=100)
pwm.start(0)  # Start with 0% Duty Cycle

try:
    while True:

        for dc in range(0, 101, 1):
            pwm.change_duty_cycle(dc)
            time.sleep(0.1)

        time.sleep(2)

        for dc in reversed(range(0, 101, 1)):
            pwm.change_duty_cycle(dc)
            time.sleep(0.1)

        time.sleep(2)

except KeyboardInterrupt:
    pass
finally:
    pwm.stop()
As you can see, a clean square wave signal is output and the pointer moves more or less according to the duty cycle:
You can also see in the video that the pointer sticks a little. The device has rubber feet on the back, so it is actually designed to be used horizontally. And there are two more problems, which I was able to solve using software:
- When the signal changes significantly, it can happen that the pointer oscillates quite strongly or strikes on the right or left side. For this purpose, I installed a smoothing function that acts like a low-pass filter. This causes the pointer to move slowly.
- On the one hand, the pointer deflection is not very linear, on the other hand I would like to amplify low values a little so that I have a little more deflection at low loads. For this purpose, there is a mapping that is used to convert from an actual value to a target value.
The entire code of the Python script looks like this:
# -*- coding: utf-8 -*-

import psutil
from rpi_hardware_pwm import HardwarePWM
import time
import sys

# --- Configuration ---
# PWM configuration for rpi_hardware_pwm
RPI_PWM_CHANNEL = 3  # For GPIO 19.   https://pypi.org/project/rpi-hardware-pwm
PWM_PIN_BCM_INFO = 19  # For informational purposes only, which BCM pin is expected for RPI_PWM_CHANNEL=1 (adjust!)
PWM_FREQ = 100  # PWM frequency in Hz

# System load metrics configuration
UPDATE_INTERVAL_SEC = 1.0  # How often raw data is fetched and the pointer is updated

TARGET_DISK_DEVICE = 'nvme0n1p2'
TARGET_NET_INTERFACE = 'wlan0'

MAX_DISK_IO_BPS = 1 * 1024 * 1024
MAX_NET_IO_BPS = 1 * 1024 * 1024

# weights
WEIGHT_CPU = 0.20
WEIGHT_DISK = 0.30
WEIGHT_NET = 0.30
WEIGHT_TEMP = 0.20

MIN_TEMP_C = 40.0  # Temperature (Celsius) that corresponds to 0% contribution to temp load (e.g., Idle)
MAX_TEMP_C = 75.0  # Temperature (Celsius) that corresponds to 100% contribution to temp load

SMOOTHING_FACTOR_ALPHA = 0.1  # For EMA smoothing (smaller = slower/smoother)

# Calibration points for the pointer instrument's scale
# Format: (desired_pointer_percentage_on_scale, required_PWM_percentage_output_for_that)
# The "desired_pointer_percentage_on_scale" should increase linearly from 0 to 100.
# The "required_PWM_percentage_output_for_that" are the values you need to set
# for the pointer to physically reach this position.
CALIBRATION_POINTS = [
    (0, 0),      # Example: For 0% pointer deflection -> 0% PWM
    (10, 25),    # Example: To see 10% on scale -> 20% PWM needed
    (25, 55),    # Example: To see 25% on scale -> 55% PWM needed
    (50, 75),    # Example: To see 50% on scale -> 75% PWM needed
    (75, 90),    # Example: To see 75% on scale -> 90% PWM needed
    (100, 100)   # Example: For 100% pointer deflection -> 100% PWM needed
]
# ==============================

# Global variables
last_time = 0  # Will be set correctly the first time
last_disk_io_specific = None
last_net_io_specific = None
smoothed_overall_load = 0.0  # This is the "linear" target value for the scale (0-100%)
first_run_ema = True

pwm_device = None  # Global variable for the rpi_hardware_pwm object

# --- Helper functions ---
# Helper function to print warnings only once
_printed_warnings = set()


def print_once(message, key):
    if key not in _printed_warnings:
        print(message, file=sys.stderr)
        _printed_warnings.add(key)


def get_cpu_temperature():
    try:
        temps = psutil.sensors_temperatures()
        if 'cpu_thermal' in temps and temps['cpu_thermal']:
            return temps['cpu_thermal'][0].current
        for sensor_name, entries in temps.items():  # Fallback
            if entries and ("temp" in sensor_name.lower() or "thermal" in sensor_name.lower()):
                return entries[0].current
        print_once("W: CPU temperature sensor not clearly identifiable.", "temp_sensor_id_warn")
        return None
    except Exception as e:
        print_once(f"E: Error reading CPU temperature: {e}", "temp_sensor_read_error")
        return None


def normalize(value, max_value):
    if max_value <= 0: return 0.0
    value = max(0.0, value)
    return min(value / max_value, 1.0)


def calculate_combined_load(cpu_percent, disk_bps, net_bps, normalized_temp):
    norm_cpu = cpu_percent / 100.0
    norm_disk = normalize(disk_bps, MAX_DISK_IO_BPS)
    norm_net = normalize(net_bps, MAX_NET_IO_BPS)
    # normalized_temp is already passed as a 0.0-1.0 value

    combined = (norm_cpu * WEIGHT_CPU +
                norm_disk * WEIGHT_DISK +
                norm_net * WEIGHT_NET +
                normalized_temp * WEIGHT_TEMP)
    final_load_fraction = min(max(0.0, combined), 1.0)
    return final_load_fraction * 100.0


def get_calibrated_pwm(linear_load_percent, points):
    sorted_points = sorted(points, key=lambda p: p[0])
    if not sorted_points: return 0

    if linear_load_percent <= sorted_points[0][0]:
        return sorted_points[0][1]
    if linear_load_percent >= sorted_points[-1][0]:
        return sorted_points[-1][1]

    for i in range(len(sorted_points) - 1):
        p1_load, p1_pwm = sorted_points[i]
        p2_load, p2_pwm = sorted_points[i + 1]

        if p1_load <= linear_load_percent < p2_load:
            load_range = p2_load - p1_load
            pwm_range = p2_pwm - p1_pwm
            if load_range == 0: return p1_pwm
            calibrated_pwm = p1_pwm + (linear_load_percent - p1_load) * pwm_range / load_range
            return calibrated_pwm
    return sorted_points[-1][1]  # Should not be reached if 100 is in the input


# --- Main program ---
try:
    print(
        f"Initializing rpi_hardware_pwm on PWM channel {RPI_PWM_CHANNEL} (exp. GPIO {PWM_PIN_BCM_INFO}) with {PWM_FREQ} Hz...")
    pwm_device = HardwarePWM(pwm_channel=RPI_PWM_CHANNEL, hz=PWM_FREQ)
    pwm_device.start(0)  # Starts with 0% duty cycle
    print("Hardware PWM initialized.")
    print(f"Monitoring Disk: '{TARGET_DISK_DEVICE}', Network: '{TARGET_NET_INTERFACE}', Temp: CPU")
    print("Calibration points for scale:", CALIBRATION_POINTS)
    print("Starting load measurement... Press CTRL+C to exit.")

    # Get initial counter readings for the target devices
    try:
        initial_disk_stats = psutil.disk_io_counters(perdisk=True)
        if TARGET_DISK_DEVICE in initial_disk_stats:
            last_disk_io_specific = initial_disk_stats[TARGET_DISK_DEVICE]
        else:
            print_once(f"W: Initial disk device '{TARGET_DISK_DEVICE}' not found.", "init_disk_warn")

        initial_net_stats = psutil.net_io_counters(pernic=True)
        if TARGET_NET_INTERFACE in initial_net_stats:
            last_net_io_specific = initial_net_stats[TARGET_NET_INTERFACE]
        else:
            print_once(f"W: Initial network interface '{TARGET_NET_INTERFACE}' not found.", "init_net_warn")

        last_time = time.monotonic()
    except Exception as init_e:
        print(f"E: Error during initial reading of counters: {init_e}", file=sys.stderr)
        last_time = time.monotonic()

    # Initialize variables for output in case the first data collection cycle fails
    cpu_load, disk_total_bps, net_total_bps, norm_temp = 0.0, 0.0, 0.0, 0.0
    cpu_temp_c = None  # For temperature display
    raw_overall_load, duty_cycle_percent_calibrated = 0.0, 0

    while True:
        current_time = time.monotonic()
        time_delta = current_time - last_time

        if time_delta >= UPDATE_INTERVAL_SEC:
            # Temporary variables for current cycle
            current_cpu_load = 0.0
            current_disk_total_bps = 0.0
            current_net_total_bps = 0.0
            current_norm_temp = 0.0
            current_cpu_temp_c = None

            try:
                current_cpu_load = psutil.cpu_percent(interval=0.1)
                current_cpu_temp_c = get_cpu_temperature()

                if current_cpu_temp_c is not None:
                    clamped_temp = max(MIN_TEMP_C, min(current_cpu_temp_c, MAX_TEMP_C))
                    if (MAX_TEMP_C - MIN_TEMP_C) > 0:
                        current_norm_temp = (clamped_temp - MIN_TEMP_C) / (MAX_TEMP_C - MIN_TEMP_C)
                    else:
                        current_norm_temp = 0.0 if clamped_temp <= MIN_TEMP_C else 1.0
                    current_norm_temp = max(0.0, min(1.0, current_norm_temp))
                else:
                    print_once("W: CPU temperature not available, temp contribution is 0.", "no_temp_loop")

                disk_io_all = psutil.disk_io_counters(perdisk=True)
                current_disk_io_target = disk_io_all.get(TARGET_DISK_DEVICE)
                if current_disk_io_target and last_disk_io_specific and time_delta > 0:
                    disk_read_bps = max(0, (
                                current_disk_io_target.read_bytes - last_disk_io_specific.read_bytes)) / time_delta
                    disk_write_bps = max(0, (
                                current_disk_io_target.write_bytes - last_disk_io_specific.write_bytes)) / time_delta
                    current_disk_total_bps = disk_read_bps + disk_write_bps
                elif not current_disk_io_target and last_disk_io_specific is not None:  # Only warn if it was there before
                    print_once(f"W: Disk '{TARGET_DISK_DEVICE}' no longer found.", "disk_lost_warn")

                net_io_all = psutil.net_io_counters(pernic=True)
                current_net_io_target = net_io_all.get(TARGET_NET_INTERFACE)
                if current_net_io_target and last_net_io_specific and time_delta > 0:
                    net_sent_bps = max(0, (
                                current_net_io_target.bytes_sent - last_net_io_specific.bytes_sent)) / time_delta
                    net_recv_bps = max(0, (
                                current_net_io_target.bytes_recv - last_net_io_specific.bytes_recv)) / time_delta
                    current_net_total_bps = net_sent_bps + net_recv_bps
                elif not current_net_io_target and last_net_io_specific is not None:  # Only warn if it was there before
                    print_once(f"W: Interface '{TARGET_NET_INTERFACE}' no longer found.", "net_lost_warn")

                # Apply values for this cycle
                cpu_load, disk_total_bps, net_total_bps, norm_temp, cpu_temp_c = \
                    current_cpu_load, current_disk_total_bps, current_net_total_bps, current_norm_temp, current_cpu_temp_c

                raw_overall_load = calculate_combined_load(cpu_load, disk_total_bps, net_total_bps, norm_temp)

                if first_run_ema:
                    smoothed_overall_load = raw_overall_load
                    first_run_ema = False
                else:
                    smoothed_overall_load = (SMOOTHING_FACTOR_ALPHA * raw_overall_load) + \
                                            ((1 - SMOOTHING_FACTOR_ALPHA) * smoothed_overall_load)

                calibrated_pwm_value = get_calibrated_pwm(smoothed_overall_load, CALIBRATION_POINTS)
                duty_cycle_percent_calibrated = int(round(calibrated_pwm_value))
                duty_cycle_percent_calibrated = max(0, min(100, duty_cycle_percent_calibrated))

                if pwm_device:
                    pwm_device.change_duty_cycle(duty_cycle_percent_calibrated)

                # Save values for the next iteration
                last_time = current_time
                if current_disk_io_target:
                    last_disk_io_specific = current_disk_io_target
                else:
                    last_disk_io_specific = None # Explicitly set to None if target disappears
                if current_net_io_target:
                    last_net_io_specific = current_net_io_target
                else:
                    last_net_io_specific = None # Explicitly set to None if target disappears

            except Exception as loop_e:
                print(f"E: Error in main loop (data acquisition/processing): {loop_e}", file=sys.stderr)
                # In case of an error in this cycle, keep the old values for output
                # and pause to avoid immediate re-failure.
                time.sleep(UPDATE_INTERVAL_SEC)  # Wait before trying again

            # Debug output with the last successfully read or initialized values
            disk_mbps_str = f"{disk_total_bps / (1024 * 1024):5.2f}"
            net_mbps_str = f"{net_total_bps / (1024 * 1024):5.2f}"
            temp_str = f"{cpu_temp_c:.1f}°C" if cpu_temp_c is not None else "  N/A"  # Fixed width for N/A
            print(
                f"CPU:{cpu_load:5.1f}% | T:{temp_str:6s} | D:{disk_mbps_str}MB/s | N:{net_mbps_str}MB/s | RawL:{raw_overall_load:5.1f}% | SmoothL:{smoothed_overall_load:5.1f}% | CalPWM%:{duty_cycle_percent_calibrated:3d}")

        # Adjust sleep time to minimize CPU load
        # Ensures the loop doesn't run faster than necessary
        # and also sleeps if time_delta < UPDATE_INTERVAL_SEC
        # Calculate remaining time until the next UPDATE_INTERVAL_SEC slot
        time_to_next_update = last_time + UPDATE_INTERVAL_SEC - time.monotonic()
        actual_sleep_time = max(0.01, time_to_next_update)  # Sleep at least 10ms, or what's left
        time.sleep(actual_sleep_time)


except KeyboardInterrupt:
    print("\nProgram terminated by user.")
except Exception as e:
    print(f"\nA serious error occurred: {e}")
    import traceback

    traceback.print_exc()
finally:
    if pwm_device:
        print("Cleaning up: Stopping PWM...")
        try:
            pwm_device.stop()
            print("Hardware PWM stopped.")
        except Exception as cleanup_pwm_e:
            print(f"W: Error stopping hardware PWM: {cleanup_pwm_e}", file=sys.stderr)
    else:
        print("No rpi_hardware_pwm object to clean up.")

print("Script finished.")
The script runs on the Raspberry in a screen terminal. As I rarely restart the server, I don't need a separate startup script.
It's funny how the pointer now moves back and forth while listening to music. I can even determine whether I'm listening to an mp3, FLAC or HiRes FLAC. Whether it makes sense or not, this little project was a lot of fun again. If you have any questions or suggestions, just leave me a message.
Update 20.05.2025
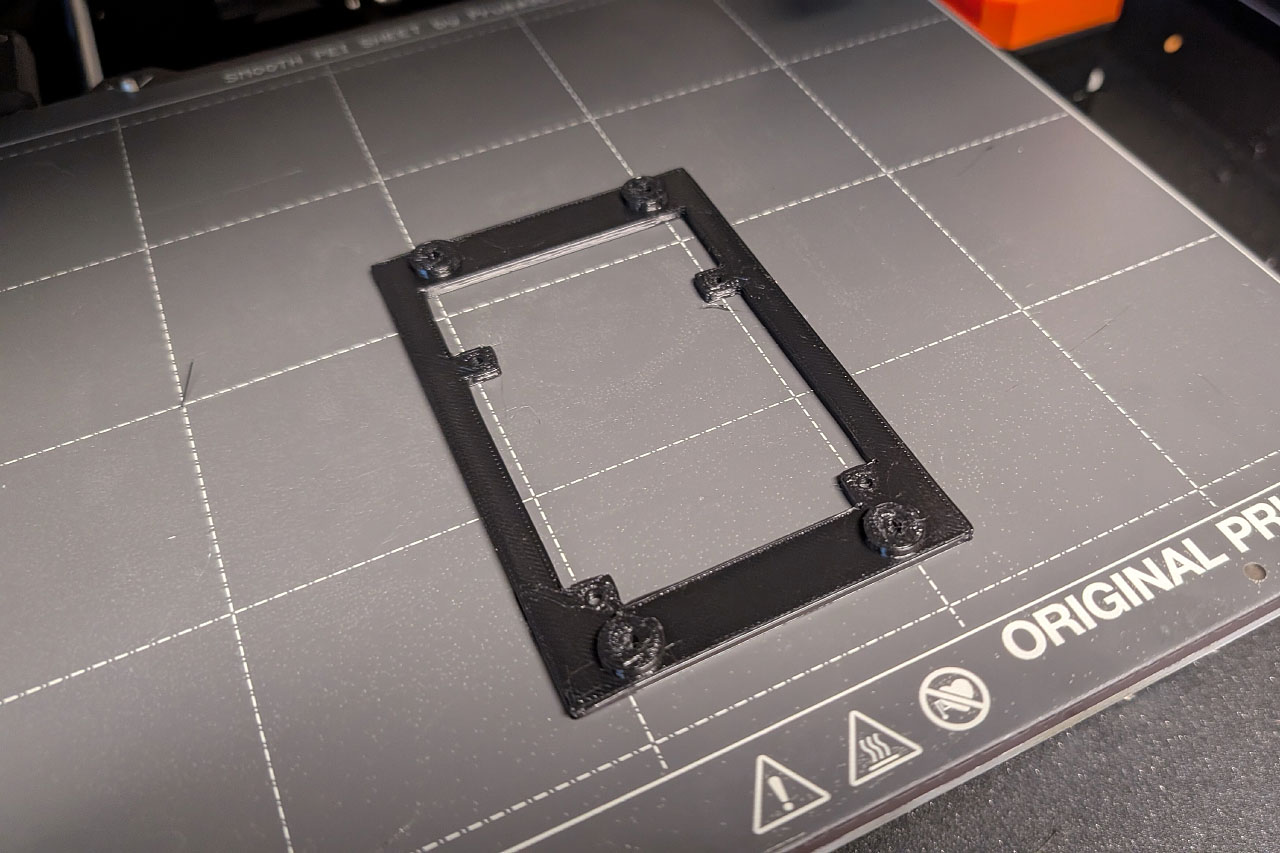
There are some funny coincidences. I found another moving-coil meter at a flea market. Although it is much more modern than the other measuring device, it is about the same size. As I wrote above, the old movement is quite sticky, which means that the pointer sometimes only moves slightly or not at all. I therefore had the idea of simply installing the new movement in the old housing.
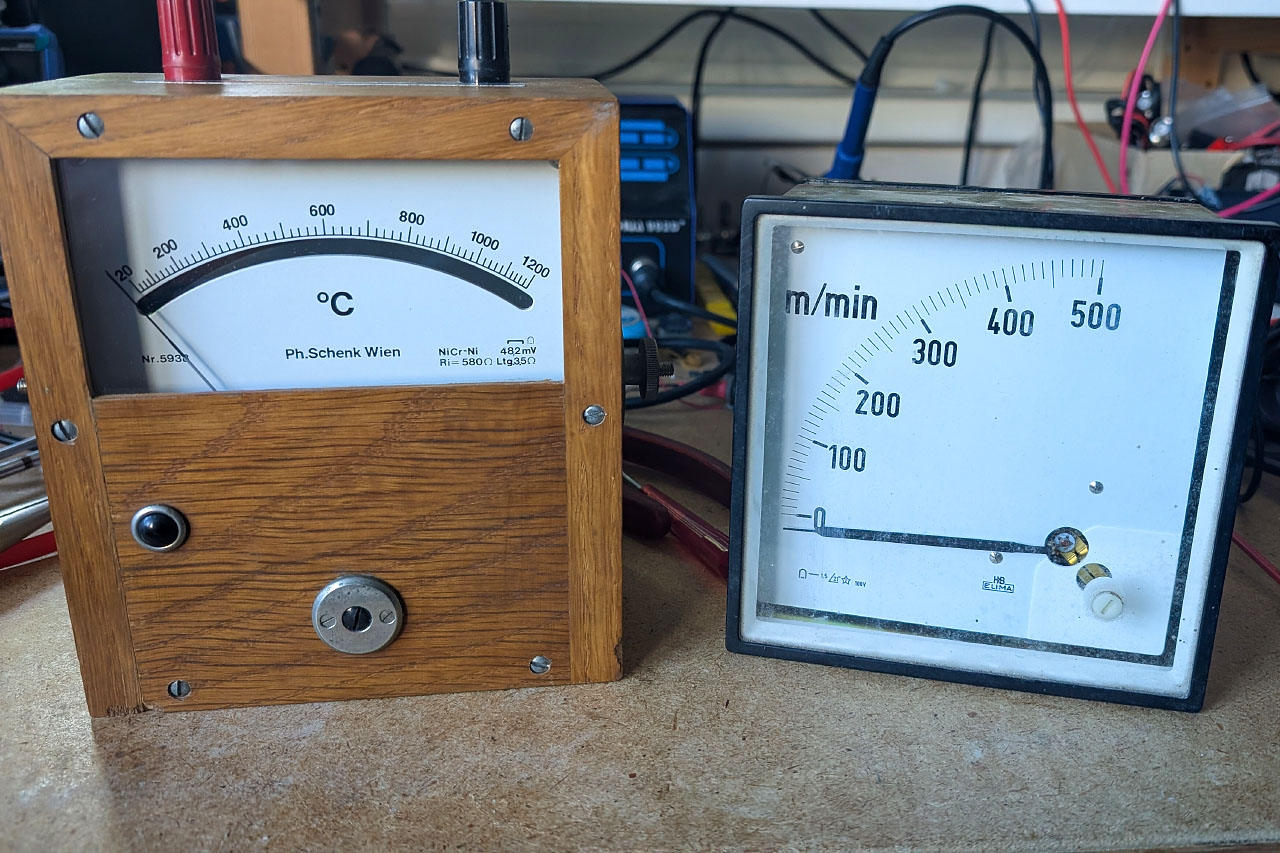
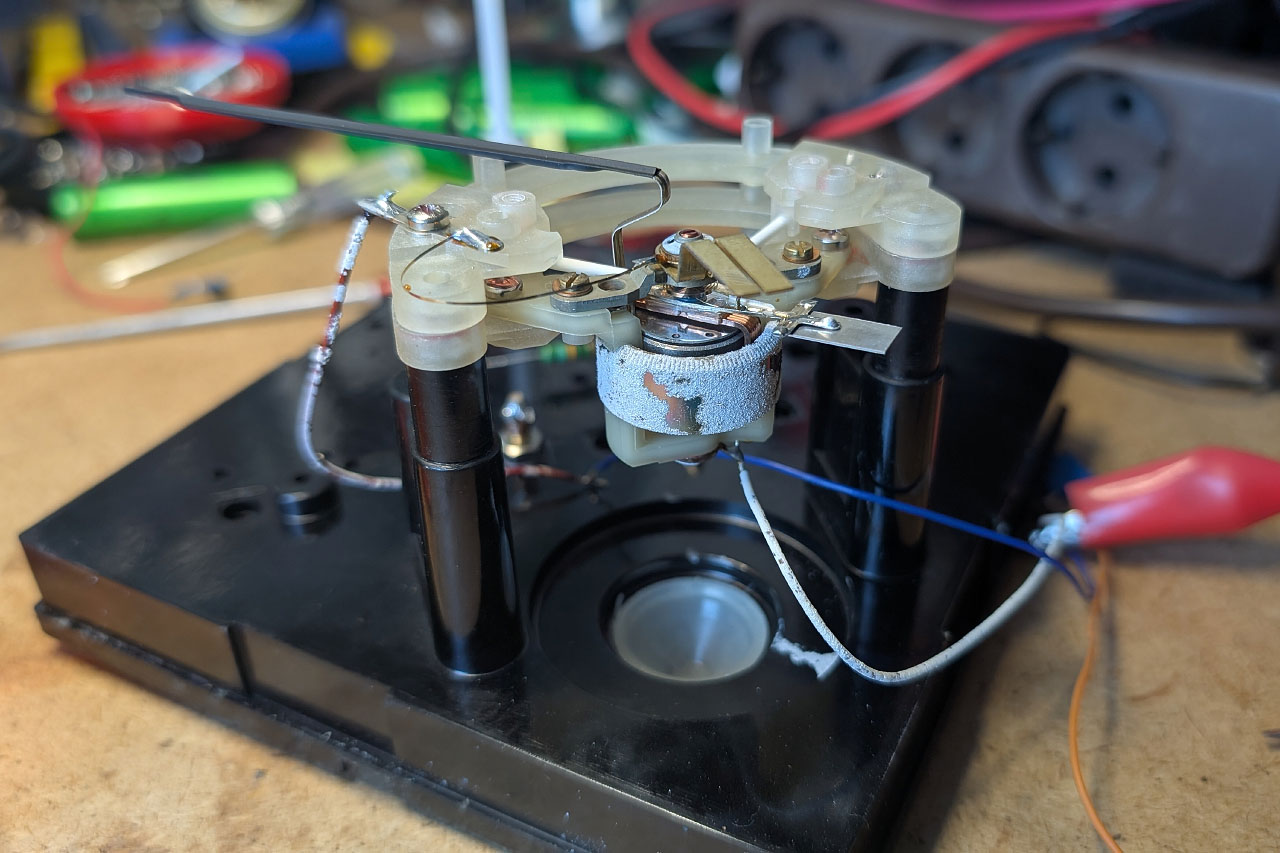
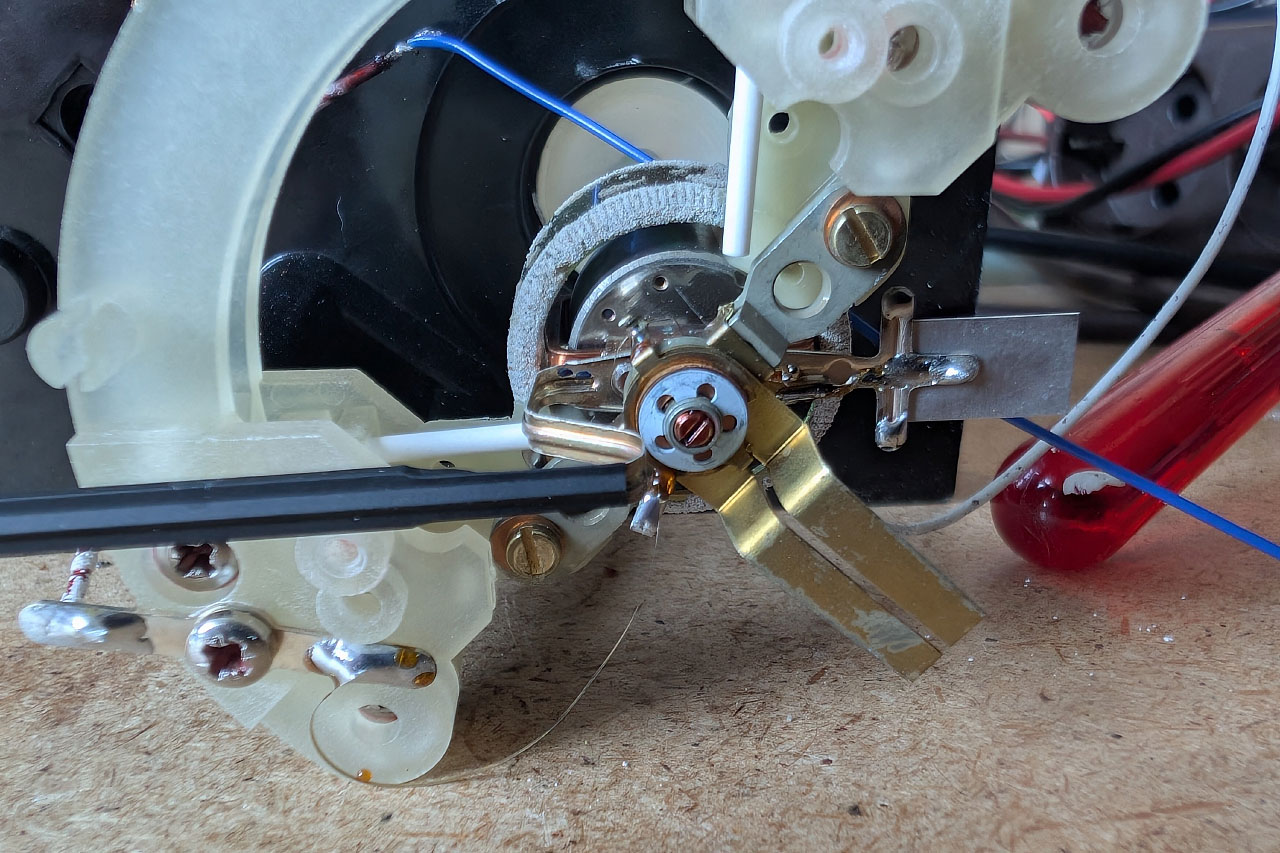

The problem with this is, of course, that the new measuring device does not simply fit into the case. I therefore first measured the dimensions of the old and new moving-coil movements as accurately as possible, designed a corresponding adapter and printed it with my 3D printer. As this measuring device has a different internal resistance, I also had to adjust the value on the potentiometer slightly. The new movement works perfectly and the value is even easier to read as the pointer is slightly wider.