Logitech Media Server with Raspberry Pi 3 B+ and 3.2″ TFT Display
My enthusiasm for the Squeezebox ecosystem began several years ago. I bought my first Squeezebox in 2005. It was a Squeezebox2 with a very easy to read vacuum fluorescent display and great sound thanks to a high quality digital to analog converter. At that time the company was called Slim Devices, but was taken over by Logitech in 2006. Some more very interesting devices followed, but in 2012 Logitech unfortunately stopped the production of the Squeezeboxes. Since then, you can only buy second-hand devices or you build your own device. I have remained loyal to the system to this day, as I have not yet found anything comparable that is so practical and flexible.
The Logitech Media Server, formerly also called SlimServer, SqueezeCenter or Squeezebox Server, is the heart of the Squeezebox ecosystem. Since it was open-sourced by Slim Devices from the beginning, the software is still being developed today. My server has been running smoothly on a Raspberry Pi 3 B+ for several years now. Now a good friend of mine also wants to install a small Squeezebox server, which gave me the idea to write a small manual for it.
Hardware
For a Logitech media server, there are basically not very many components necessary, some of which might even be lying around unused somewhere. Therefore, the list is not very long. The display isn't really necessary, it's just a little gimmick:
- Raspberry Pi 3 B+ with suitable power supply unit
- microSD card, 8GB or larger
- external USB disk, size depending on the size of the music collection
- Waveshare 3.2" TFT Display
- Joy-it 3.2" display case
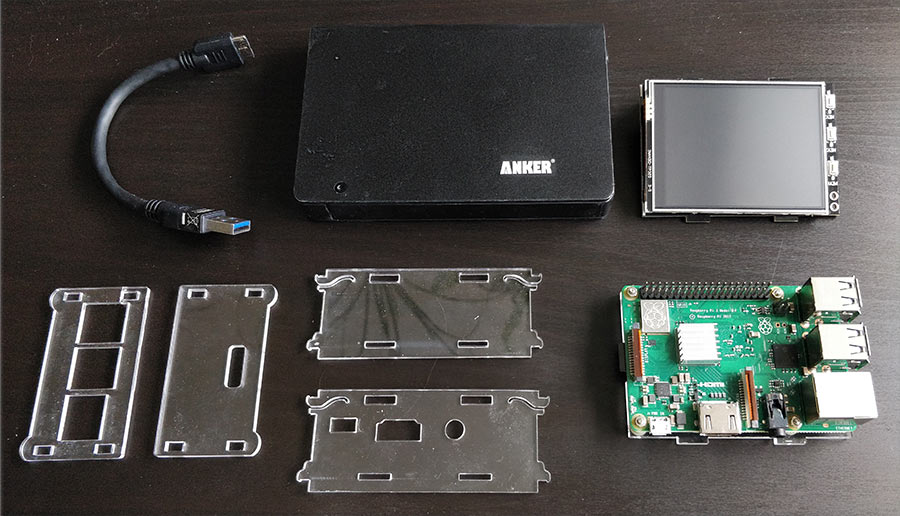
The display is simply plugged into the GPIO ports of the Raspberry and then the case is put together. The whole thing takes less than 5 minutes. There are also instructions for the case on the JOY-IT website.
Installation Raspberry Pi OS
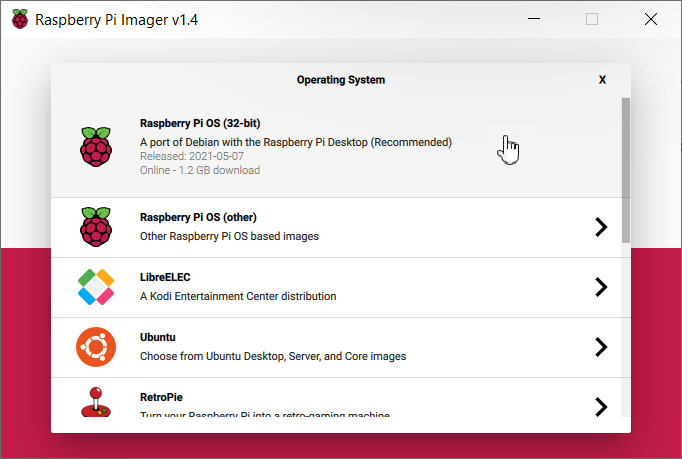
The next step is to install the operating system of the Raspberry Pi. For the Logitech Media Server the Raspberry Pi OS Lite would be sufficient. But since I will install a system monitor that needs the desktop, I need the Raspberry Pi OS with desktop. The easiest way to install it is with the Raspberry Pi Imager. The current version is Debian Buster.
After the operating system is written to the SD card, the card must be prepared so that the Raspberry can connect to the WLAN and access (easiest with PuTTY) via SSH is possible. To do this, remove the card briefly and insert it back into the PC. Now a new drive with the /boot partition of the SD card should be available.
To configure the WLAN, a file named wpa_supplicant.conf with the following content is copied to the card. The fields for the country, SSID and password must be adjusted accordingly.
country=XX
ctrl_interface=DIR=/var/run/wpa_supplicant GROUP=netdev
update_config=1
network={
       ssid="WLAN_NAME"
       psk="WLAN_PASSWORT"
       key_mgmt=WPA-PSK
}
For SSH access only an empty file with the name ssh has to be copied to the card.
Now the SD card can be inserted into the Raspberry Pi and the computer can be booted. After the boot process you can check at the router if the Raspberry has started correctly and which IP address it has. It appears in the list of connections under the name raspberrypi. Then you can login via SSH on the Raspberry with the default login pi/raspberry.
It is recommended to change the default password first and then update the system with the commands
sudo apt-get update
sudo apt-get upgrade
This may take a few minutes. Finally set the timezone to the appropriate value. In my case this is
sudo timedatectl set-timezone Europe/Vienna
The list of available time zones is located in the /usr/share/zoneinfo directory.
Display driver
The display driver is installed with the following commands:
git clone https://github.com/waveshare/LCD-show.git
cd LCD-show
chmod +x LCD32-show
sudo ./LCD32-show
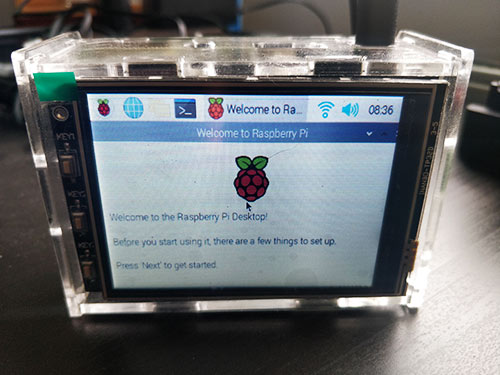
At the end the Raspberry reboots and should look like this:
Optimizations
First, the hostname of the Raspberry is changed:
sudo hostname -b SqueezeboxServer
sudo hostnamectl set-hostname SqueezeboxServer
sudo reboot
After that, the computer should also be shown on the router under the name SqueezeboxServer.
The following are some changes to extend the life of the SD card by reducing write accesses. First, swapping is disabled:
sudo service dphys-swapfile stop
sudo systemctl disable dphys-swapfile
sudo apt-get purge dphys-swapfile
Afterwards another entry is made in /boot/cmdline.txt. The editor is started with
sudo nano /boot/cmdline.txt
At the end of the line the option noswap is added. The whole line then looks like this:
dwc_otg.lpm_enable=0 console=ttyAMA0,115200 console=tty1 root=/dev/mmcblk0p2 rootfstype=ext4 elevator=deadline rootwait fbcon=map:10 fbcon=font:ProFont6x11 logo.nologo noswap
To prevent log files from being written to the SD card, temporary directories can be moved to RAM. To do this, the file /etc/fstab is modified with
sudo nano /etc/fstab
and should look like this:
proc            /proc           proc    defaults          0       0
PARTUUID=afd7b074-01  /boot           vfat    defaults,noatime  0       2
PARTUUID=afd7b074-02  /               ext4    defaults,noatime  0       1

# Log to RAM
tmpfs   /tmp            tmpfs   defaults,noatime,nosuid,mode=1777,size=256m 0 0
tmpfs   /var/log        tmpfs   defaults,noatime,nosuid,mode=0755,size=128m 0 0
tmpfs   /var/tmp        tmpfs   defaults,noatime,nosuid,mode=0755,size=128m 0 0

# a swapfile is not a swap partition, no line here
#   use  dphys-swapfile swap[on|off]  for that
After a reboot, the adjustments can be checked with the command
df -h
The result should look something like the following:
pi@SqueezeboxServer:~ $ df -h
Filesystem      Size  Used Avail Use% Mounted on
/dev/root        29G  3.2G   25G  12% /
devtmpfs        430M     0  430M   0% /dev
tmpfs           463M     0  463M   0% /dev/shm
tmpfs           463M  6.3M  456M   2% /run
tmpfs           5.0M  4.0K  5.0M   1% /run/lock
tmpfs           463M     0  463M   0% /sys/fs/cgroup
tmpfs           128M     0  128M   0% /var/tmp
tmpfs           256M  4.0K  256M   1% /tmp
tmpfs           128M  216K  128M   1% /var/log
/dev/mmcblk0p1  253M   48M  205M  19% /boot
tmpfs            93M  4.0K   93M   1% /run/user/1000
Mount external hard disk
The external hard disk should be mounted automatically in a defined directory. As file system I use exFAT, so that files larger than 4GB can be stored. First the directory is created and necessary packages are installed:
sudo mkdir /media/usb-drive
sudo chown pi:pi /media/usb-drive/
sudo apt-get install exfat-fuse
sudo apt-get install exfat-utils
Now the external USB hard disk is connected. With the command
sudo blkid
the available partitions are displayed. The list looks like this, for example:
/dev/mmcblk0p1: LABEL_FATBOOT="boot" LABEL="boot" UUID="7616-4FD8" TYPE="vfat" PARTUUID="afd7b074-01"
/dev/mmcblk0p2: LABEL="rootfs" UUID="87b585d1-84c3-486a-8f3d-77cf16f84f30" TYPE="ext4" PARTUUID="afd7b074-02"
/dev/mmcblk0: PTUUID="afd7b074" PTTYPE="dos"
/dev/sda1: LABEL="Music" UUID="9292-2EB8" TYPE="exfat" PARTUUID="eefca9f3-01"
The last line shows the external hard disk. For mounting now the UUID is needed, in this case 9292-2EB8. Now again the file /etc/fstab is created with
sudo nano /etc/fstab
and insert the entry for this external harddisk. The file looks like this:
proc            /proc           proc    defaults          0       0
PARTUUID=afd7b074-01  /boot           vfat    defaults,noatime  0       2
PARTUUID=afd7b074-02  /               ext4    defaults,noatime  0       1

# Musik Disk
UUID=9292-2EB8 /media/usb-drive exfat utf8,uid=pi,gid=pi,noatime 0

# Log to RAM
tmpfs   /tmp            tmpfs   defaults,noatime,nosuid,mode=1777,size=256m 0 0
tmpfs   /var/log        tmpfs   defaults,noatime,nosuid,mode=0755,size=128m 0 0
tmpfs   /var/tmp        tmpfs   defaults,noatime,nosuid,mode=0755,size=128m 0 0

# a swapfile is not a swap partition, no line here
#   use  dphys-swapfile swap[on|off]  for that
After a reboot, the external hard drive should now be available under /media/usb-drive.
Set up Samba share
In order to conveniently copy the music files to the Squeezebox server from the PC, it is helpful to create a shared folder with Samba. To do this, the Samba package must first be installed. The question about the WINS server can be answered with No.
sudo apt-get install samba
After that, the shared folder is configured in the /etc/samba/smb.conf file:
sudo nano /etc/samba/smb.conf
The following configuration is added to the end of the file:
[Musik]
 comment=Raspberry Pi Share
 path=/media/usb-drive
 browseable=Yes
 writeable=Yes
 only guest=no
 create mask=0644
 directory mask=0755
 public=no
Now you have to create a Samba user. I use the user pi again with the same password as above.
sudo smbpasswd -a pi
After a restart the Samba service with
sudo service smbd restart
you can mount the network drive on your PC. When logging in, enter the user that has just been created. Now you can easily copy the music collection to the hard disk of the Squeezebox server.
Logitech Media Server
Now comes the actual server software. I do not use the nighlty packages, but stay on the stable branch. For the Raspberry you have to download the software for arm architecture. Currently it is the version 8.2.0.
wget https://downloads.slimdevices.com/LogitechMediaServer_v8.2.0/logitechmediaserver_8.2.0_arm.deb
The installation of the package and some libraries for encoding is done with
sudo apt-get --fix-broken install libio-socket-ssl-perl
sudo dpkg -i logitechmediaserver_8.2.0_arm.deb
sudo apt-get install -y libsox-fmt-all libflac-dev libfaad2
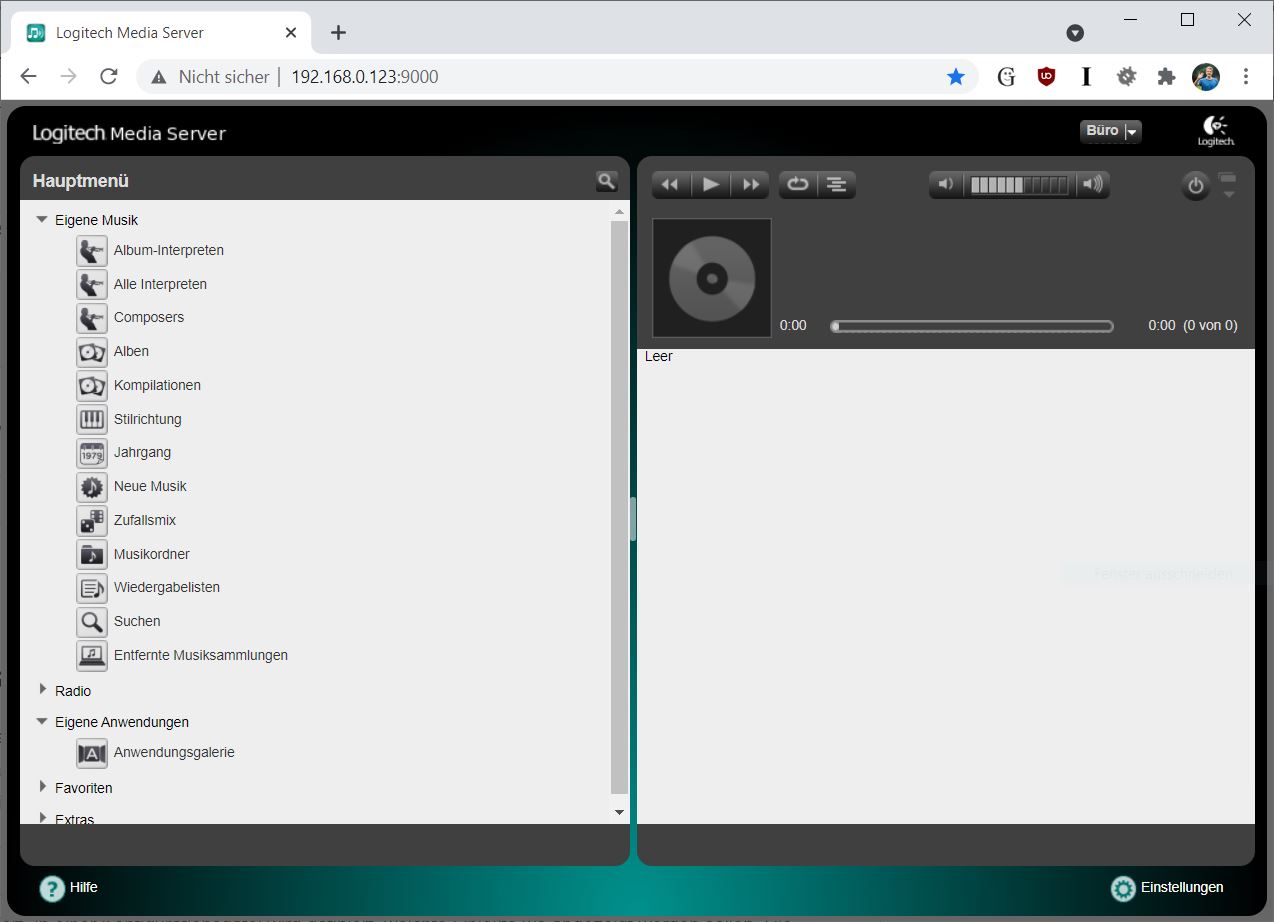
That is all. The server is now accessible under port 9000 with the respective IP address. With me this is
http://192.168.0.123:9000/
A setup wizard then opens in the browser, with which the most important basic settings of the Logitech Media Server can be made. After the setup is complete, the actual start page appears.
However, there is still a small problem. After a reboot of the Raspberry the server would not start anymore. This is because the /var/logs path above has been moved to a temporary directory. When installing the server package, a subfolder squeezeboxserver was created in the logs directory. Since all changes are only present in RAM, this directory consequently no longer exists after the reboot. Actually, services should automatically create the necessary directories at startup, but Logitech Media Server seems to have a problem with this. Therefore this directory has to be created when starting the service. To do this, edit the startup script with
sudo nano /etc/init.d/logitechmediaserver
and insert the bold marked part:
# Read config file if it is present.
if [ -r /etc/default/$NEWNAME ]; then
        . /etc/default/$NEWNAME
elif [ -r /etc/default/$NAME ]; then
        . /etc/default/$NAME
fi

# Create Logfiles directory
if [ ! -d /var/log/$NAME ]; then
  mkdir /var/log/$NAME/
  chown squeezeboxserver:nogroup /var/log/$NAME/
fi
For this change to take effect, the command
sudo systemctl daemon-reload
must be executed. Now the Squeezebox server will boot correctly even after a reboot.
Set up system monitor
What is still missing is a small program to monitor the system and show the most important data on the display. For this purpose there is a small but versatile system monitor called Conky. The package is simply installed with
sudo apt-get install conky
A configuration file defines which objects should be displayed where. The configuration is done with
nano .config/.conkyrc
and then copy the following content into it:
conky.config = {
    alignment = 'top_left',
    double_buffer = true,
    background = false,
    border_width = 0,
    cpu_avg_samples = 2,
    default_color = 'white',
    default_outline_color = 'white',
    default_shade_color = 'white',
    draw_borders = false,
    draw_graph_borders = true,
    draw_outline = false,
    draw_shades = false,
    use_xft = true,
    font = 'LiberationMono:bold:size=9',
    gap_x = 0,
    gap_y = 0,
    minimum_width = 315,
    maximum_width = 320,
    minimum_height = 240,
    maximum_height = 240,
    net_avg_samples = 2,
    no_buffers = true,
    out_to_console = false,
    out_to_stderr = false,
    extra_newline = false,
    own_window = true,
    own_window_class = 'Conky',
    own_window_type = 'desktop',
    stippled_borders = 0,
    update_interval = 1.0,
    uppercase = false,
    use_spacer = 'none',
    show_graph_scale = false,
    show_graph_range = false
}

conky.text = [[
${color grey}Time: $color${time %a %d. %b %k:%M}  ${color grey}Uptime: $color$uptime
${color grey}CPU: $color$freq MHz    ${color grey}GPU: $color$freq_g GHz
${color grey}Temperature: $color$acpitemp °C
${color grey}CPU Usage:$color $cpu% ${cpubar 6}
${color grey}RAM Usage:$color $mem/$memmax - $memperc% ${membar 6}
${color grey}Networking:  Up: $color${upspeed wlan0}${color grey} - Down: $color${downspeed wlan0}

${color grey}File systems:
${color grey} SD Card $color${fs_used /}/${fs_size /} ${fs_bar 6 /}
${color grey} Disk    $color${fs_used /media/usb-drive}/${fs_size /media/usb-drive} ${fs_bar 6 /media/usb-drive}

${color grey}Name                PID     CPU%    MEM%
${color lightgrey} ${top name 1}   ${top pid 1}  ${top cpu 1}  ${top mem 1}
${color lightgrey} ${top name 2}   ${top pid 2}  ${top cpu 2}  ${top mem 2}
${color lightgrey} ${top name 3}   ${top pid 3}  ${top cpu 3}  ${top mem 3}
${color lightgrey} ${top name 4}   ${top pid 4}  ${top cpu 4}  ${top mem 4}
]]
In order to start Conky automatically after booting, a corresponding file must be created with
mkdir -p .config/autostart
nano .config/autostart/conky.desktop
and insert the following content:
[Desktop Entry]
Type=Application
Name=Conky
Comment=Conky starten
Exec=/usr/bin/conky -b -c /home/pi/.config/.conkyrc
To deactivate the screensaver, a file is created again with the commands
mkdir -p .config/lxsession/LXDE-pi
nano .config/lxsession/LXDE-pi/autostart
and this content is inserted:
@xset s 0 0
@xset s noblank
@xset s noexpose
@xset dpms 0 0 0
What is still disturbing is the mouse pointer in the middle of the display. This can be changed in the file
sudo nano /etc/lightdm/lightdm.conf
For this you have to find the line
#xserver-command=X
and change it as follows:
xserver-command=X -nocursor
Finally, the Setup Wizard is deactivated:
sudo rm /etc/xdg/autostart/piwiz.desktop
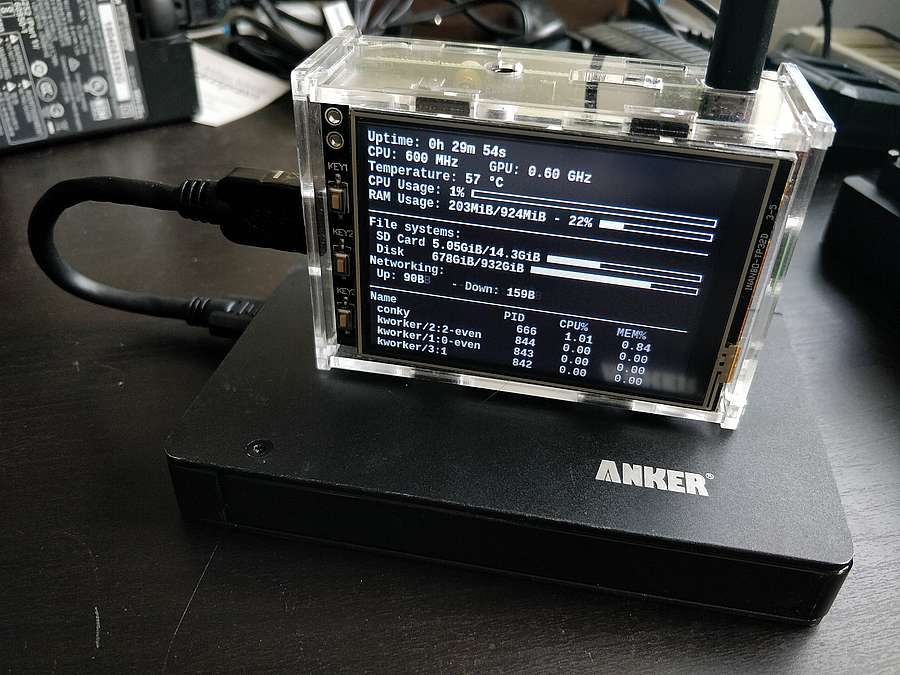
After a final reboot it should look like this. The display is of course pure gimmick and not necessary for the operation of the Squeezebox server. But I like to know how my server is doing :)
The Logitech Media Server is now installed and ready to go. As written above, the system has been running for a few years now without any problems. Maybe I will replace the hard drive with an SSD at some point, but that's not urgent. But regular backups of the hard disk are very important! There is a lot of work in my music collection and I would not like to start from scratch.
If anything in the instructions is unclear or an error has crept in, just leave me a message.