CrowPanel Advance 7" ESP32-P4: High-Performance HMI with RISC-V and MIPI-DSI
After reviewing the CrowPanel Advance Display with the ESP32-S3 and its update some time ago, this time I would like to introduce you to the new CrowPanel Advance 7" ESP32-P4 HMI AI Display.
While the ESP32-S3 already offers many possibilities for numerous HMI applications, it has one fundamental problem: the parallel display occupies 20 GPIO pins of the microcontroller just to transmit the image data. This means that you can either barely use any other peripherals on the display or have to resort to cumbersome hardware workarounds. On older CrowPanels, I/O extenders, an additional microcontroller, or analog switches were used for this purpose.
By using the ESP32-P4, Espressif's current flagship product, these limitations are now eliminated. In addition to 55 GPIOs, the ESP32-P4 offers dedicated high-speed interfaces: MIPI-DSI for the display and MIPI-CSI for cameras. MIPI stands for Mobile Industry Processor Interface – a standard that was originally developed to connect the main processor in smartphones efficiently and quickly to peripherals such as cameras, displays, or sensors.
The technical specifications of the new display leave virtually nothing to be desired:
- SoC: Espressif ESP32-P4 (Dual-Core RISC-V @360 MHz + LP-Core @40 MHz )
- Memory: 32 MB PSRAM, 16 MB NOR Flash
- Display: 7-inch IPS Panel (1024 x 600 Pixel, 400 cd/m²), capacitive touch (GT911)
- Interfaces: MIPI-DSI (2-Lane) and MIPI-CSI (2-Lane) for camera
- ESP32-C6 (WiFi 6, Bluetooth 5.4, Zigbee/Thread/Matter Support)
- Slot for modules (e.g., LoRa SX1262, nRF2401)
- Peripherals: 1x USB 2.0 (OTG), 1x USB-UART, microSD slot, digital microphone, speaker amplifier, charge controller for LiPo battery, various GPIOs (I2C, UART)
As with the predecessors, the build quality of the board is very high. The PCB layout is clean and even provides space for two small speakers that are included with the display.
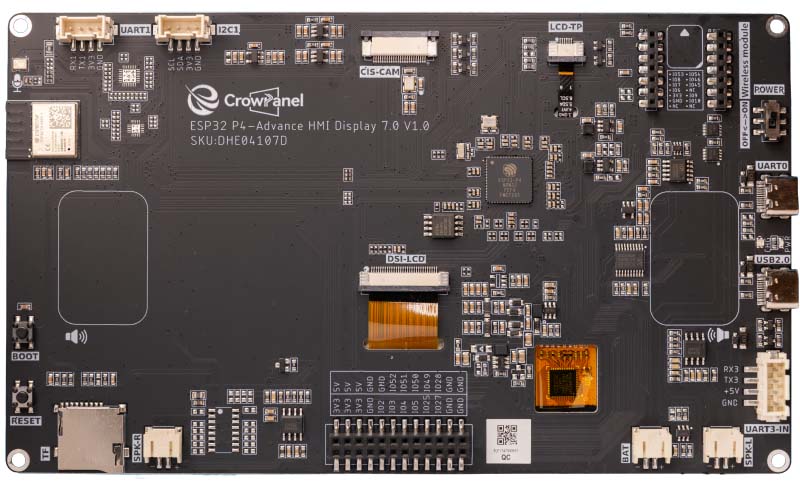
The most important components on the display are:
- The heart is the ESP32-P4 SoC. It is significantly larger than the familiar S3 chips, which is primarily due to the many GPIOs and the MIPI high-speed interfaces.
- The ESP32-C6-MINI-1 module soldered on the top left handles all wireless communication (WiFi 6, Bluetooth, Zigbee), since the P4 itself has no radio unit.
- At the top right is again the slot for the optional wireless modules (e.g., for LoRa).
- Multimedia interfaces:
- Center: The wide ribbon connector (DSI-LCD) connects the display via MIPI-DSI.
- Top center: The connector (CSI-CAM) is the MIPI-CSI port for camera. This is labeled "CIS-CAM". The CSI interface is probably meant here.
- USB ports (right):
- UART0: Used for flashing and debugging (classically via USB-to-UART bridge).
- USB2.0: This is the native USB port of the P4 (with up to 480 Mbit/s), usable for OTG applications (e.g., connecting keyboards or USB sticks).
- At the bottom are two connectors for speakers (SPK-L / SPK-R), which enables stereo sound, as well as an onboard microphone (top left, labeled with the microphone symbol).
- GPIOs (bottom): For expansions, the black pin header at the bottom is important. Various GPIOs as well as power supply (3V3, 5V) are routed out here.
- UART1: The ESP32-C6 can be programmed via this interface.
- Additionally, there are connectors for I2C, UART3, and a LiPo battery.
To better illustrate the interconnection of the components, I have summarized the structure again in a diagram:
In this diagram, you can see at first glance that finally no compromises are necessary to connect all components.
An interesting detail is the microcontroller next to the TP4059 charge controller. Normally, you would connect all necessary pins with the ESP32-P4. Instead, Elecrow uses a microcontroller of type STC8H1K08, which is connected to the ESP32-P4 via the I2C bus. The charge controller is therefore addressed like a special I2C device. In the GitHub repository with the examples for this display, I found no information on how the microcontroller is addressed, but in the examples for the 5-inch variant of the display there is the corresponding source code.
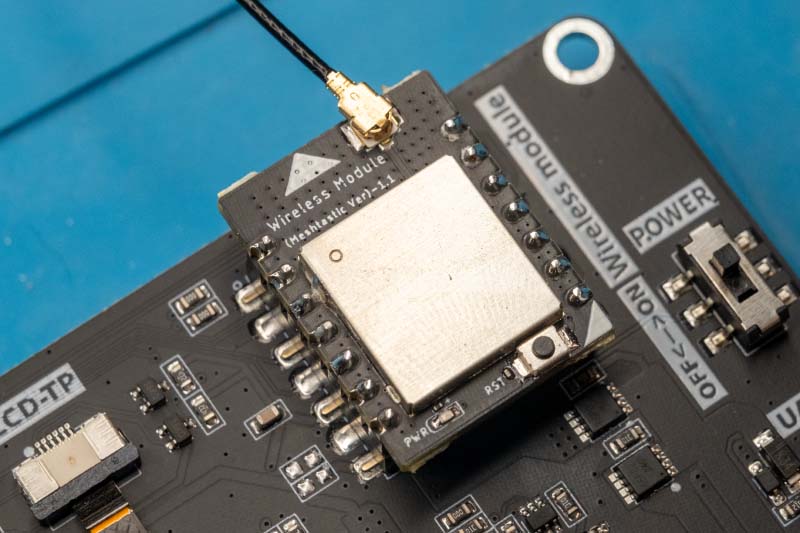
Wireless Modules
The new CrowPanel display also supports wireless modules again to extend the functionality of the display. The modules are connected to the display via a 2 x 7 pin GPIO header. The pin arrangement looks as follows:
Currently, Elecrow offers the following modules:
- Wi-Fi HaLow: This module uses the Wi-Fi HaLow standard (IEEE 802.11ah). Unlike conventional Wi-Fi, this technology does not operate in the 2.4 GHz band, but in the sub-1 GHz range (approx. 900 MHz). The physical advantage of this lower frequency is a significantly higher range (up to 1 km) as well as much better penetration of walls and massive obstacles. Technically, Wi-Fi HaLow fills the gap between the extremely long-range but slow LoRa and the fast but short-range standard Wi-Fi.
- ESP32-H2: This module is based on the IEEE 802.15.4 standard as well as Bluetooth 5.2 (LE). Unlike the classic WLAN connection, this technology is specifically designed for energy-saving mesh networks, as known from home automation. The technical advantage lies in the native support of protocols such as Zigbee 3.0 and Thread, which makes the module the ideal basis for the new Matter standard. Technically, the ESP32-H2 thus enables seamless integration into modern smart home ecosystems, where stable networking is more important than high data rates.
- ESP32-C6: At first glance, this module seems redundant, since a C6 chip is already permanently soldered on the mainboard. However, the crucial difference from the previously mentioned H2 module is the Wi-Fi: While the H2 is purely limited to 802.15.4 (Thread/Zigbee), the C6 module additionally supports WiFi 6. This enables scenarios that are not feasible with the H2: You get a second, physically separate WLAN interface. For example, the display can simultaneously hang as a client in the home network (via the onboard chip) and in parallel span its own access point for sensors or a dedicated ESP-NOW mesh network (via the module), without the traffic loads interfering with each other.
- nRF2401: This module is based on the extremely popular nRF24L01+ chip. Although it operates in the 2.4 GHz band like WLAN, it uses a proprietary, very lean protocol (Enhanced ShockBurst). The advantage lies in direct, delay-free communication with minimal energy consumption. Technically, this module is ideal for simple point-to-point connections, such as for a remote control or a sensor that should send data directly to the display without the overhead of a complex WLAN network.
- SX1262: This module is based on the Semtech SX1262 transceiver and uses LoRa technology (Long Range) in the sub-GHz range. Unlike the other radio standards, the focus here is on maximum range, which can be several kilometers in open field, but at very low data rates. The technical advantage of the SX1262 over older LoRa chips (such as the SX127x) is the more efficient power consumption and higher transmission power. Technically, this module is therefore predestined for LoRaWAN applications or the popular Meshtastic project to build decentralized text messenger networks completely without internet and mobile network.
I still think the wireless modules are a great idea. They allow you to specifically expand the board for specific scenarios. This makes the CrowPanel an absolute all-rounder: Depending on project requirements, you simply add the required radio standard, whether it's LoRa for high ranges or Zigbee for the smart home. Of course, other displays also have expansion ports, but the manufacturers don't offer corresponding hardware modules.
Development with ESP-IDF
In my previous tests of the Elecrow displays, I developed a small demo with the ESP-IDF framework to demonstrate some features of the display and especially the use of the LVGL library. This is not necessary this time, as Elecrow has provided a comprehensive repository on GitHub in which all aspects of the display are covered:
- Basics: Hello World, LED, serial communication
- Display & Touch: LVGL UI development, touchscreen handling
- Multimedia: Audio recording/playback, camera livestream, SD card access
- Wireless: LoRa (SX1262), nRF2401, WiFi functions
- Peripherals: USB 2.0, temperature/humidity
For the examples, there is a comprehensive tutorial in which each example is explained precisely with photos. Additionally, there is a wiki with basic information on installing the Espressif plugin for Visual Studio Code and other topics.
I tried some of the examples and almost all of them compiled and flashed without problems. However, one small detail must be noted to avoid error messages: In some examples, the local .vscode folder was uploaded to the repository. It contains a settings.json that references the developer's local paths. The fix is simple: Just delete the entire .vscode folder before opening the project in VS Code. Afterward, the environment cleanly rebuilds the configuration and the project compiles without errors.
Matching my recently developed LoRa test tool, I wanted to try out whether my Heltec board can send data to the display. First, I tested an older LoRa module, which however led to errors in the ESP32 log. This module appears to be defective. With the new version 1.1 that Elecrow sent along, the connection worked right away.
The output on the screen is simple, but proves that the display correctly receives the LoRa packets.
In Elecrow's example code, I only had to adjust the frequency and the connection was established. This small experiment shows very nicely how flexibly the display can be used in practice through the various modules.
Wireless Connections: The Interaction of P4 and C6
Unlike almost all other chips in the ESP32 family, Espressif positions the ESP32-P4 as a pure high-performance MCU. This means the P4 has no hardware for WiFi or Bluetooth whatsoever. To compensate for this shortcoming, it is usually paired with another microcontroller such as the ESP32-C6. The CrowPanel Advance ESP32-P4 display also uses the C6 as a coprocessor.
For development, this would have far-reaching consequences. As soon as you want to use WiFi or Bluetooth, you would actually have to program two microcontrollers and implement a communication protocol between them. Espressif has therefore developed the ESP-Hosted-MCU solution to avoid this complexity. A special firmware runs on the C6 that essentially degrades it to a pure WLAN adapter. The P4 sends network commands via SPI/SDIO to the C6, and it executes them. For the application on the P4, it feels as if it has native WLAN. The following diagram from Espressif illustrates the complexity of this solution:
But unfortunately, there is a problem here. ESP-Hosted currently (still) does not support ESP-NOW. I am in contact with a developer from Espressif and it is also planned to integrate ESP-NOW, but there is no timeline for this yet. However, as soon as Espressif has implemented the ESP-NOW protocol, one could update the firmware of the ESP32-C6 and also use this protocol. For this purpose, other manufacturers such as Waveshare or even the cheap yellow displays integrate a UART port to be able to flash the ESP32-C6 with a simple USB-to-serial adapter.
This UART port is unfortunately missing on the CrowPanel display. Although some solder pads are drawn in the schematic of the display, they are not accessible. Therefore, it is fundamentally not possible on this display to ever update the firmware of the C6. I have already contacted Elecrow support about this, but have not yet received a response. Of course, you could now simply use a C6 module in the expansion slot, but this would require implementing your own communication protocol between the P4 and C6 and you could no longer use any other modules.
Conclusion
The CrowPanel Advance 7" ESP32-P4 is a great display. The hardware is cleanly manufactured and it offers plenty of expansion possibilities. With the ESP32-P4, even computationally intensive applications up to small AI models can be easily implemented. The only weak point is the missing UART port for the ESP32-C6, which makes it impossible to update Espressif's ESP-Hosted solution. However, if you only need WiFi or Bluetooth connections for your project, there is currently hardly a better and more flexible display on the market. Elecrow also offers the display in 5", 9", and 10" by the way. The hardware is identical across all variants except for the display size.
For my weather station, however, this means that this display is not an option, since ESP-NOW is the central protocol of the wireless sensors. I will also support the LoRa protocol in the future, but this is only an extension and should not replace the existing sensors.