ESP32: WiFi Provisioning with SoftAP and Captive Portal
By now, I have implemented several projects with the ESP32, such as the Zyklochron, the slave clocks, or the aquarium lighting, as these microcontrollers have an integrated WLAN interface, which greatly simplifies the development of IoT applications. The problem for these "headless" devices (devices without a screen and keyboard) is always the "first contact," i.e., how to get the ESP32 onto your own WiFi network.
So far, I have used my SmartConfig library for this, which generally works very well. However, provisioning requires a smartphone app, which is not provided by Espressif. Although the source code for this app is available on GitHub for both Android and iPhone, it seems that Espressif itself prefers other provisioning methods.
These provisioning methods are principally divided into two types:
In-band Provisioning: Uses exclusively the WiFi wireless network to transmit network information. This includes methods like Wi-Fi Protected Setup (WPS), Access Point Mode, and SmartConfig. SmartConfig, a method developed by Texas Instruments, for example, uses the lengths of data packets to encode network data, which is then sent via UDP.
Out-of-band Provisioning: Uses another medium, whether wired (e.g., USB) or wireless (e.g., Bluetooth, NFC, or even light signals/sounds). With WPA3, Wi-Fi Easy Connect (DPP) via QR codes or NFC tags was also introduced here.
The Espressif SDK offers extensive support for provisioning, and corresponding apps for Bluetooth and SoftAP provisioning are also available in the Apple and Google app stores.
However, in the future, I no longer want to be dependent on any app, so out-of-band provisioning is out of the question in this case. An app is also necessary for SmartConfig, which is why I opted for the Access Point method (SoftAP) with a Captive Portal. This also makes it easy to send other data, such as the time zone, in addition to the SSID and password, so that the ESP32 can set the correct time immediately.
SoftAP with a Captive Portal - How it Works
To transmit WiFi credentials, the ESP32 is temporarily turned into a fully-fledged network host. This process is realized through the interaction of three services that are started on the microcontroller: an Access Point (AP), a DNS server, and a web server.
Step 1: Establishing the Access Point
First, the ESP32 is put into Access Point mode. Instead of connecting to an existing network, the ESP32 creates its own local WiFi network with a specific SSID (e.g., "ESP32-Setup"). This network is usually unsecured to simplify the initial connection for the user. Any WiFi-enabled device can now connect directly to the ESP32.
Step 2: Automatic Redirection via DNS (Captive Portal)
After a device connects to the ESP32's WiFi, the crucial step takes place. Modern operating systems (iOS, Android, etc.) automatically perform a connectivity check after connecting to a new network. To do this, they try to reach a manufacturer-specific webpage, such as captive.apple.com for Apple devices or connectivitycheck.gstatic.com for Android.
This is where the DNS server started on the ESP32 intervenes:
- The smartphone's request for the IP address of captive.apple.com is sent not to the internet, but to the DNS server on the ESP32.
- The only task of this DNS server is to intercept every domain request and respond with the IP address of the ESP32 itself (by default 192.168.4.1).
So, the smartphone asks, "Where can I find captive.apple.com?" and the ESP32 replies, "That's me, 192.168.4.1."
Step 3: Delivering the Configuration Page
Due to the DNS redirection, the smartphone's browser now tries to load a webpage from the address 192.168.4.1. At this point, the third service, the web server on the ESP32, takes over. Instead of the simple text response that the operating system expects, the web server delivers a complete HTML webpage - the configuration interface. The smartphone's operating system recognizes that it is in a Captive Portal and automatically opens this page in a special browser window.
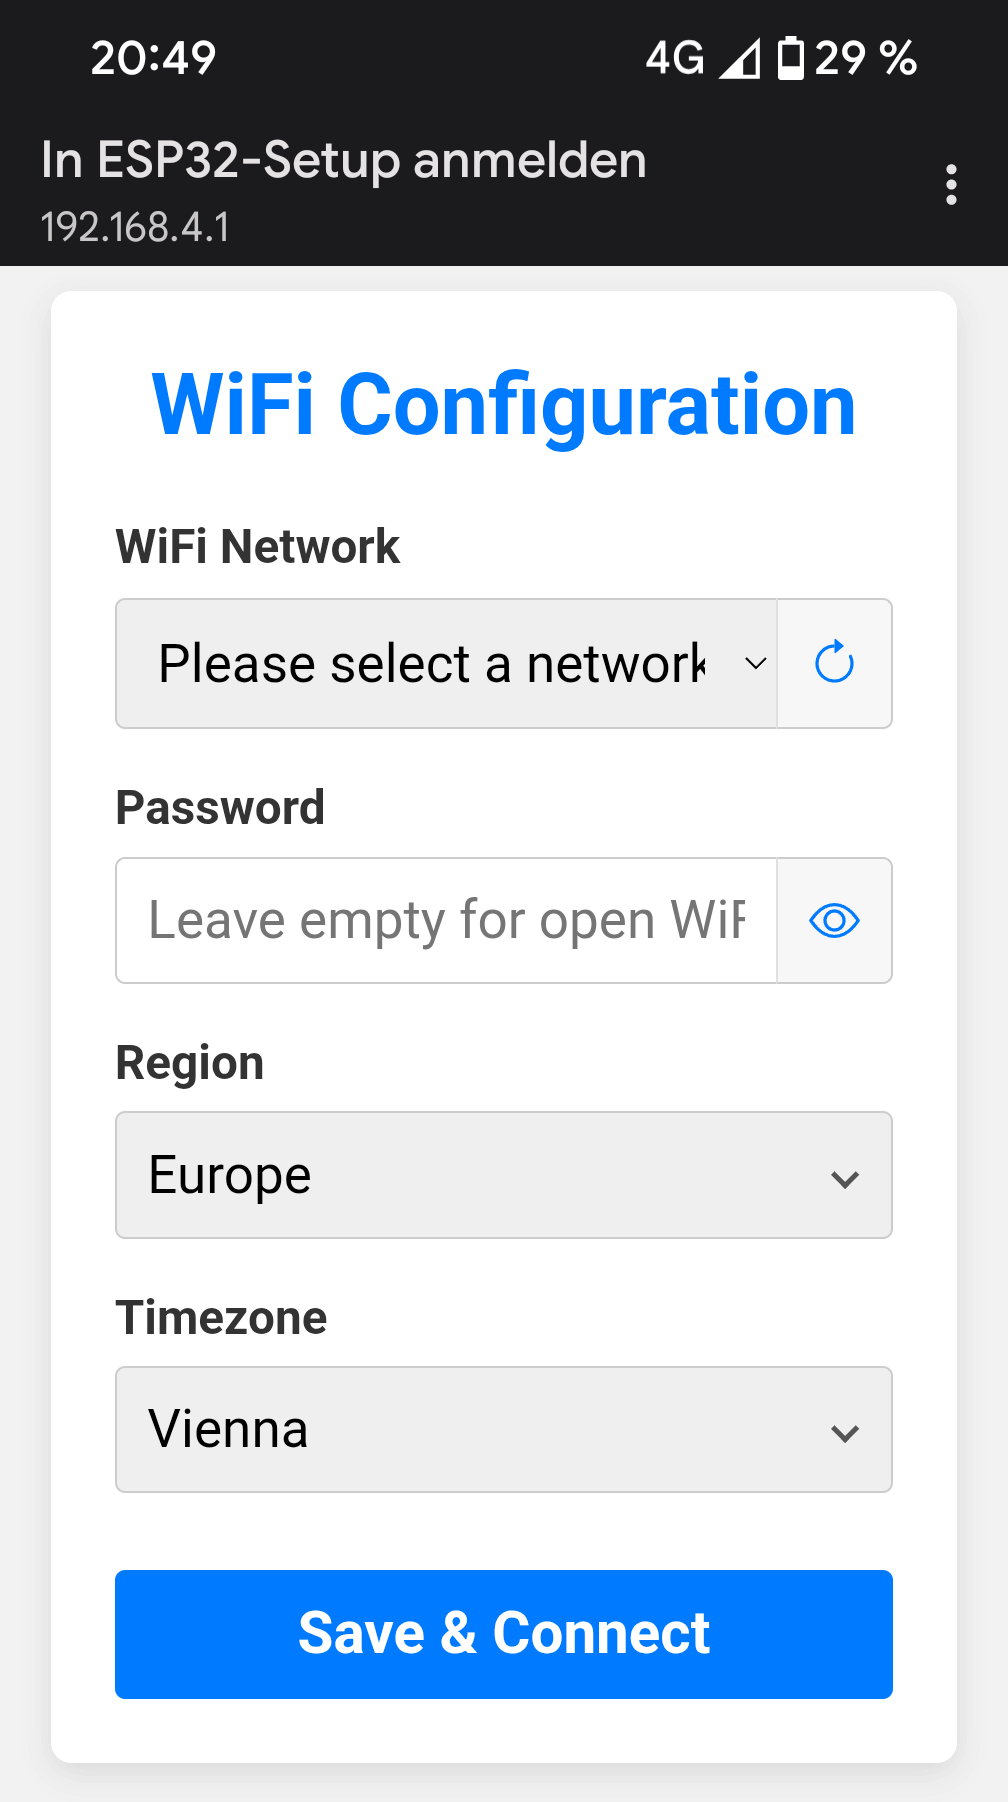
The user is now shown a web page for selecting the Wi-Fi network and entering the password. The region and time zone are selected automatically based on the smartphone settings, but can be changed if necessary.
Step 4: Receiving and Storing the Credentials
When the user enters the SSID and password and confirms the input, the browser sends an HTTP POST request to the ESP32's web server. The received data is extracted from the request and stored for permanent saving in the NVS (Non-Volatile Storage), a special flash memory area of the ESP32. This ensures the credentials are retained even after a restart.
Step 5: Switching to Client Mode
After the data has been successfully saved, the state change is initiated. The services started for provisioning are shut down in reverse order, and the "ESP32-Setup" WiFi network disappears. A complete deinitialization of the WiFi stack ensures that the system is reset to a defined initial state.
Step 6: Final Connection
Finally, the WiFi stack is re-initialized, but this time in Station mode (STA). The ESP32 reads the credentials stored in the NVS and connects to the WiFi network configured by the user. As soon as an IP address is obtained from the router via DHCP, the process is complete, and the microcontroller is ready for use in the local network. If the connection fails, the ESP32 retries the connection a few times, and if it still fails, the connection data is deleted, and the ESP32 is restarted.
Structure and Functions of the Library
The WifiProvisioner library is designed as a C++ class that encapsulates the entire network configuration process. It was developed as a pure ESP-IDF project, as I rarely use the Arduino framework. The functionality of the library can best be explained by its central public methods:
start_provisioning() – The Configuration Process
This method is the starting point for the initial configuration. It is blocking, which means it pauses the program's execution until the user has submitted the WiFi data via the captive portal. Internally, it orchestrates the interaction of all necessary services:
- Starts the ESP32 in Access Point mode.
- Activates the DNS server for automatic redirection (captive effect).
- Activates the web server that delivers the configuration page.
- Waits for an internal signal from the web server confirming the receipt of the data.
- Performs a clean deinitialization of all services after receiving the data.
esp_err_t WifiProvisioner::start_provisioning(const std::string& ap_ssid, bool persistent_storage, const std::string& ap_password) {
    _persistent_storage = persistent_storage;

    ESP_LOGI(TAG, "Starting provisioning mode...");
    ESP_ERROR_CHECK(start_ap_(ap_ssid, ap_password));
    start_dns_server();
    ESP_ERROR_CHECK(start_web_server_());

    ESP_LOGI(TAG, "Provisioning running. Waiting for user to submit credentials...");

    // Pauses execution until the data is received via the web form
    xEventGroupWaitBits(_provisioning_event_group, PROV_SUCCESS_BIT,
                        pdTRUE, pdFALSE, portMAX_DELAY);

    ESP_LOGI(TAG, "Credentials received. Shutting down provisioning services.");

    // Shuts down all services
    stop_dns_server();
    stop_web_server_();
    shutdown_wifi_(); // Includes esp_wifi_stop() and esp_wifi_deinit()

    return ESP_OK;
}
is_provisioned() – The State Check
This simple helper function checks whether valid WiFi credentials are already stored in the NVS (Non-Volatile Storage) of the ESP32. It allows the main application to decide at startup whether the configuration process needs to be started or if a connection can be established directly.
bool WifiProvisioner::is_provisioned() {
    nvs_handle_t h;
    if(nvs_open(PROV_NVS_NAMESPACE, NVS_READONLY, &h) != ESP_OK) return false;

    size_t required_size = 0;
    // Checks if the key "ssid" exists and has a length > 0
    bool key_exists = nvs_get_str(h, "ssid", NULL, &required_size) == ESP_OK && required_size > 1;

    nvs_close(h);
    return key_exists;
}
connect_sta() – Establishing the Connection
After the credentials have either been received through provisioning or loaded from the NVS, this function initiates the actual connection to the target WiFi network.
- Initializes the WiFi stack in Station mode.
- Configures the ESP32 with the previously loaded credentials (SSID and password).
- Sets the device's hostname.
- Starts the WiFi driver, which then establishes the connection in the background.
esp_err_t WifiProvisioner::connect_sta(const char* hostname) {
    // Ensures the WiFi system is initialized
    if (!wifi_initialized_) {
        init_wifi_();
    }

    // Configures the hostname for the STA interface
    esp_netif_t *sta_netif = esp_netif_get_handle_from_ifkey("WIFI_STA_DEF");
    if (sta_netif) {
        ESP_ERROR_CHECK(esp_netif_set_hostname(sta_netif, hostname));
    }

    // Creates the WiFi configuration with the class member variables
    wifi_config_t wifi_config = {};
    strncpy((char*)wifi_config.sta.ssid, _ssid.c_str(), sizeof(wifi_config.sta.ssid));
    strncpy((char*)wifi_config.sta.password, _password.c_str(), sizeof(wifi_config.sta.password));

    // Starts the WiFi stack in Station mode
    ESP_ERROR_CHECK(esp_wifi_set_mode(WIFI_MODE_STA));
    ESP_ERROR_CHECK(esp_wifi_set_config(WIFI_IF_STA, &wifi_config));
    ESP_ERROR_CHECK(esp_wifi_start());

    // Sets the time zone
    setenv("TZ", _timezone.c_str(), 1);
    tzset();

    return ESP_OK;
}
Das Frontend – HTML and JavaScript
The entire user interface for the provisioning process is provided by an embedded HTML file. Scanning for networks and submitting the data is handled by client-side JavaScript. The interaction between the frontend (user's browser) and the backend (web server on the ESP32) is based on two central endpoints: /scan.json for retrieving networks and /save for sending the configuration.
1. The WiFi Scan and Populating the Selection List
As soon as the page is loaded in the browser (window.onload), an asynchronous request is immediately sent to the ESP32 to scan for available WiFi networks.
- A JavaScript fetch request is sent to the /scan.json endpoint.
- The ESP32 performs a WiFi scan and sends back a JSON-formatted list of the networks found. This response is an array of objects, each containing the SSID and signal strength (RSSI).
- The JavaScript processes this JSON response. It clears the initial "Scanning..." message from the dropdown list and inserts the found networks.
// --- WiFi scan logic ---
fetch('/scan.json')
    .then(response => response.json()) // Interpret response as JSON
    .then(data => {
        // Clear the dropdown and initialize with "Please select a network"
        ssidSelect.innerHTML = '<option value="">Please select a network</option>';

        if (data.aps && data.aps.length > 0) {
            // Create a new option for each network found
            data.aps.forEach(ap => {
                const option = new Option(ap.ssid, ap.ssid);
                ssidSelect.add(option);
            });
        } else {
            ssidSelect.innerHTML = '<option value="">No networks found</option>';
        }
        // Hide the loading animation
        loader.style.visibility = 'hidden';
    })
    .catch(error => {
        // Error handling if the scan fails
        console.error('Error during WiFi scan:', error);
        ssidSelect.innerHTML = '<option value="">Scan failed</option>';
        loader.style.visibility = 'hidden';
    });
2. The Linked Time Zone Selection
To allow for easy selection of the time zone, a two-step logic is used: First, a region (e.g., "Europe") is selected, and then a specific time zone (e.g., "(GMT+01:00) Amsterdam, Berlin...").
- The list of all time zones is stored directly in the JavaScript as an array of objects. Each object contains a user-friendly description and the technical POSIX value.
- The script initially populates only the region selection. When the user selects a region, the script filters the large time zone array and fills the second dropdown list with only the matching entries.
- The technical POSIX string required by the ESP32 is stored in the background in a hidden input field (<input type="hidden">) and is sent along when the form is submitted.
3. Submitting the Configuration to /save
When the user submits the completed form, the browser's default behavior is prevented, and the data is also sent asynchronously via fetch
- An event listener on the form's submit event intercepts the click on the "Save & Connect" button.
- Using new FormData(form), all completed form fields (SSID, password, and the value from the hidden time zone field) are automatically prepared for sending.
- The data is sent via HTTP POST to the /save endpoint on the ESP32.
- After submission, the button is disabled. On a successful response from the ESP32, the entire form area is replaced with a success message informing the user that the process is complete and they can close the window.
// --- Form submit logic ---
form.addEventListener('submit', function(event) {
    event.preventDefault(); // Verhindert das Neuladen der Seite

    // Send the form data to the ESP32
    fetch('/save', {
        method: 'POST',
        body: new URLSearchParams(new FormData(form))
    })
    .then(response => {
        if (response.ok) {
            // Show the success message
            mainContainer.innerHTML = `
                <h1>Configuration Received</h1>
                <p>The device will now attempt to connect to the WiFi.</p>`;
        } else {
            // Show an error message
            throw new Error('Server response was not OK');
        }
    })
    .catch(error => { /* Fehlerbehandlung */ });
});
Configuration
The user interface files for each language (index_xx.html, style.css) are embedded directly into the firmware.
This is configured in components/wifi_provisioner/CMakeLists.txt:
# ...
target_add_binary_data(${COMPONENT_TARGET} "web/index_en.html" TEXT)
target_add_binary_data(${COMPONENT_TARGET} "web/style.css"  TEXT)
and in components/wifi_provisioner/wifi_provisioner.cpp:
# ...
extern const char root_html_start[] asm("_binary_index_en_html_start");
extern const char root_html_end[]   asm("_binary_index_en_html_end");
Application Example
The following example shows how these functions work together in a typical app_main function to implement the startup process:
#include "freertos/FreeRTOS.h"
#include "freertos/task.h"
#include "esp_log.h"
#include <time.h>
#include "wifi_provisioner.hpp"

static const char* TAG = "MAIN_APP";

extern "C" void app_main(void) {
    ESP_LOGI(TAG, "Application starting...");

    WifiProvisioner provisioner;

    // STEP 1: Decide if configuration is needed
    if (provisioner.is_provisioned()) {
        // Option A: Device is already configured. Load data from NVS.
        provisioner.get_credentials();
    } else {
        // Option B: Device is new. Start the provisioning process.
        provisioner.start_provisioning("ESP32-Setup", true);
    }

    // STEP 2: Connect
    // This function uses the data that was either loaded or newly received in Step 1.
    provisioner.connect_sta("My-ESP32");

    // Infinite loop for the actual main application
    ESP_LOGI(TAG, "Main application logic can now run. Waiting for WiFi events...");
    while(true) {
        time_t now;
        struct tm timeinfo;
        char strftime_buf[64];

        time(&now);
        localtimer(&now, &timeinfo);

        // Check if time has been synchronized from the NTP server
        if (timeinfo.tm_year < 100) {
            ESP_LOGI(TAG, "Time is not yet synchronized.");
        } else {
            strftime(strftime_buf, sizeof(strftime_buf), "%A, %d. %B %Y %H:%M:%S", &timeinfo);
            ESP_LOGI(TAG, "Current local time: %s", strftime_buf);
        }

        vTaskDelay(pdMS_TO_TICKS(1000));
    }
}
Conclusion
This article has become quite detailed, but I have attempted to explain everything as detailed as possible so that I will still understand the code later on. :-)
In the near future, I will gradually integrate this provisioning method into my ESP32 projects to test its stability and everyday usability. The source code for the library is, as always, on GitHub. If you have any questions or comments, just leave me a message.