Using a GPS module to set the correct time for the Raspberry PI 3 A+ without a network
One of the biggest disadvantages of the Raspberry PI is the lack of a battery-backed clock. Normally this does not matter much because the Raspberry is connected to a network and can get the time via the Network Time Protocol (NTP) when it is started. However, there are situations where no network is available and you still need the exact time.
I am currently building version 2.0 of the Zyklochron. Of course, the clock should show the correct time everywhere without having to connect it to a Wi-Fi network. This was not a problem for the prototype, but a product ready for sale needs a different solution.
The simplest would be to install an RTC (real-time clock) module. However, this variant fails for a purely practical reason. My clock does not have any buttons to initially set the time. The second obvious solution would be a DCF77 receiver. I tried that too. Basically, the receiver delivered a time signal, but as soon as the stepper motor driver was in operation, nothing came. Unfortunately, this confirmed what you can often read on the net, namely that a DCF77 receiver reacts very sensitively to interference signals. The third option would be a GPS receiver, because the GPS signal not only transmits the position, but also the exact time. Since this variant works very well, I would like to describe to you how to set the time of the Raspberry with a GPS module and a small Python script.
The GPS module
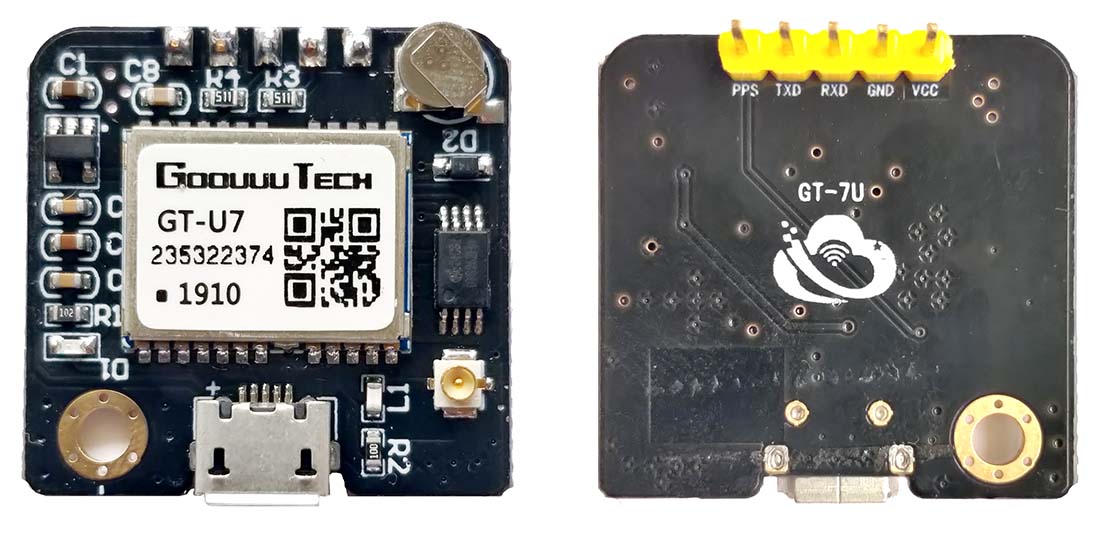
For my setup I use a GT-U7 GPS module from Goouuu Tech. This module is compatible with the NEO-6M GPS module from u-blox.
The GPS module offers a whole range of features, of which I will only list the most important ones here:
- UART, USB, I2C and SPI interfaces, of which UART and USB are available on the board.
- Baud rate of the serial interface: 4800-230400 (default 9600)
- PPS output (pulse per second) provides a signal every second and is connected to an LED. If the LED flashes, the GPS module has found enough satellites and the position could be determined.
- Voltage regulator so that the module can also be operated with 5V. The NEO-6M requires 3.3V
- Current consumption under 50mA
- A buffer battery supplies the module with power for up to two weeks. This stores important information such as the time or the last position.
- A serial EEPROM, which is connected to the I2S bus, stores the settings
- Update rate 5Hz
- Supported communication protocols: NMEA, UBX Binary, RTCM
- Time to fix: cold start: 27s, warm start: 1s. However, these values only apply under optimal conditions, in reality it can take considerably longer.
- External ceramic antenna
- The Neo-6M modules only support GPS. The Neo-7M modules also support the Russian GLONASS satellite navigation system and the Neo-M8 series also supports the European Galileo and Chinese Beidou systems.
The price for the GPS module is around 10 euros. Considering what the module can do, I really don't think that's much. Maybe I'll also try out the NEO-M8 module, especially its performance indoors. Who knows, maybe this will be my first order from AliExpress :-)
Connection to the serial interface of the Raspberry PI
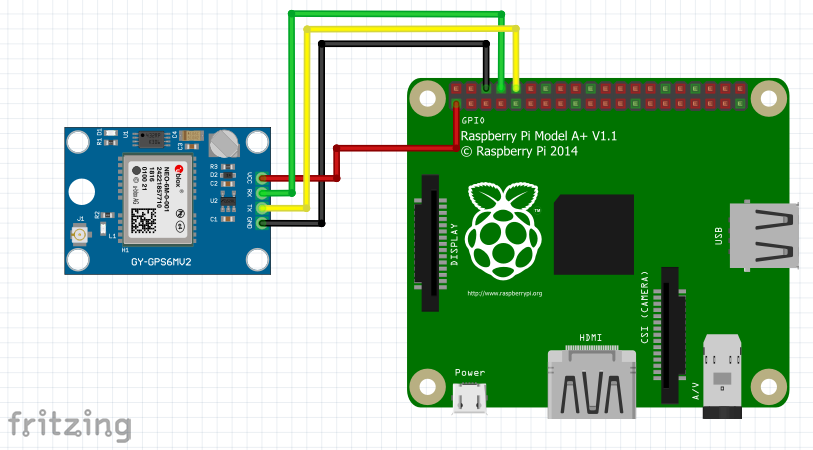
The connection of the Neo-6M module is very simple. I use the UART interface, so apart from the power supply, only the RX and TX connections need to be connected crosswise, i.e. RX on the Raspberry with TX on the GPS module or TX on the Raspberry with RX on the GPS module. Since I only read data here, the transmission line of the GPS module can actually be omitted. Unfortunately I couldn't find a Fritzing library for my module, so here is the circuit diagram for a similar GPS module. The basic concept is the same.
Now some changes in the configuration of the Raspberry Pi 3 are necessary to use the serial interface. The Raspberry 3 has two UART interfaces. PL011 UART (PrimeCell UART) and mini UART. By default, the PL011 UART is used for Bluetooth and the mini UART is connected to the RX/TX pins and is also used for the Linux console. The clock of the mini UART interface is coupled with the GPU clock, which means that the baud rate is not stable, which in turn can cause problems with the connection.
Since the serial console would interfere, it must be deactivated. To do this, delete an entry in the file /boot/cmdline.txt. To do this, the editor is started with
sudo nano /boot/cmdline.txt
The file looks like this for me:
console=serial0,115200 console=tty1 root=PARTUUID=c64d7f36-02 rootfstype=ext4 elevator=deadline fsck.repair=yes rootwait
The part marked in bold is the configuration for the serial console and must simply be deleted. After that, the line should look like this.
console=tty1 root=PARTUUID=c64d7f36-02 rootfstype=ext4 elevator=deadline fsck.repair=yes rootwait
In addition, the service of the serial console is deactivated with these commands:
sudo systemctl stop serial-getty@ttyAMA0.service
sudo systemctl disable serial-getty@ttyAMA0.service
Now Bluetooth must be deactivated and the PL011 UART interface must be activated so that the RX/TX pins are used. To do this, open the file /boot/config.txt with
sudo nano /boot/config.txt
and insert the following lines at the end:
# Disable bluetooth
dtoverlay=pi3-disable-bt

# Enable UART
enable_uart=1
init_uart_baud=9600
Since Bluetooth is deactivated, the associated services can also be deactivated. This is done with these commands:
sudo systemctl stop hciuart
sudo systemctl disable hciuart

sudo systemctl stop bluetooth.service
sudo systemctl disable bluetooth.service
Finally, the Raspberry must be rebooted with the command
sudo reboot
in order for the changes to take effect.
The Raspberry is now ready to communicate with the GPS module.
Python script for reading out the GPS information
First, this Python script checks whether the GPS module is working properly: For the script to work, a Python module must be installed to access the serial interface. To do this, execute the command
pip3 install pyserial
The Python script for reading the serial interface is very simple:
import io
import serial
import sys
import logging

logger = logging.getLogger()
logger.addHandler(logging.StreamHandler(sys.stdout))
logger.setLevel(logging.DEBUG)

ser = serial.Serial(
        port = '/dev/ttyAMA0',
        baudrate = 9600,
        parity = serial.PARITY_NONE,
        stopbits = serial.STOPBITS_ONE,
        bytesize = serial.EIGHTBITS,
        timeout = 1
)
sio = io.TextIOWrapper(io.BufferedRWPair(ser, ser))

while True:
        try:
                line = sio.readline()

                logger.debug (line)

        except serial.SerialException as e:
                logger.error('SerialException: {}'.format(e))
                break
        except UnicodeDecodeError as e:
                logger.error('UnicodeDecodeError: {}'.format(e))
        continue
First start the script and then connect the GPS module to the power supply. The module starts immediately with the output and the first lines should look like this:
$GPTXT,01,01,02,u-blox ag - www.u-blox.com*50
$GPTXT,01,01,02,HW  UBX-G70xx   00070000 *77
$GPTXT,01,01,02,ROM CORE 1.00 (59842) Jun 27 2012 17:43:52*59
$GPTXT,01,01,02,PROTVER 14.00*1E
$GPTXT,01,01,02,ANTSUPERV=AC SD PDoS SR*20
$GPTXT,01,01,02,ANTSTATUS=DONTKNOW*33
$GPTXT,01,01,02,LLC FFFFFFFF-FFFFFFFD-FFFFFFFF-FFFFFFFF-FFFFFFF9*53
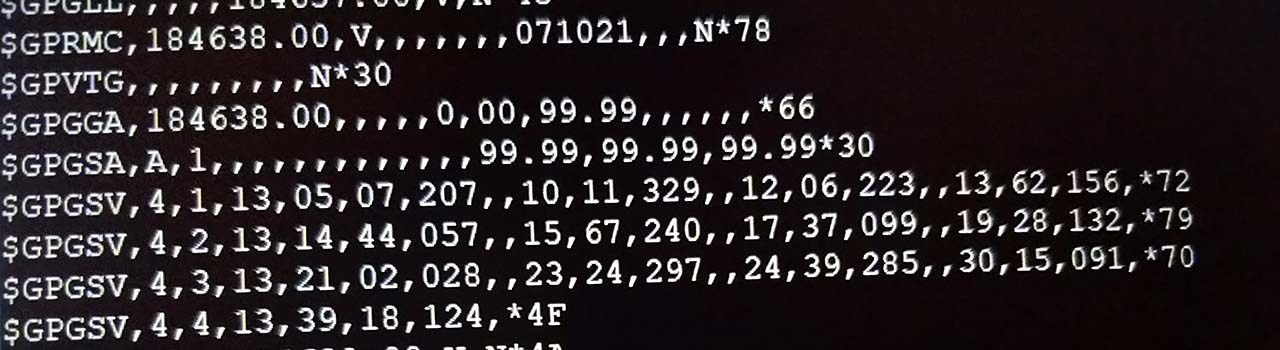
As soon as the module has a GPS fix, the following lines are sent:
$GPRMC,183125.00,A,4812.84035,N,01619.41598,E,1.030,,131021,,,A*75
$GPVTG,,T,,M,1.030,N,1.908,K,A*21
$GPGGA,183125.00,4812.84035,N,01619.41598,E,1,03,14.13,244.5,M,42.1,M,,*6F
$GPGSA,A,2,13,15,19,,,,,,,,,,14.17,14.13,1.00*08
$GPGSV,4,1,15,01,01,048,,05,04,205,,10,12,326,,12,10,224,11*71
$GPGSV,4,2,15,13,57,157,26,14,40,056,09,15,66,229,23,17,39,095,15*7F
$GPGSV,4,3,15,19,31,129,23,21,02,025,,23,24,293,,24,43,287,*7E
$GPGSV,4,4,15,28,59,062,,30,12,094,,39,18,124,*46
$GPGLL,4812.84035,N,01619.41598,E,183125.00,A,A*6E
What you see here is the so-called NMEA protocol. This protocol is used for communication between navigation and terminal devices. The data is transmitted by means of ASCII-based data records, which have a rather simple structure. The GPRMC data record, for example, is composed as follows:
| $ | Start of the record |
| GP | Device ID. GP = Global Positioning System (GPS) |
| RMC | Record ID. RMC = Recommended Minimum Sentence C |
| 183125.00 | UTC time in format HHMMSS.SS |
| A | Status (A = valid, V = not valid) |
| 4812.84035 | Latitude |
| N | Orientation |
| 01619.41598 | Longitude |
| E | Orientation |
| 1.030 | Speed in knots |
| Kurs | |
| 131021 | Date in format DDMMYY |
| Magnetic deviation | |
| Sign of the deviation (E or W) | |
| A | Signal integrity
A = Autonomous mode,
D = Differential Mode, E = Estimated (dead-reckoning) mode M = Manual Input Mode S = Simulated Mode N = Data Not Valid |
| * | End of record |
| 75 | Checksum |
The NMEA protocol defines quite a few of these record types, but the GPRMC record is sufficient in this case because it transmits the date and time.
The Python script above must therefore be extended and read the GPRMC data record until the GPS module could determine the position and deliver a valid data record. For parsing the NMEA protocol there is the Python module pynmea2. It is installed with the command
pip3 install pynmea2
Here is an example of how the record can be read:
import pynmea2

line = "$GPRMC,092757.00,A,4812.82676,N,01619.39135,E,0.800,,021021,,,A*76"
msg = pynmea2.parse(line)

zeit = msg.datetime

print (zeit)
This actually gives you almost all the information you need. However, there is still one small problem. The GPS satellites transmit UTC time. To find out the local time, you need to know the time zone you are in. This sounds quite simple at first, but when you look at the map of time zones, you quickly realize how complex this task is. Fortunately, there is a Python module timezonefinder for this purpose, which can determine the time zone based on the coordinates sent. The module is installed with
pip3 install timezonefinder
It is now possible to infer the time zone from the position and to set the local time. The final Python script looks like this:
import io
import pynmea2
import serial
import time
import pytz
import logging
import sys
import os
from timezonefinder import TimezoneFinder

logger = logging.getLogger()
logger.addHandler(logging.StreamHandler(sys.stdout))
logger.setLevel(logging.DEBUG)

ser = serial.Serial(
    port = '/dev/ttyAMA0',
    baudrate = 9600,
    parity = serial.PARITY_NONE,
    stopbits = serial.STOPBITS_ONE,
    bytesize = serial.EIGHTBITS,
    timeout = 1
)
sio = io.TextIOWrapper(io.BufferedRWPair(ser, ser))

while True:
    try:
        line = sio.readline()
        msg = pynmea2.parse(line)

        if type(msg) == pynmea2.types.talker.RMC:

            status = msg.status

            if status == 'A':
                logger.debug('Got Fix')

                zeit = msg.datetime

                latitude = msg.latitude
                longitude = msg.longitude

                tf = TimezoneFinder()
                zeitzone_string = tf.timezone_at(lng=longitude, lat=latitude)

                logger.debug('Set timezone to %s', zeitzone_string)
                os.system(f"timedatectl set-timezone {zeitzone_string}")

                zeitzone = pytz.timezone(zeitzone_string)
                zeit_mit_zeitzone = zeit.replace(tzinfo=pytz.utc).astimezone(zeitzone)
                unix_zeit = time.mktime(zeit_mit_zeitzone.timetuple())

                logger.debug('Set time to %s', zeit_mit_zeitzone)
                clk_id = time.CLOCK_REALTIME
                time.clock_settime(clk_id, float(unix_zeit))

                break

    except serial.SerialException as e:
        logger.error('Device error: {}'.format(e))
        break
    except pynmea2.ParseError as e:

        logger.error('Parse error: {}'.format(e))
    except UnicodeDecodeError as e:
        logger.error('UnicodeDecodeError error: {}'.format(e))
    continue
Since this Python script changes the time and time zone of the operating system, it must be started with root permissions. In addition, the sudo command must be executed with the -E option so that the installed Python modules are still found. The call looks like this, for example:
sudo -E python3 settime.py
The following screenshot shows how the date/time and the time zone were changed by the script:
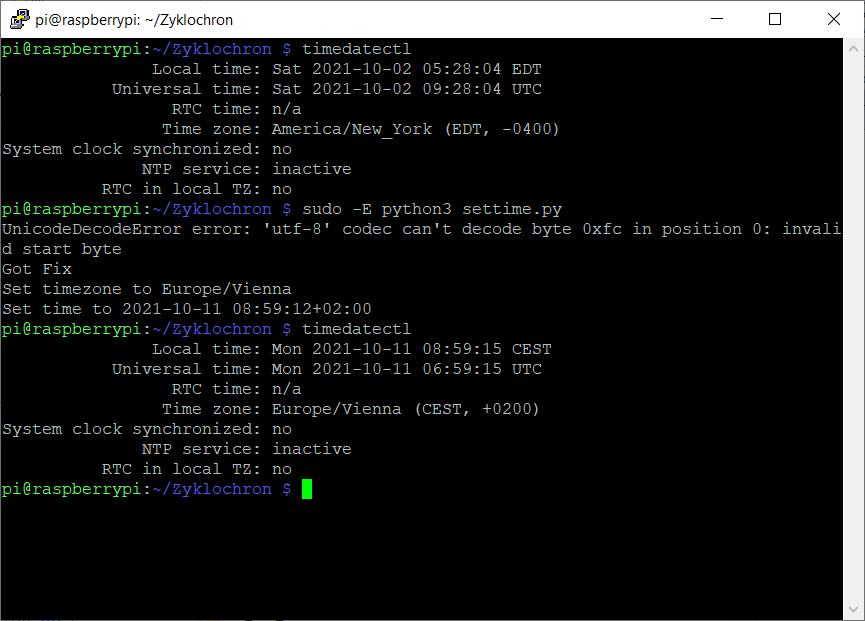
With this Python script it is now possible to set the exact time of the Raspberry Pi 3 without the need for a network connection. The prerequisite is, of course, that you have GPS reception. So far, I have always managed to get a GPS fix even inside the flat. However, it can take quite a while until it is ready.